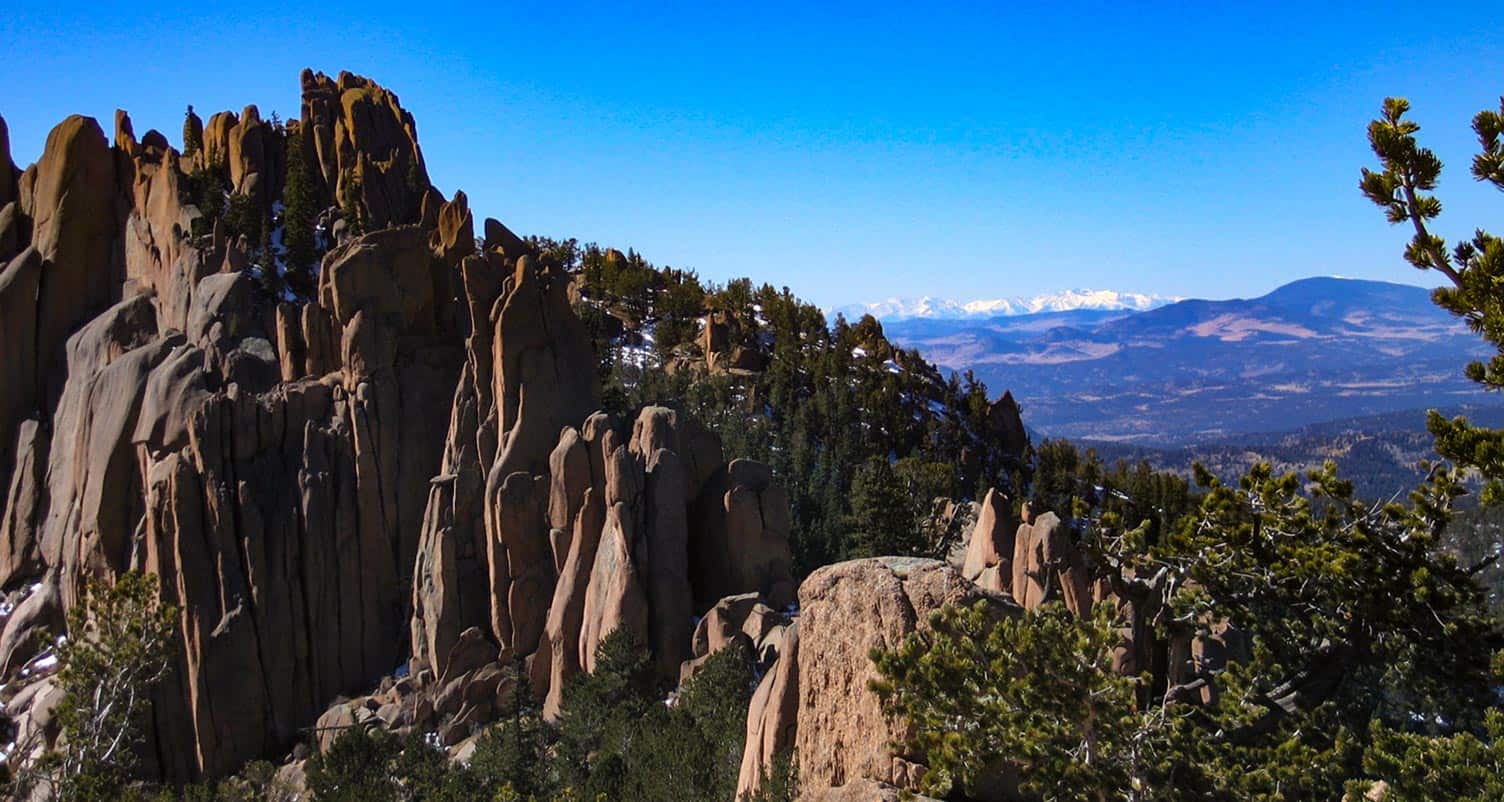
Grizzly Peak Hike at Loveland Pass
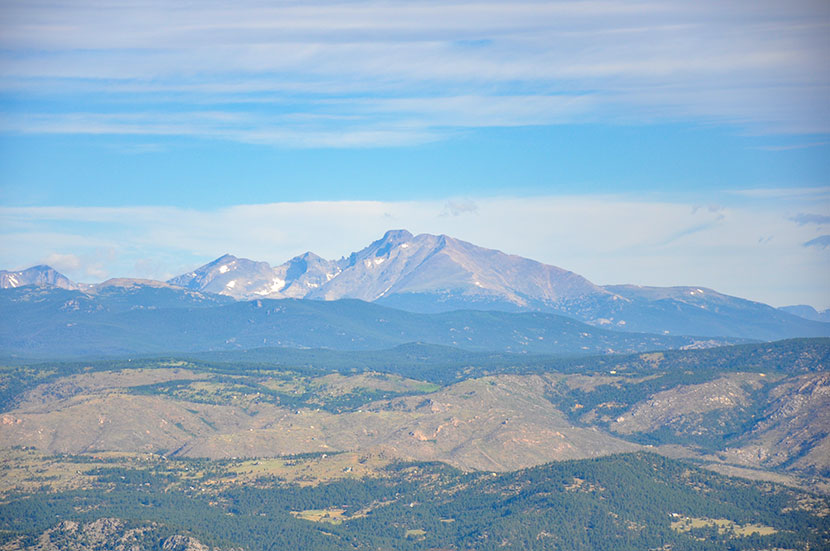
Grizzly Peak is a challenging 5-mile hike from Loveland Pass that ends with a scramble to its craggy 13,427' summit with breathtaking views of the Loveland Pass area, local ski resorts, and 14ers Grays and Torreys Peaks. About one hour from Denver, Grizzly and it's sister peak, Sniktau are two of the most accessible 13er peak hikes near Denver.
Trail Snapshot: Grizzly Peak
| Hike Distance | 5 miles Round Trip |
|---|---|
| Difficulty | Difficult |
| Duration | Approx 3-4 Hours |
| Trail Type | Out-and-Back |
| Starting Elevation | 11,990′ |
| Elevation Gain | Approx +1635′ |
| Seasons | Year Round |
| Dogs | Allowed On Leash |
| Hike Trail Map | Click for Trail Map of Grizzly Peak Hike Map |
| Denver Drive Time | 1 hour |
| Driving Directions to Loveland Pass Trailhead for Grizzly Peak | Click for Google Map |
| Town Nearest Hike | Dillon, Colorado |
| Beauty | Views of the Rocky Mountains and Loveland Pass area, Views of local ski areas, Summit, Alpine tundra |
| Activities | Hiking |
Parking & Trailhead Information for Grizzly Peak
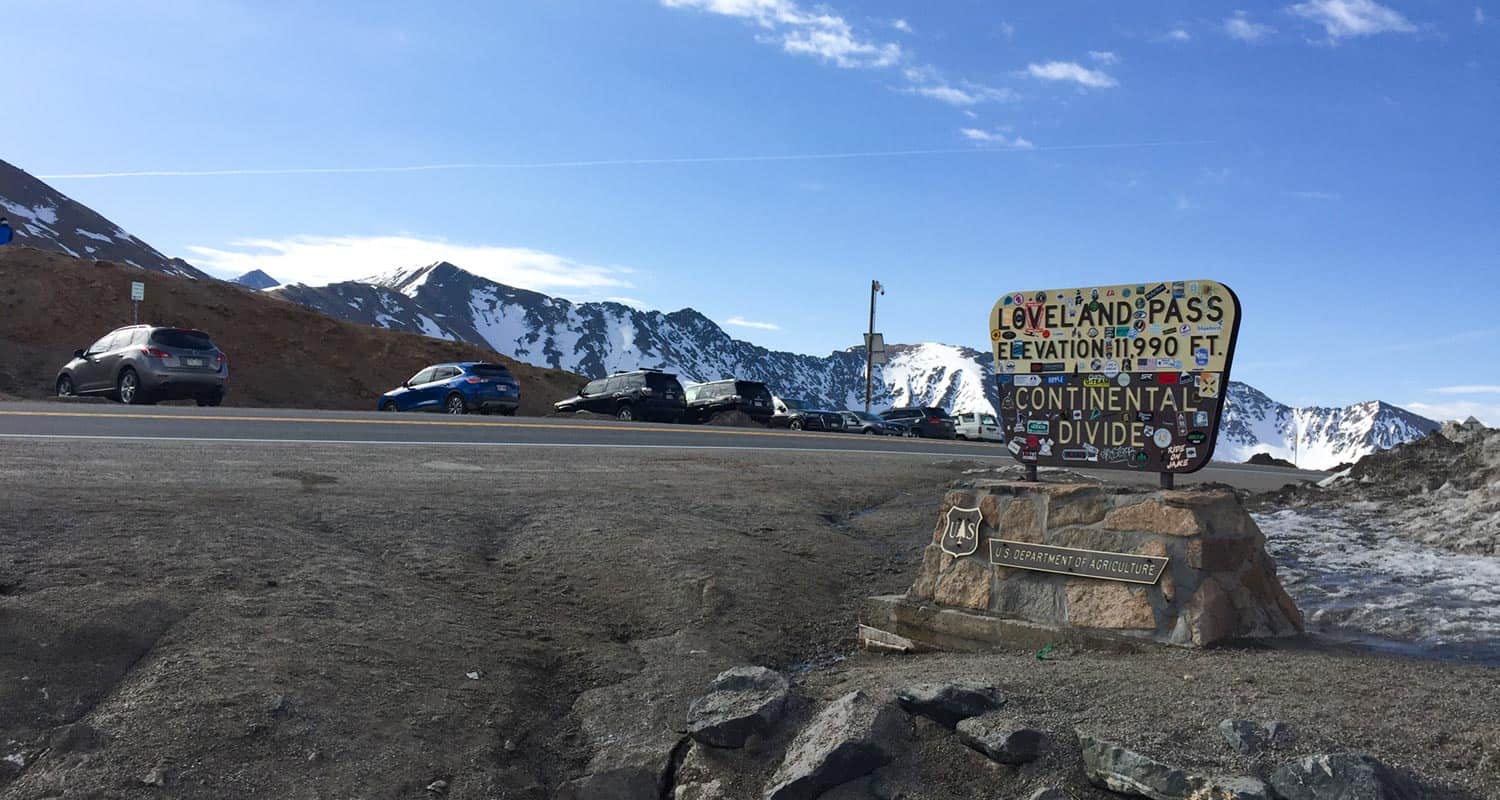
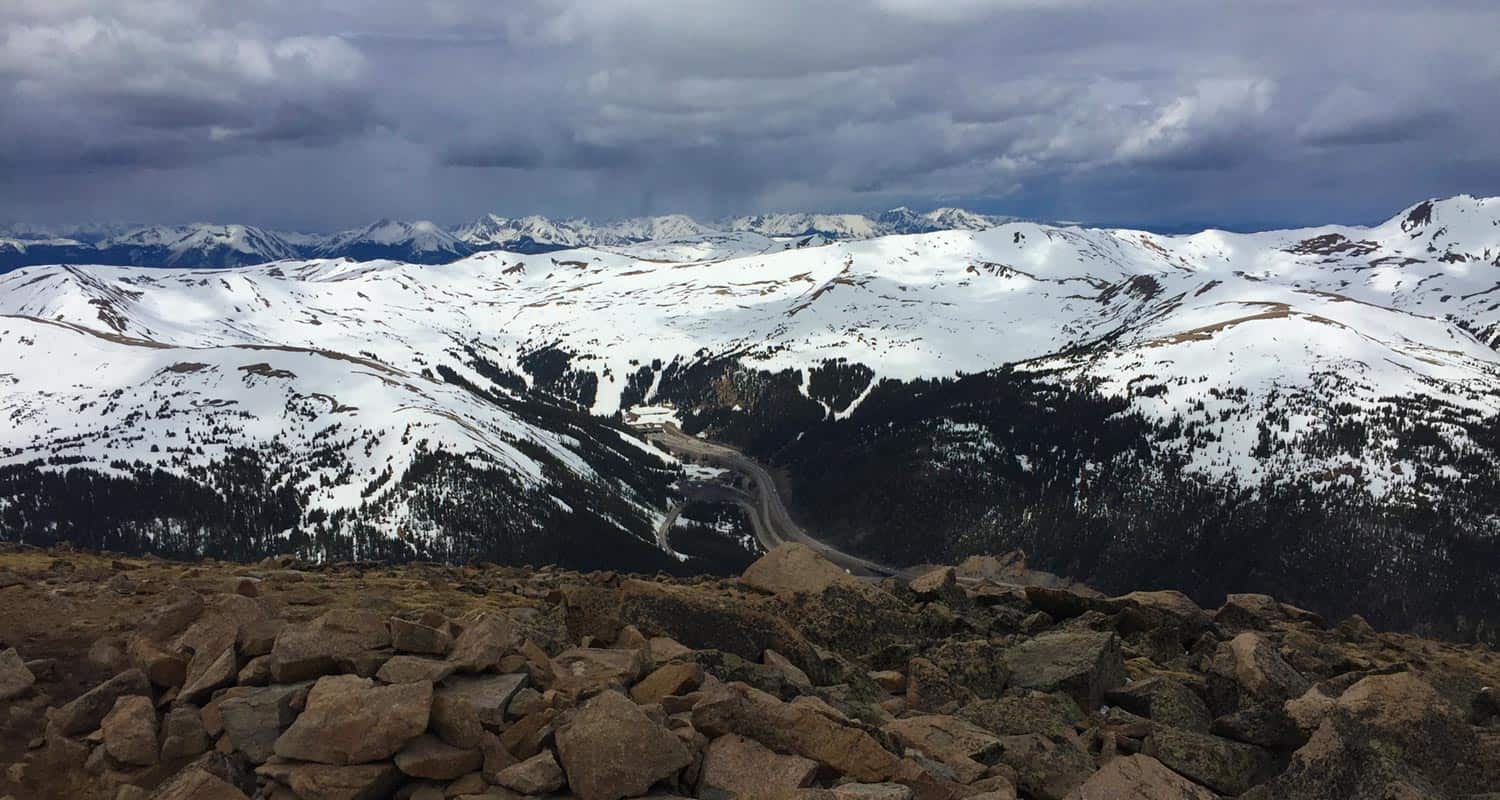
The trailhead at Loveland Pass for Grizzly Peak and Mt. Sniktau has capacity for about 25 vehicles with additional roadside parking on the opposite side of the road. Because of this, the lot fills fast. So, plan to arrive early and carpool when hiking with friends. Do be aware of vehicles coming over the pass when crossing. They can come at high speeds and visiblity is limited. There are no restrooms or other facilities at the trailhead.
The Hike: Grizzly Peak
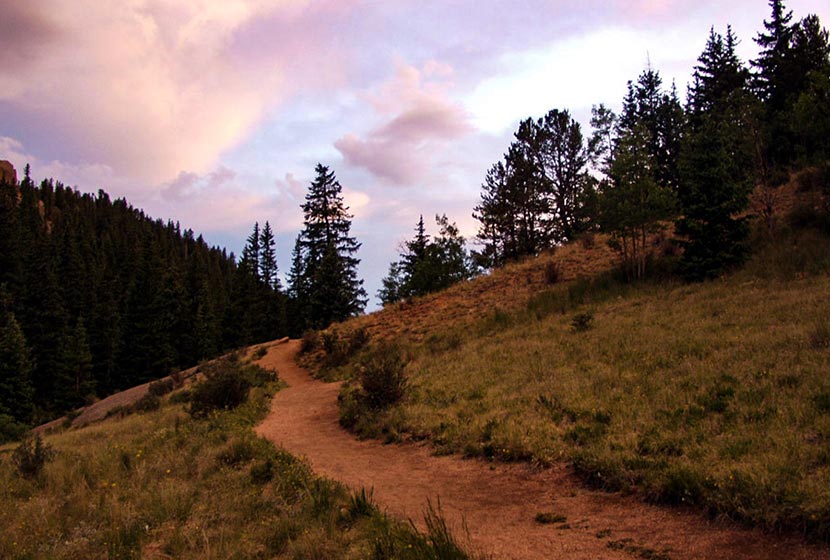
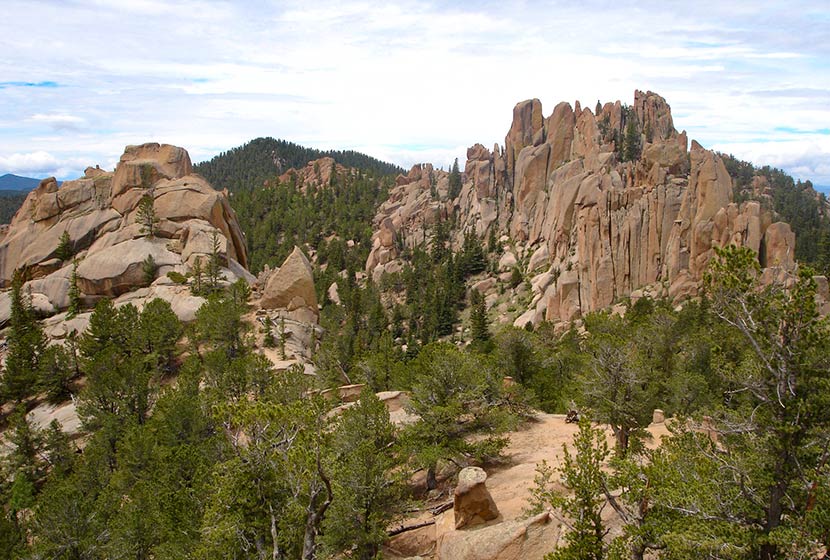
The hike begins by climbing a short set of rock steps up to the trail. After a few hundred yards of gentle grade, the trail becomes more steep as it follows a ridgeline across the high country tundra. It's important to note that this ecosystem is fragile, so going off trail and indavertantly stepping on plants and flowers can do permanent damage or require these unique flora years to recover. Additionally, because this trail is so accessible from Denver, off-trail hiking compounds, creating areas where eroded washouts and other trail damage. So, stay the trail as you take in the incredible views on the way up to the first small "summit." This first segment from the trailhead to the trail split is about 0.8 mile.

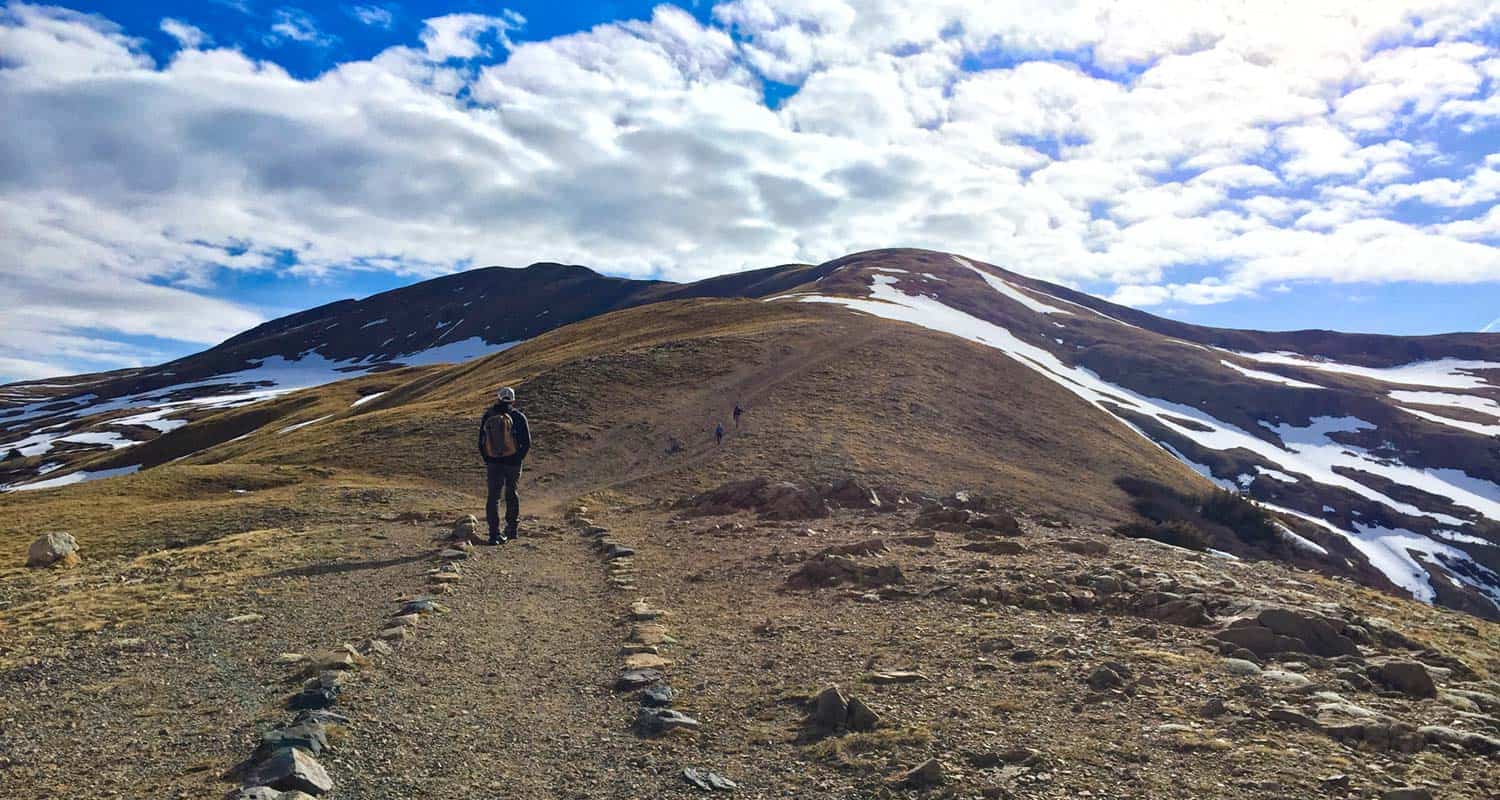
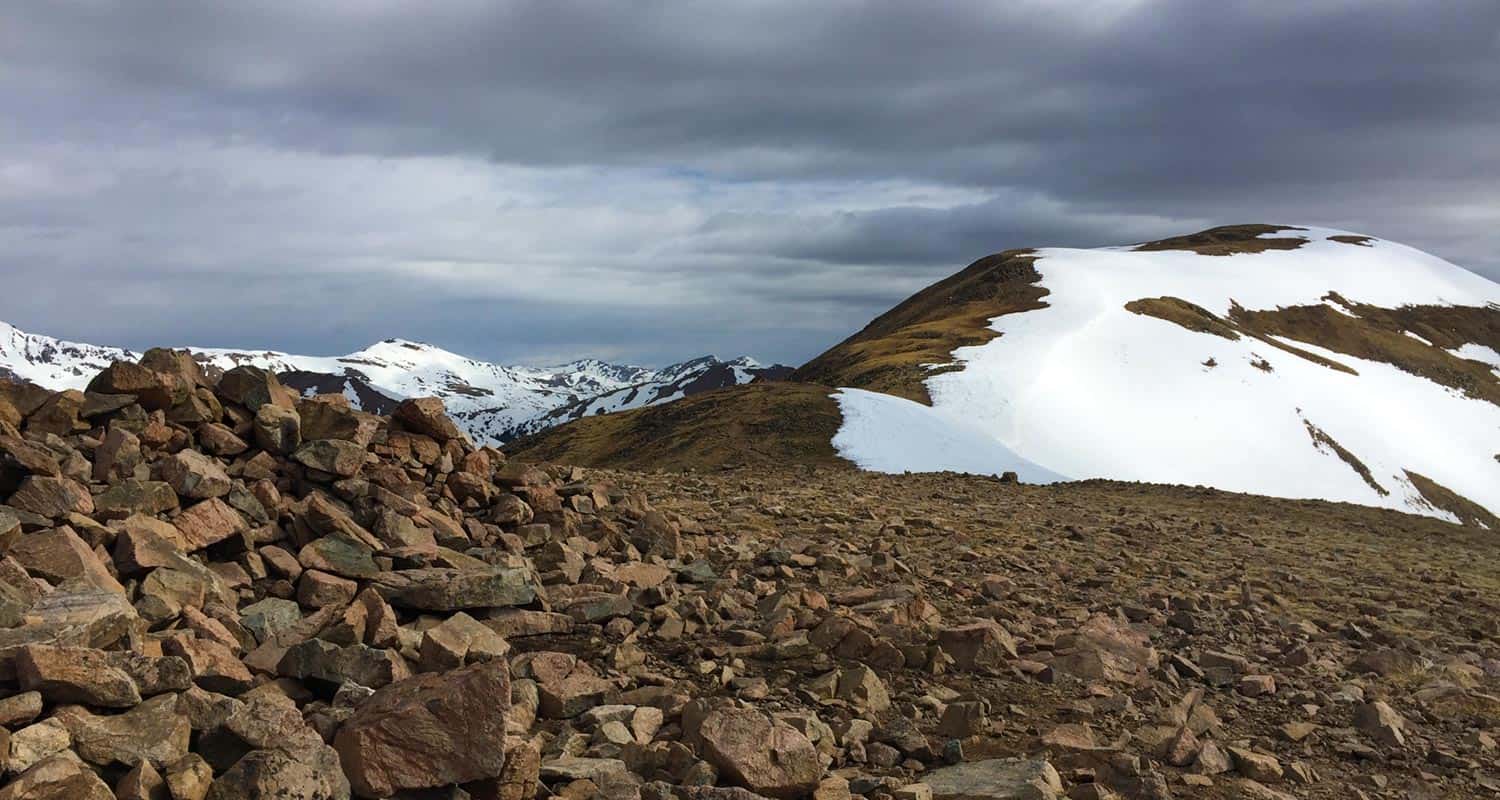
The photo above is from this first "plateau" where past hikers have built some windbreaks. Here the trail splits and the right side leads to Grizzly Mountain. The left trail leads up to Mt. Sniktau, a less demanding hike that is about 1 mile shorter in total route and requires no scrambling to reach the peak. The hiker in the photo above is looking out to the Grizzly Peak trail and Grizzly Peak. The trail is discernable in the photo and follows the top of the ridgeline. The map below traces the trail but do not rely on this to be GPS exact.
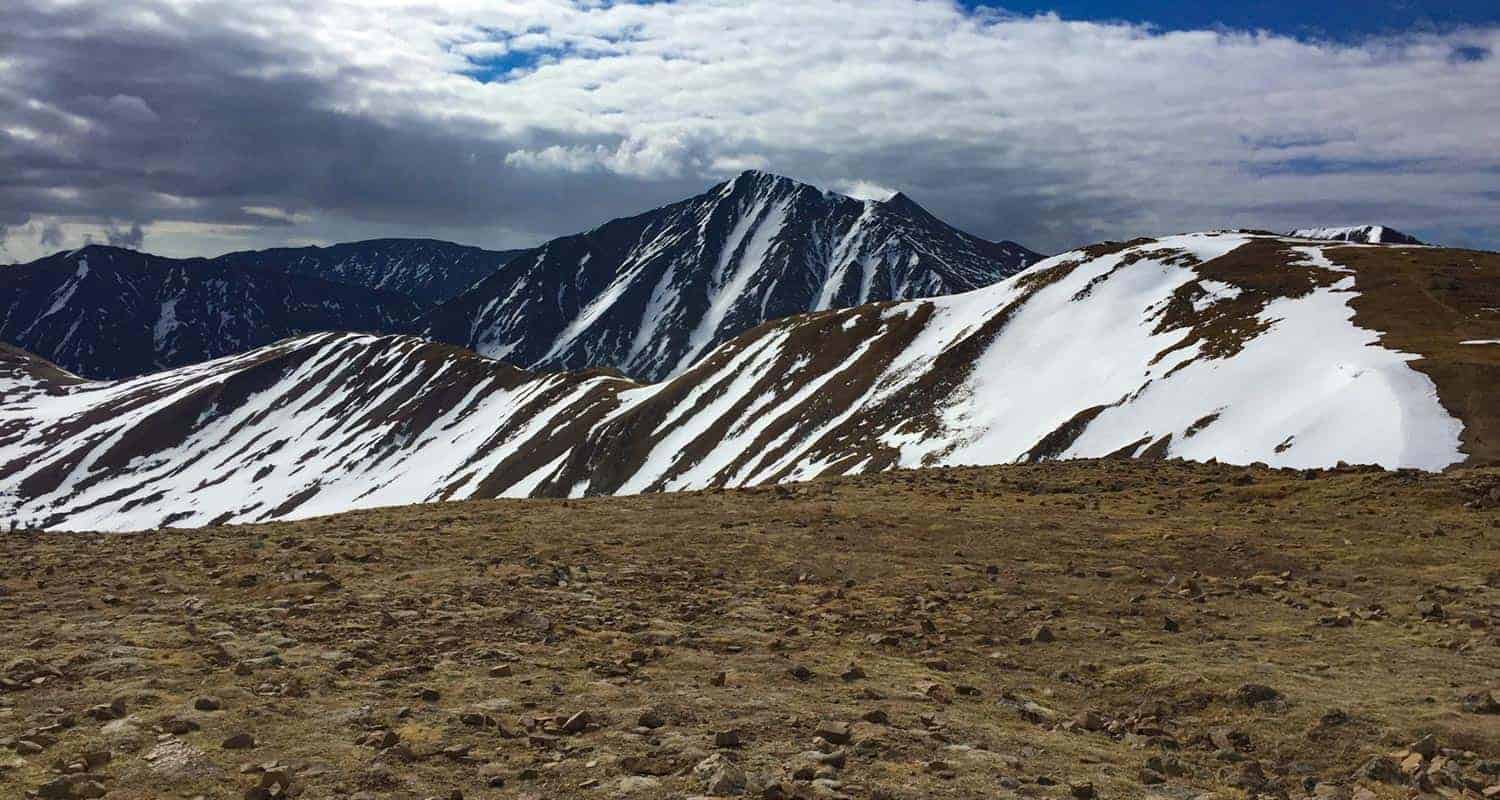
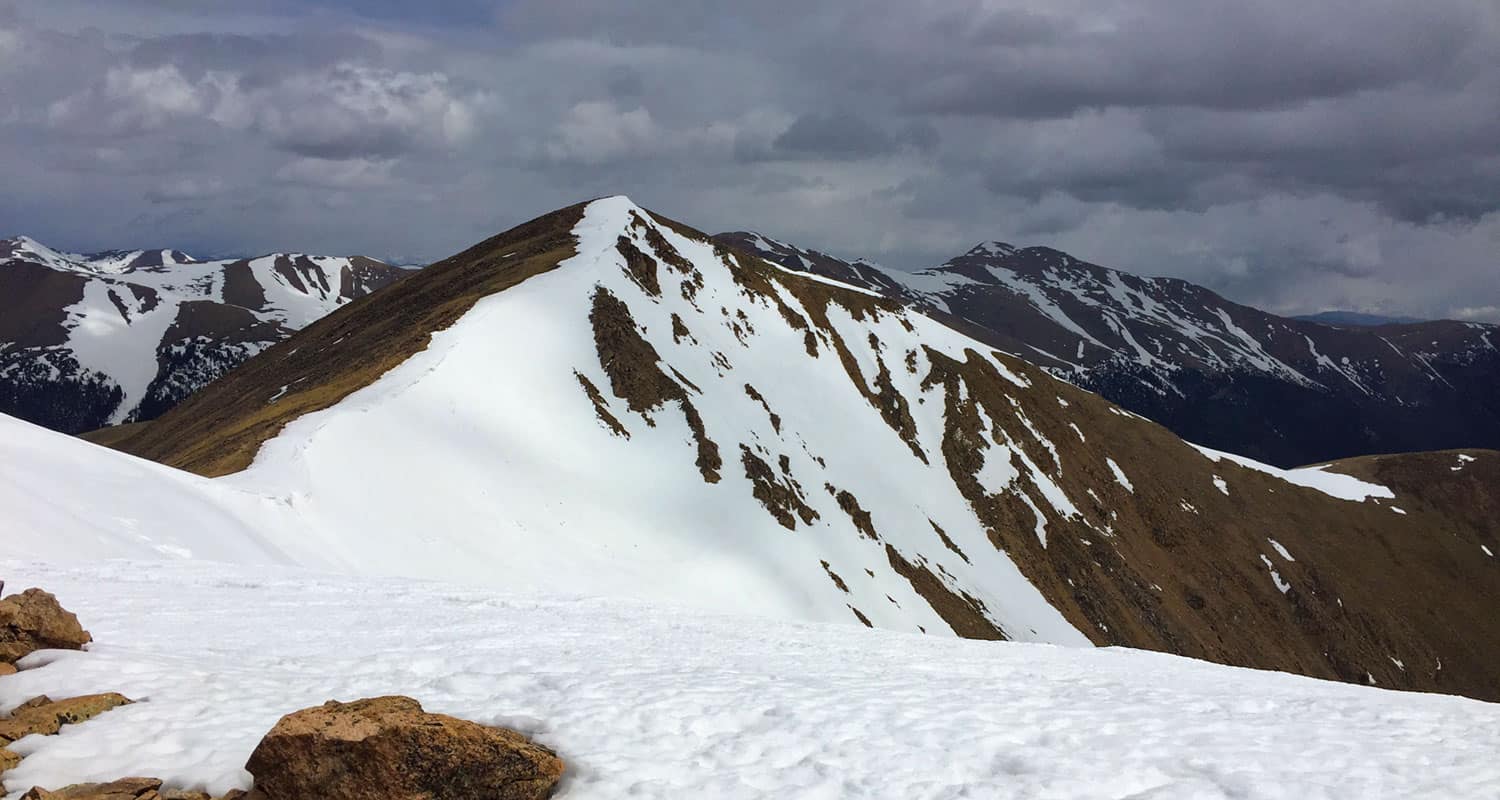
From the trail split, the next segment dips down then levels out onto a broad stretch of tundra, then climbs again to another point at about 1.5 miles into the hike. From here, hikers can trace the ridgeline that leads up to Grizzly. Hiking this in mid-May, a long snow cornice was visible along the eastern side of the ridge (in photo below). Cornices like this are visible at a distance, but are hard to see when hiking near them. They pose a real avalanche danger, too. So, be sure to stay to the west side while hiking along the ridge. The trail should avoid these cornices, however, when snowcovered, it can be easy to lose the trail.

As pictured in the above photo, the trail descends about 150' then climbes again to another peak-shaped rise along the ridge. After descending once more, the trail becomes steep and the tundra gives way to rock, making its way through a series of switchbacks and a scramble to Grizzly's 13,427' summit. At the summit, take in views of the Gore Range to the northwest and Grays and Torreys peaks looming right in front of Grizzly to the southeast. These are farther away than they appear and the ridgeline between Grizzly and Torreys is not the recommended route. Return to the trailhead via the route hiked to Grizzly Peak.
Tips & Resources for Hiking Grizzly Peak
- Be Weather Aware: Grizzly Peak trail accumulates cornices on its eastern edges which means avalanche danger and the danger of falling through the cornice if walking upon it's surface. Though most years, most of the trail is discernable in Winter months, heavy snows can change the landscape and cover the trail without warning. Thunderstorms can appear quickly, so climb early before the early afternoon thunderstorms roll in during the Summer months.
- Mt. Sniktau: If you are considering including Mt. Sniktau to your itinerary, this will add about 2.4 miles to your hike, making for an approximately 7.5 mile and 4-6 hour adventure.
- Trail Map: Grizzly Peak
- Packing List: Always pack the 10 Essentials. Download our Hiking Guide to get the list and dayhiking packing checklist.
- Colorado Road Conditions: Colorado Road Conditions
- After the Hike: http://www.thepourhousecoffee.com/
Weather
Map & Driving Directions
Click for Driving Directions
Mt. Sniktau Hike at Loveland Pass
Mt. Sniktau may be the most accessible and breathtaking summit hike near Denver. This 4-miles, moderate hike up to Sniktau travels across high country tundra along ridgelines with views of Grays and Torrey peaks and views of the Gore Range of mountains in the north. Considered a year-round hike this trail is popular with hikers wanting to get in shape for Summer 14er summits.
Trail Snapshot: Mt. Sniktau
| Hike Distance | 4 miles Round Trip |
|---|---|
| Difficulty | Moderate |
| Duration | Approx 2-3 Hours |
| Trail Type | Out-and-Back |
| Starting Elevation | 11,990′ |
| Elevation Gain | Approx +1635′ |
| Seasons | Year Round |
| Dogs | Allowed On Leash |
| Hike Trail Map | Click for Trail Map of Mt. Sniktau Hike Map |
| Denver Drive Time | 1 hour |
| Driving Directions to Loveland Pass Trailhead for Sniktau | Click for Google Map |
| Town Nearest Hike | Dillon, Colorado |
| Beauty | Views of the Rocky Mountains and Loveland Pass area, Views of local ski areas, Summit, Alipine tundra |
| Activities | Hiking |
Parking & Trailhead Information for Mt. Sniktau
The trailhead at Loveland Pass for Mt. Sniktau and Grizzly Peak has capacity for about 25 vehicles with additional roadside parking on the opposite side of the road. Do be aware of vehicles coming over the pass when crossing. They can come at high speeds and visiblity is limited. There are no restrooms or other facilities at the trailhead.
The Hike: Mt. Sniktau
The hike begins by climbing a short set of rock steps up to the trail. After a few hundred yards of gentle grade, the trail becomes more steep as it follows a ridgeline across the high country tundra. It's important to note that this ecosystem is fragile, so going off trail and indavertantly stepping on plants and flowers can do permanent damage or require these unique flora years to recover. Additionally, because this trail is so accessible from Denver, off-trail hiking creates areas where erosion can wash out segments of the mountainside. So, stay the trail as you take in the incredible views on the way up to the first "summit." This first segment from the trailhead to the trail split is about 0.8 mile.
At the first summit, hikers will find a couple rock windbreaks created by past hikers. It's a great place to take in the 360 degree views with a bit of shelter from the wind. If you don't want to continue on to Mt. Sniktau, an out-and-back hike to this point is about 1.5 miles total. The trail splits on this plateau, the way to Grizzly peak is on the right (south) and the way out to Mt. Sniktau is left (northeast).
The trail out to Mt. Sniktau is another 1.2 miles from this point, and an easy hike as far as summiting a Colorado 13er goes. Many hikers use this as a winter or early season training hike to acclimatize for doing 14ers during the Summer months. The trail follows the ridgeline to a false peak, then makes its way up another steep and rocky segment to the summit of Mt. Sniktau.
From the summit of Mt. Sniktau, you can take in views of several Greys and Torrey peaks as well as Grizzly Peak to the south. Looking down in the bowl on the south side, blue alpine lakes show through the snowcover, and to the west, you'll see what looks like endless mountains.
Hike back to the Loveland Pass trailhead on the same trail leading to the summit.
Tips & Resources for Hiking Mt. Sniktau
- Be Weather Aware: Mt. Sniktau is known for being an all-season hike, relatively safe when it comes to avalanche danger. However, heavy snows can change that in moments. The entire trail is exposed, so climb early before the early afternoon thunderstorms roll in during the Summer.
- Grizzly Peak: If you are considering including Grizzly Peak to your itinerary, this will add about 3.5 miles of trail and a more demanding summit segment to the hike.
- Trail Map: Mt. Sniktau
- Packing List: Always pack the 10 Essentials. Download our Hiking Guide to get the list and dayhiking packing checklist.
- Colorado Road Conditions: Colorado Road Conditions
- After the Hike: http://www.thepourhousecoffee.com/
Weather
Map & Driving Directions
Click for Driving Directions
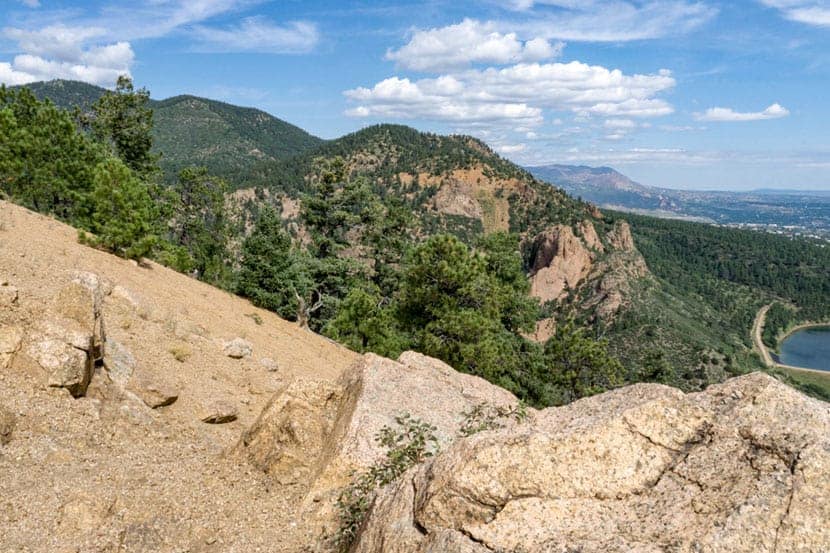
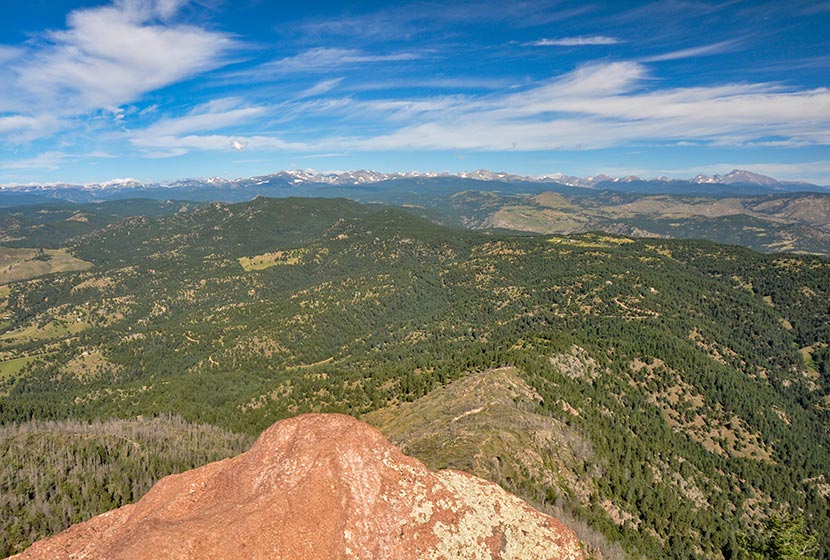
Blodgett Peak Hike Near Colorado Springs
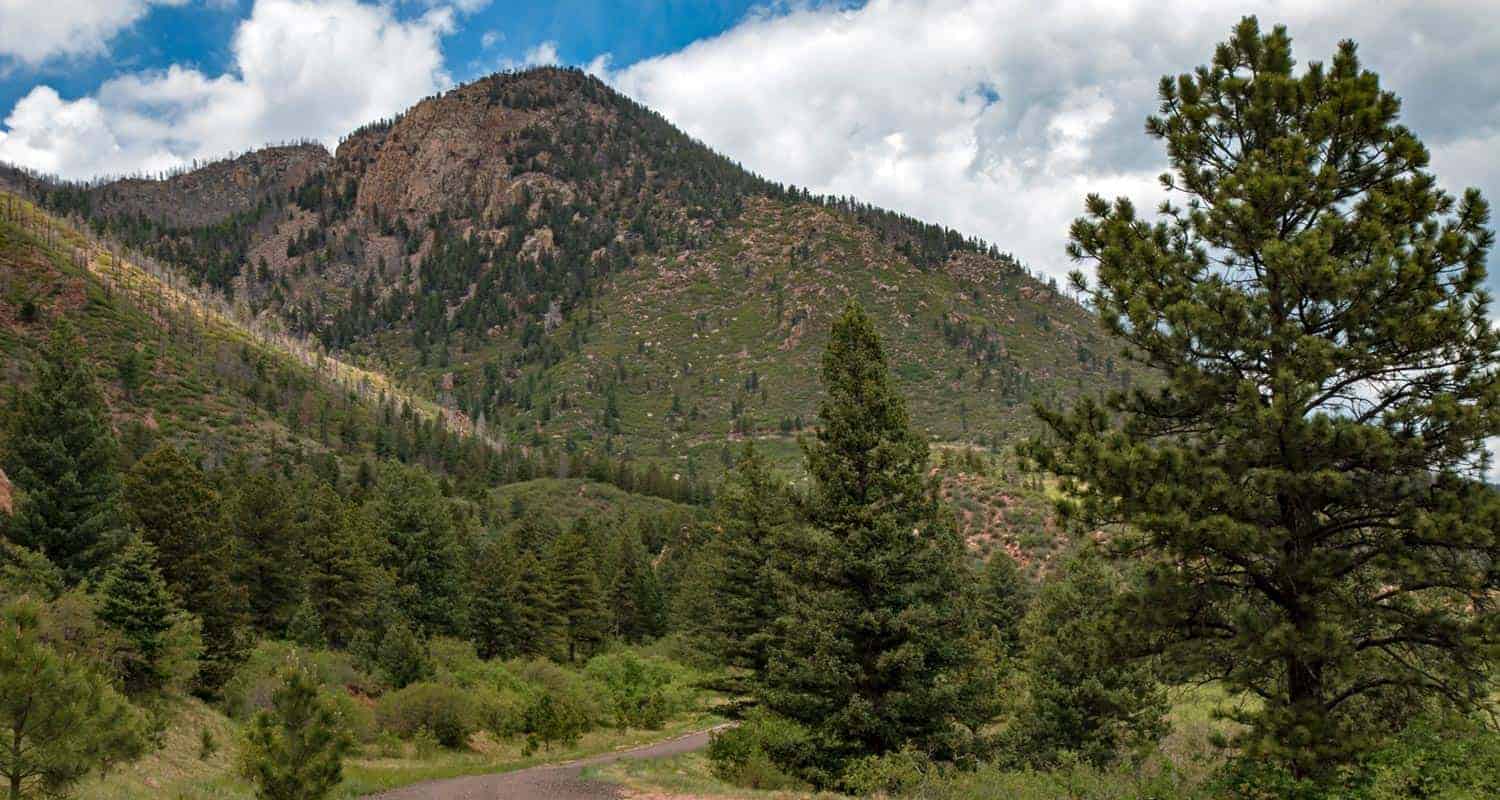
Blodgett Peak requires a challenging 3.2 mile ascent through the passage of rocky canyon to the summit where hikers gain panoramic views of Pikes Peak, Rampart Reservoir, and the United States Air Force Academy. Located on the northwestern edge of Colorado Springs, Blodgett Peak is a local favorite for those looking for demanding workout or just to enjoy the 360 degree views of the plains and mountains.
Trail Snapshot: Blodgett Peak
| Hike Distance | 6.4 miles Round Trip |
|---|---|
| Difficulty | Difficult |
| Duration | Approx 3 hrs |
| Trail Type | Out-And-Back |
| Starting Elevation | 7200′ |
| Elevation Gain | Approx +2680′ |
| Seasons | Year Round |
| Dogs | Allowed On Leash on Lower Trails |
| Hike Trail Map | Click for Trail Map of Blodgett Peak Trail Map |
| Denver Drive Time | 1 hr 15 min |
| Driving Directions to Blodgett Peak Open Space Trailhead | Click for Google Map |
| Town Nearest Hike | Colorado Springs, Colorado |
| Beauty | Views of Pikes Peak, Rampart Range Reservoir, and the Air Force Academy, Cliff Bands, Seasonal Waterfall. |
| Activities | Hiking, Photography |
Parking & Trailhead Information for Blodgett Peak Open Space
From Denver, take Interstate 25 South and take Exit 149 onto Woodmen Road. Continue on West Woodmen Road until for 2.4 miles, then turn left onto Orchard Valley Road. Proceed for 1.1 mile, then turn right onto West Woodmen Road again (Yes, that's the same West Woodmen road. It's a curcuit, so it wraps around). The road will bend north, and after 0.8 mile you'll see the Blodgett Peak Open Space on your left. It's a small lot, and because this is a popular trail, it fills fast on the weekends. There is a portable restroom at the trailhead. The City of Colorado Springs is developing additional parking to the south.
The Hike: Blodgett Peak
The trail up to Blodgett Peak begins on a wide, gravel road that heads west into the foothills and up toward a watertower built into the lower flanks of the mountainside. At just over a 1/2 mile, the trail encounters a double-track path named the Hummingbird Trail. Take the Hummingbird Trail until it ends at a broad gravel space near the entrace to the canyon. The correct trail up to Blodgett Peak will be on your left. Avoid other social trails and take this more established route up into the canyon.
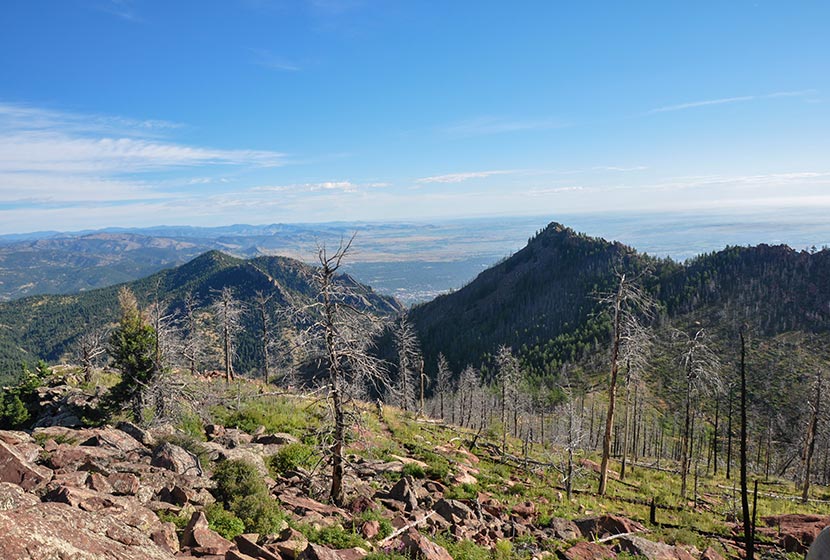
You'll know that you are on the right trail when, just a little ways up the trail, you see a large boulder. Here is where the trail becomes more steep and demanding. As always, it's important to stay the trail to reduce human impact, especially the erosion that can quickly damage the scree surface and drainage ecosystem of this area. The upper regions of the Blodgett Peak trail were impacted by the 2012 Waldo Canyon fire and are going to take many years to reestablish, making it that much more critical that hikers stay the trail.

This trail segment continues for about a mile then, at 2.3 miles encounters an intermittent waterfall on the left side fo teh trail. Depending on rain and snowmelt, Blodgett Falls may be dried up or a quaint but beautiful spill over about 50' of granite cliffs. Just before the waterfall, the trail up Blodgett will bear to the right taking hikers between cliffs and the boulder field.
Again, stay the trail here as you enter a wooded section (which bears to the left or to the west of the boulder field) because the boulder field has a lot of loose rock and it would be easy to inadvertently trundle rock down onto hikers below. Good friends had this happen to them on this hike several years ago.
Next, the trail crosses the intermittent stream bed again and bends to the north, where hikers will notice the scars and deadfall from the Waldo Canyon fire. Be aware that this segment has many dead trees and snags that can be toppled by the winds that run up through the canyon. The trail continues to be steep and demanding with a wall of cliffs on the left side.

At 3 miles, the trail emerges from the steep canyon onto the broad southern saddle of Blodgett Peak. Keep alert because, this last segment of the trail along the saddle to the summit it littered with more deadfall and snags.
At the summit of Blodgett Peak, you'll to take in great views of Pikes Peak to the South, and Rampart Range Reservoir to the west. The Air Force Academy will be below you to the Northeast and Colorado Springs spreads itself out across the eastern plains.
Hike back down the way you came for a total hike distance of about 6.4 miles. Avoid alternative routes down the mountain as these can lead to being cliffed out or cause more damage to a landscape that's in need in of our care.
Tips & Resources for Hiking Blodgett Peak
- Not Dog Friendly: Dogs are allowed on the lower trails at Blodgett Peak Open Space, but due to the terrain, narrow trail sections, this hike up the peak is not considere a dog-friendly hike.
- Trekking Poles and Traction: At Blodgett Peak hikers will encounter a lot of steep terrain and scree. In the winter months, the trail can get icy and muddy in spots. Because of this, we recommend Trekking Poles. During the winter season, it's a hike that may require traction devices. I'm a huge fan of trekking poles because they take so much impact off the knees when hiking and backpacking, and allow us to navigate more demanding terrain. Check out Trekking Pole options at REI.
- Packing List: Always pack the 10 Essentials. Download our Hiking Guide to get the list and dayhiking packing checklist.
- Colorado Road Conditions: Colorado Road Conditions
- Photo: We would like to express our gratitude to Joel Tonyan and Tim Marshallfor sharing such an amazing photographs of Blodgett Peak.
- After the Hike: Check out Arlene's Beans and Salsa in Monument.. If you are looking for a local brew, drop by Pikes Peak Brewing Company, also in Monument.
Weather
Map & Driving Directions
Click for Driving Directions
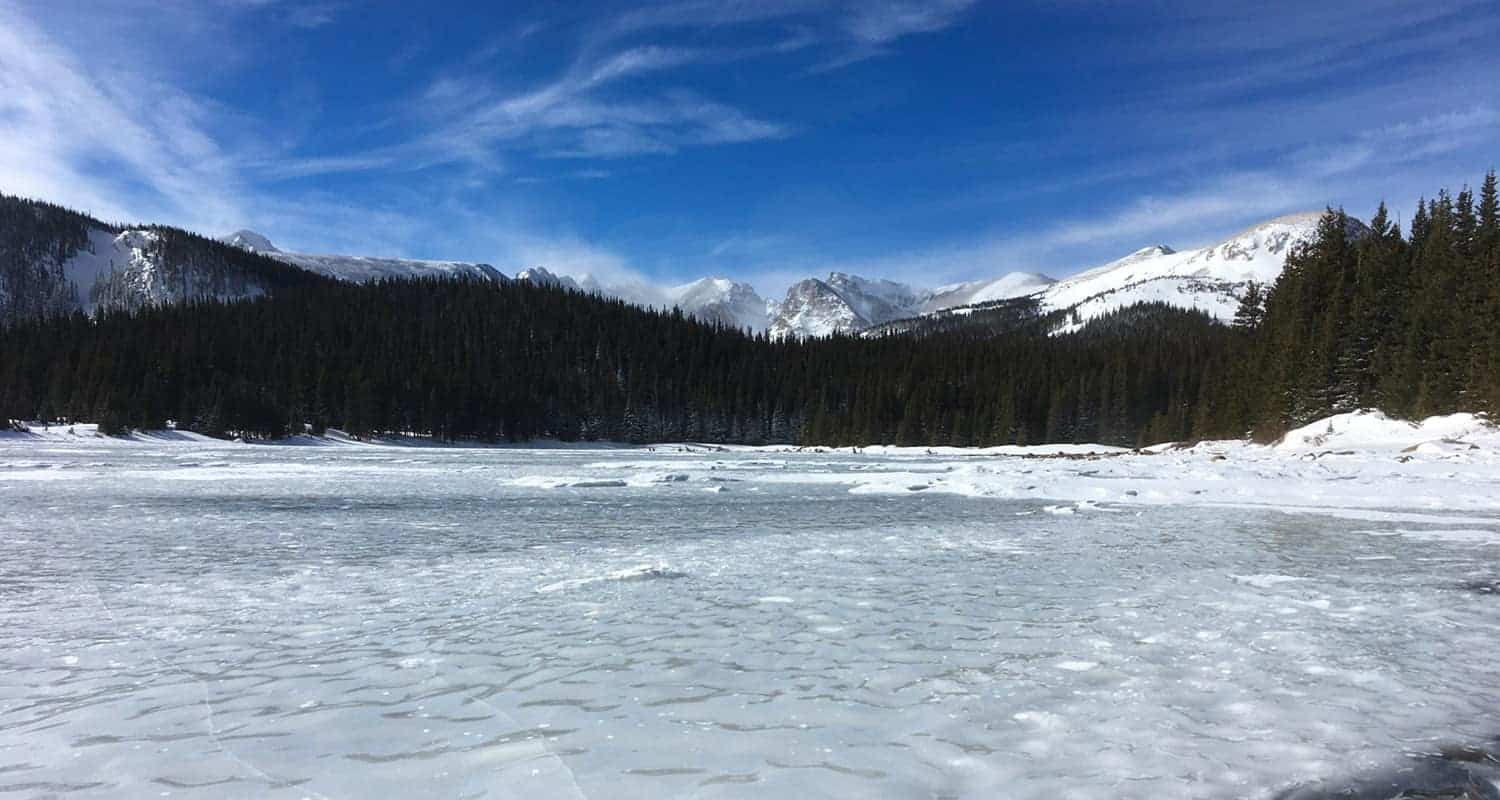
Brainard Lake CMC Cabin Hike
The CMC Cabin at Brainard Lake makes for a perfect winter snowshoe, a challenging ski in, or an easy Summer hike from the Gateway Trailhead. It's a 3-mile route in to the cabin to take in views of the beauty of Brainard Lake and surrounding snow-capped Rocky Mountains. This trail profile looks at two different 6-mile round-trip routes: a winter route via the Snowshoe Trail, and a summer route via the Waldrop Trail.
Trail Snapshot: Brainard Lake CMC Cabin Hike
| Hike Distance | 6 Miles Round Trip |
|---|---|
| Difficulty | Easy |
| Duration | Approx 2-4 depending on conditions |
| Trail Type | Out-and-Back |
| Starting Elevation | 10,080′ |
| Elevation Gain | Approx +400′ |
| Seasons | Snowshoe Trail: Winter Only Trail; Waldrop/St. Vrain Spring to Fall |
| Dogs | Only allowed on Brainard Lake Road from Nov. 15 through April 30 |
| Hike Trail Map: Winter Trails | Click for Trail Map of Brainard Lake Winter Trails |
| Hike Trail Map: Summer Trails | Click for Trail Map of Brainard Lake Summer Trails |
| Denver Drive Time | 1hr 20min |
| Driving Directions to Brainard Lake, Gateway Trailhead | Click for Google Map |
| Town Nearest Hike | Nederland, Colorado |
| Beauty | Mountain and Lake Views |
| Activities | Cross Country Skiing and Snowshoeing in Winter Months, Hiking in Spring to Fall |
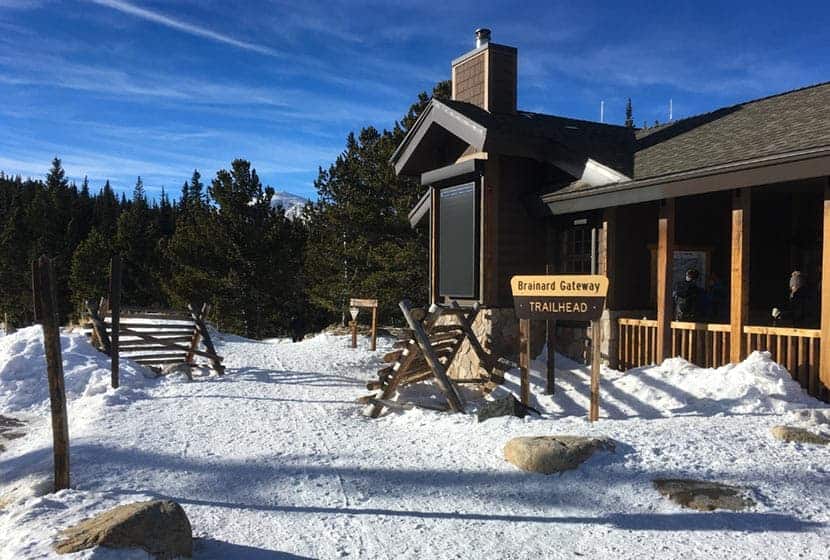
Parking & Trailhead Information for Brainard Lake CMC Cabin
Both of these Winter and Summer adventures start at the Gateway Trailhead, also known as the Brainard Lake Winter Lot. I've found that guidebooks and maps get confused with the name. But from hiking here a few times, this is the most current info. The trailhead is massive, with tons of parking and year-round restroom facilities. However, parking in the Winter months can fill by around 9am on the weekends because this trail system around Brainard Lake is probably the most popular snowshoe and non-groomed cross-country skiing destination near Denver. There are no fees to park at the Gateway Trailhead. There are fees during the Summer months for going through the gate station to the lots nearer to Brainard Lake.
From Denver, take Interstate 25 North to 36 West toward Boulder. You'll drive through Boulder on 36/28th Street as it goes North, then taking a left onto Lee Hill Road. This leads west where it makes a hard bend left and climbs into the foothills. Eventually, after about 6 miles it will dead end at a junction with Lefthand Canyon Drive. Take a left onto Lefthand Canyon and get ready for a winding drive for about 10 miles. Drive carefully here and be on alert for cyclists and motorcycles. Because it's in shadow most of the day, the road can get pretty icy and packed with snow in sections during the Winter. You'll pass through the little town of Ward, Colorado, that looks a lot like an 1800's Colorado mining settlement. There is a roadside art gallery and a coffee and ice cream place. Lefthand Canyon Drive stops where it meets up with CO-72. Take a right onto CO-72, then make an almost immediate left onto Brainard Lake Road. Proceed for about 2.5 miles and you'll find the Gateway Trailhead on your right.
The Hike: Gateway Trailhead to CMC Cabiin
Winter Snowshoe Trail to CMC Cabin
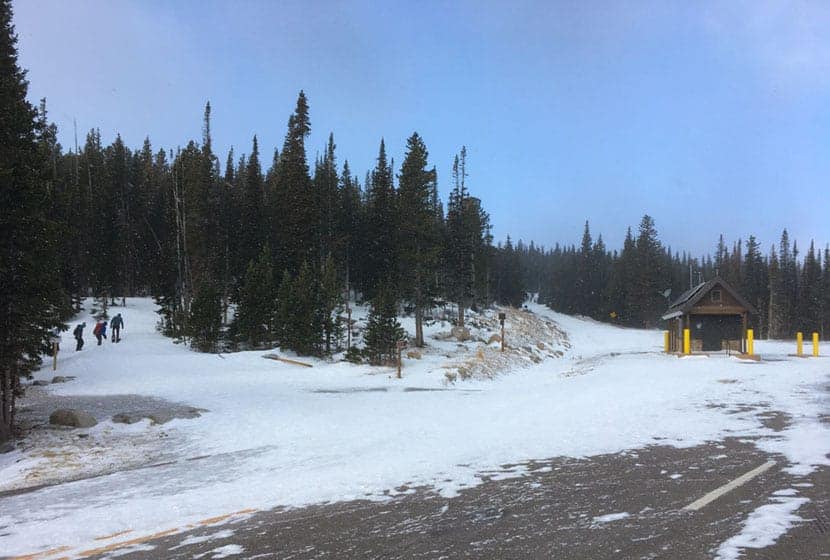
In the Winter, snowshoers will follow the Snowshoe Trail for 3 miles to the CMC Cabin. This is a Winter-only trail and dogs are prohibited. Many of the other trails in this area are Ski-only. The trails can be a bit of a maze, so I recommend printing off a trail map or having an app with you (no service, so download the map) so that you can stay oriented.
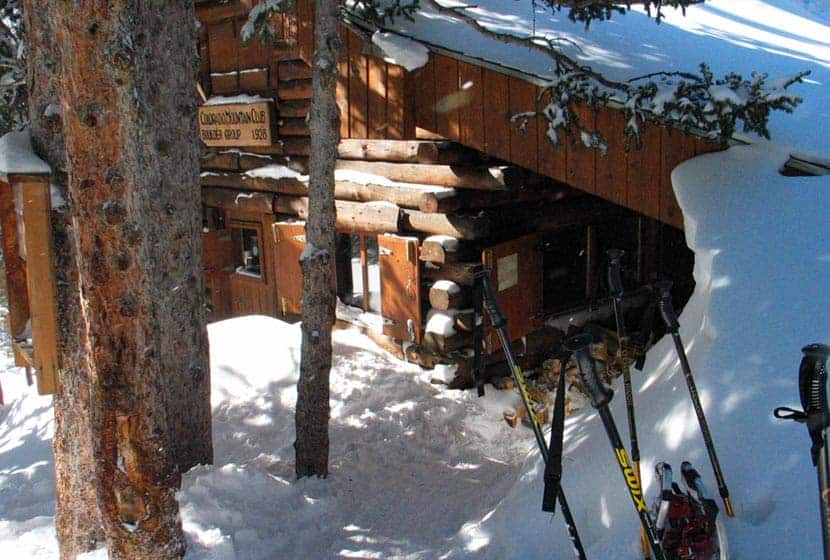
Finding the trail may be the most difficult part. Hike or snowshoe back out to the main road and head toward the gatehouse. When facing the gatehouse, the trail begins just before it on the left/south side of the road (see photo above). But why not just hike the road in, especially if it's covered with snow? The road is definitely an option and more direct route. Dogs are also allowed on the road, but the road is broad and open to wind, which can be chillng. The difference between the road and trail can be dramatic when it comes to keeping warm in the shield of the trees.
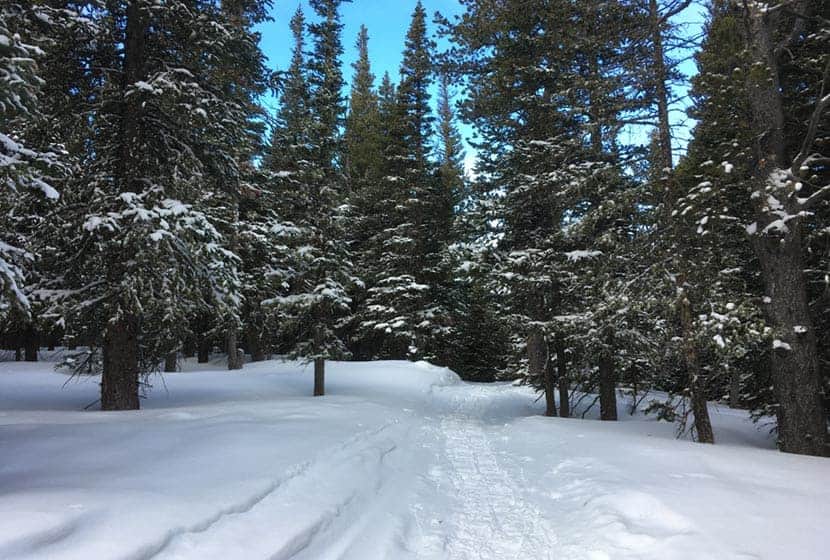
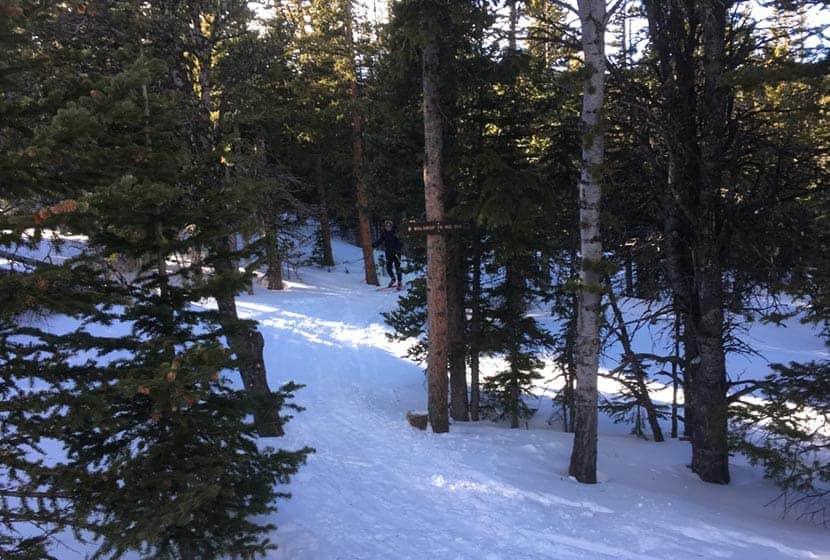
The trail will run past Red Rock Lake as it stays on the south side of Brainard Lake Road. This segement is about 1 mile before it turns North and merges with the road. You'll go left on the road proceeding for a short distnaceon it until you see signs on your right/north for the Snowshoe Trail. Keep your eyes peeled for signange at the next junction that will point your left/west to continue on the northern segment of the Snowshoe Trail.
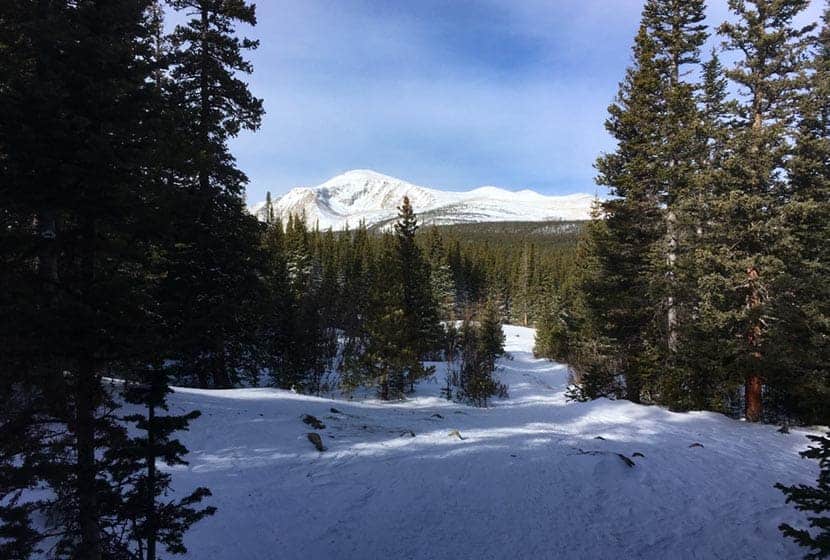
The trail will eventually emerge back out onto the road crossing the bridge over Mitchell Creek. Here is where you'll be able to take in views of Brainard Lake and the snow-covered mountains of Indian Peaks. Look for signage tht will point you to the last segment of the Snowshoe Trail which will be on your right/north. This final trail segment will take you to the CMC Cabin. In the Winter months, the cabin is availabe as a warming hut to thaw out your cold toes and spend time getting refreshed before snowshing the 3 miles back to your car.
Summer Waldrop Trail to CMC Cabin
This next route can be taken in the Summer as a hike. In the Winter months, it's a ski-only trail, and quite demanding. If you plan on cross-country skiing this, it's not for beginners and you probably should have a backcountry cross-country ski so that you have a wider base to allow you to navigate all the ups and downs. In the Spring, their will likely still be a lot of snow on the trail, but in the Summer, this Waldrop route to the CMC cabin is a nice easy to moderate hike.
To pick up the Waldrop Trail, hike or ski out to Brainard Lake Road, follow the to the Gatehouse entrance area. You willfind signage for the Waldrop Trail on the right side of the road after passing the gatehouse and before Red Rock Lakes. The trail first heads almost directly North before bending back to the west through dense forest.
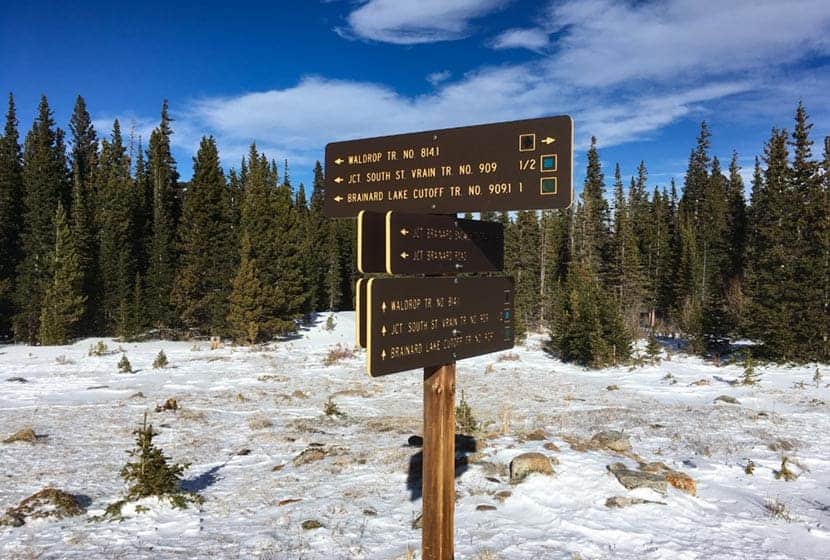
After about 2 miles, you'll encounter an open area with a junction with several other trails. This will point you to continue on the Waldrop Trail and notes that it's 1/2 mile to the South St. Vrain Trail.
Hike or Ski this 1/2 mile segment on the Waldrop until it intersects with the South St. Vrain Trail, then go left/west onto the South St. Vrain Trail. This final segment will bend south toward the lake and the cabin. Follow the signs to the cabin. If you are skiing in, then warm up at the CMC Cabin. If it's Summer, you have a lot of return options, so check out the Brainard Lake Summer Trail Map to decide your route. If hiking back the way you came in, this makes for a total distance of about 6 miles.

Tips & Resources for Hiking at Brainard Lake
- CMC Cabin: The CMC cabin can be reserved for overnights. See details on the CMC Boulder page for the Brainard Cabin.
- Time: Winter travel can take longer than the usual 2 miles per hour hiking speed, so plan on it taking longer than usual..
- Winter Conditions: Weather can change in an instant at this altitude in the mountains and this can be especially deceptive during the Fall and Spring months when its warmer. Be sure to pack and dress for extreme winter conditions. Check the weather and keep an eye on the sky.
- Winter Trail Ettiquette: On multi-use trails where you see ski tracks, avoid snowshoing or hiking over top of the ski tracks. Instead, hike to the side to preserve these tracks for skiers. It makes a big difference for them. Allow skiers traveling downhill the right of way.
- Packing List: Always pack the 10 Essentials. Download our Hiking Guide to get the list and dayhiking packing checklist.
- Colorado Road Conditions: Colorado Road Conditions
- Photo: We would like to express our gratitude to Laura Scudder for sharing her photo of the Brainard Lake CMC Cabin.
- After the Hike: Woodfired Pizza at Crosscut Pizza and Taphouse in Nederland
Weather
Map & Driving Directions
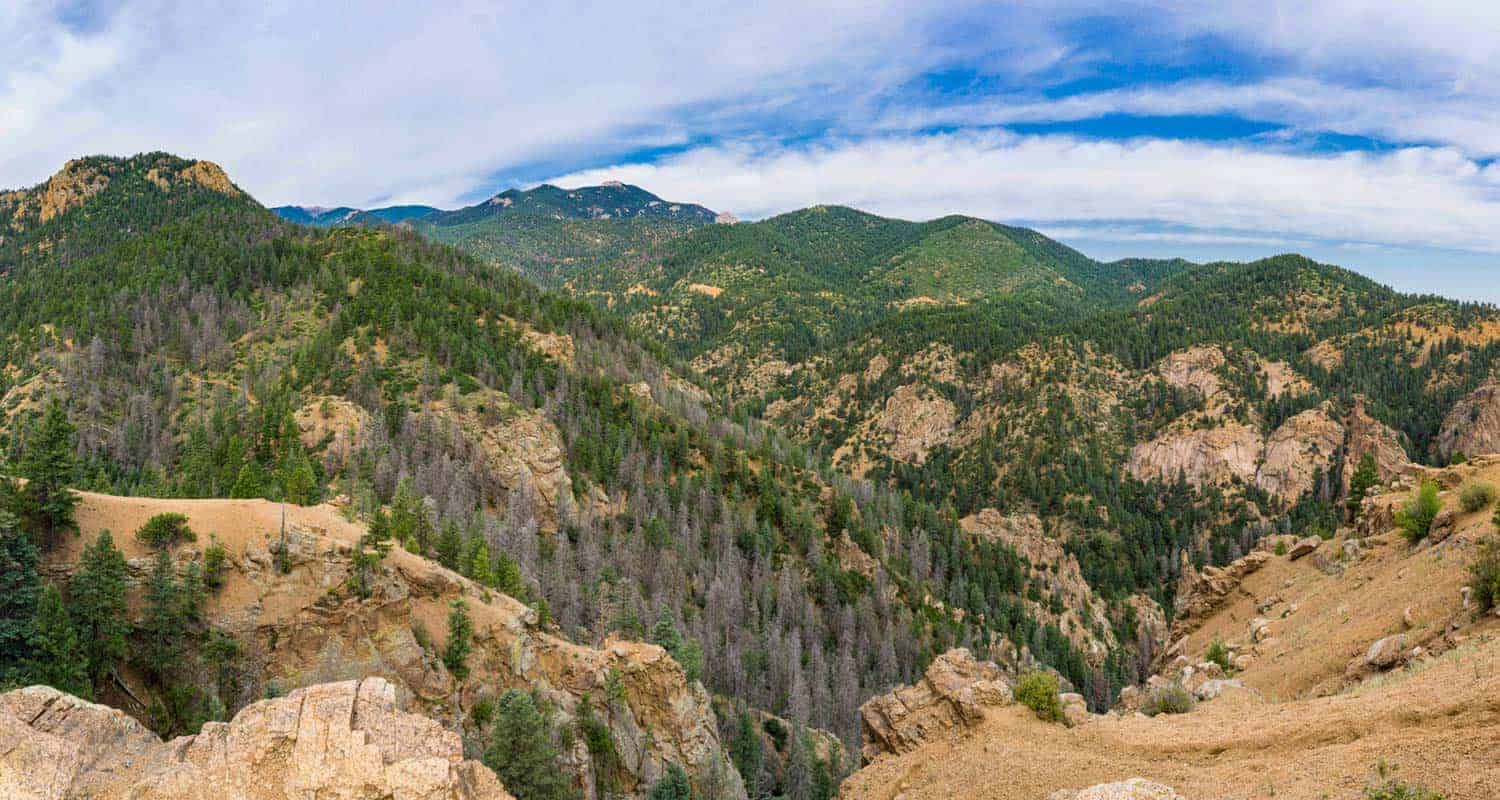
Mt. Cutler Hike in Colorado Springs
Mt. Cutler in Colorado Springs is an easy, 1-mile hike to the summit of a foothill peak that overlooks Seven Falls, the canyon system of Cheyenne Canyon, and offers panoramic views that make this hike a great option for visiting friends and family. Because it's just 2 miles out-and-back with less than 500 feet of elevation gain, this hike offers a lot of reward with less effort. Explore the full Mt. Cutler hike profile below for trail map, driving directions, and more tips and details to help you enjoy this adventure in Colorado Springs.
Trail Snapshot: Mt. Culter
| Hike Distance | 2 miles Round Trip |
|---|---|
| Difficulty | Easy |
| Duration | Approx 1 to 2 Hours |
| Trail Type | Out-and-Back |
| Starting Elevation | 6785′ |
| Elevation Gain | Approx +415′ |
| Seasons | Year Round |
| Dogs | Allowed On Leash |
| Hike Trail Map | Click for Trail Map of Mt. Culter in Cheyenne Canyon |
| Denver Drive Time | 1hr 30min |
| Driving Directions to Mt. Cutler Trailhead | Click for Google Map |
| Town Nearest Hike | Colorado Springs, Colorado |
| Beauty | Peak-Top Views, View down into Seven Falls, Rock Formations |
| Activities | Hiking |
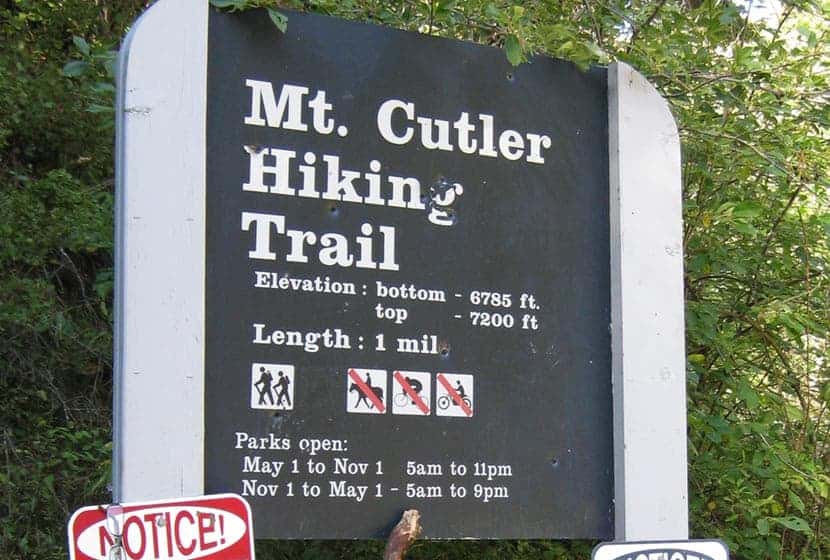
Parking & Trailhead Information for Mt. Cutler
From Denver, take Interstate 25 South to Colorado Springs. Exit onto Tejon St. via Exit 140 then take a right onto S. Tejon St. Stay in the right hand lane so that you can turn right onto Cheyenne Boulevard. Follow Cheyenne Blvd. for about 2.5 miles. Here road will fork as it enters Cheyenne Canyon. Take the road to the right that leads into North Cheyenne Canyon. Proceed for about 1.5 miles until you see the Mt. Culter Trailhead roadside parking area on your left. There are no ameneties at the trailhead. The lot will fill fast on the weekends. If it is full, there are other hike options in North Cheyenne Canyon if you continue up the road to Helen Hunt Falls and to the Seven Bridges Hike that also offers a view of a small waterfall, Undine Falls.
The Hike: Mount Cutler in Cheyenne Canyon
The Mt. Culter trail begins at the blue trailhead sign as a broad path ascends on a gentle grade under the shade of pine trees. The trail passes through some deadfall, evenutally opening out to a more level area where red rock formations have been pushed up into what might otherwise be a dull landscape. Like the Royal Arch in the Flatirons and the formations in Red Rocks Canyon in Colorado Springs, these orange and red granite fins are part of a formation that begins 14,000 feet under the surface and runs almost the entire length of Coloroado.
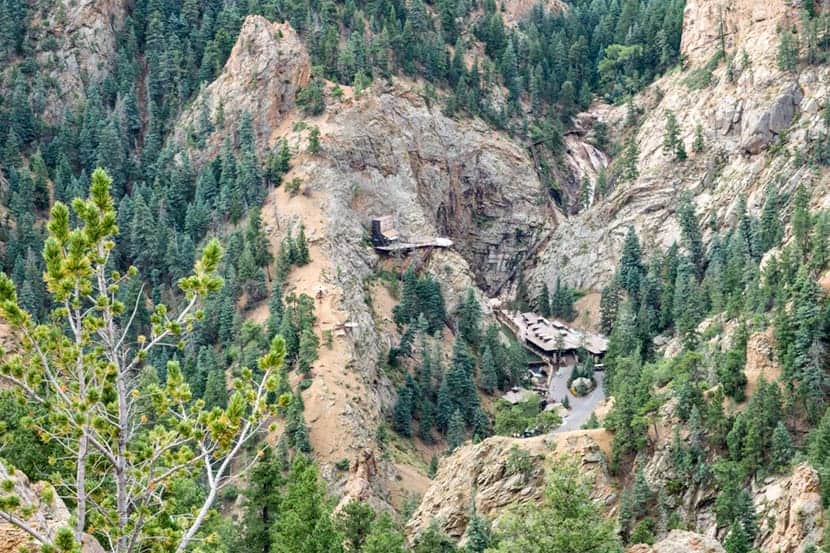
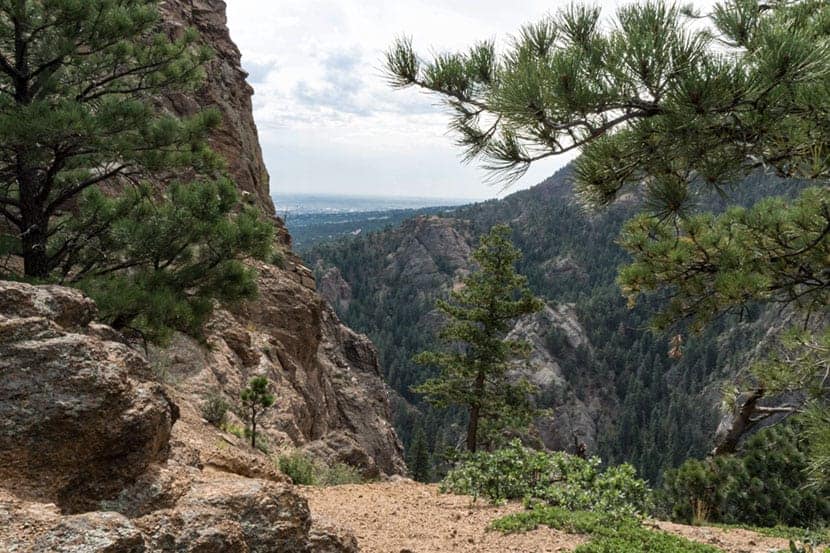
At approximately 0.8 mile, the views open up to the south, where you can look down into Seven Falls. In the Spring and after a good rain, the distant waterfall is quite stunning. To get a close up tour of the falls, you'll need to make a reservation. See our full trail profile on Seven Falls for more details.
The last segment of the hike to the summit of Mt. Cutler offers great views to the south and the north. At the Summit of Mt. Cutler, look to the North to take in the foothills and views down into the canyon, and to the Southeast you'll gain views out to the great plains of Colorado. Return via the same trail you hiked to the summit.
Tips & Resources for Hiking Mt. Cutler
- Visit the Starsmore Visitor Center: On your way in or out of the trailhead, stop by the Starsmore Visitor Center to pick up a trail map and view the exhibits.
- TIP: Wear boots or a tennis shoe that has a good sticky tread as there is a lot of loose gravel on this trail up Mt. Cutler
- Trail Map: Cheyenne Canyon and Mt. Cutler Trial Map
- Packing List: Always pack the 10 Essentials. Download our Hiking Guide to get the list and dayhiking packing checklist.
- Colorado Road Conditions: Colorado Road Conditions
- Photo: We would like to express our gratitude to Fritz MB and Phillip Stewartfor sharing such an amazing photographs of Mt. Cutler.
- After the Hike: Bristol Brewing Company
Weather
Map & Driving Directions
Fallen Timbers Loop Hike at Fox Run Park
The Fallen Timbers Loop is an easy, 2-mile hike near Colorado Springs with great views of Pikes Peak. It makes for a great family hike because of the shade of the ponderosa pines and the nearby playground at this hike in Fox Run Regional Park. Explore the full hike profile for trail map, driving directions, and tips.
Trail Snapshot: Fallen Timbers Loop Hike
| Hike Distance | 2 Miles |
|---|---|
| Difficulty | Easy |
| Duration | Approx 1 hour |
| Trail Type | Loop |
| Starting Elevation | 7300′ |
| Elevation Gain | Approx +200′ |
| Seasons | Year Round |
| Dogs | Allowed On Leash |
| Hike Trail Map | Click for a Map of Fallen Timbers Loop at Fox Run Regional Park |
| Denver Drive Time | 1 hr 15 min |
| Driving Directions to Fox Run Regional park | Click for Google Map |
| Town Nearest Hike | Monument, Colorado |
| Beauty | Ponderosa pine forest, ponds, and views of Pikes Peak. |
| Activities: | Hiking and mountain biking trails, Dog Park, Playground with climbing rock, gazebo. |

Parking & Trailhead Information for Fallen Timbers Loop at Fox Run
From Denver, take interstate 25 South and take exit 158 onto Baptist Road (left). Drive East for 2.3 miles and turn right onto Tari Drive. Proceed for about 300 feet, then take a left onto Becky Drive. Go about 1/2 mile and turn left onto Stella Drive. Drive about another 1/2 mile and the entrance to Fox Run park will be on your left. Drive around the loop to the parking area by the pond. This trailhead parking area has a restroom just to the southwest of the parking lot.
The Hike: Fallen Timbers Loop
The trail for the Fallen Timbers loop hike begins on the northeast end of the parking lot. When facing the pond, this will be the wide trail behind you, across the drive, and to the left. This little connector trail will soon come to a junction with the loop trail. I recommend hiking this counter-clockwise, so take a right onto the Fallen Timbers trail to begin the loop.
The trail works its way through the dappled shade of ponderosa pines and bends to the right (east). You'll encounter a couple trail junctions. At the junctions, stay on the Fallen Timbers trail (bearing right). Just shy of 1 mile into the trail, you'll arrive at the Roller Coaster Road parking area for Fox Run. The trail will continue north past this trailhead. However, there is a restsroom here at the trailhead that is open April through October.
The trail continues north, crossing a footbridge, then begins to bend West (left). Orange blaze markers should mark out the trail.
Along this entire trail, you'll find interpretive signs explaining the impact of the pine beetle and tree bores on the ecosystems of Colorado, and about the local fauna in this area north of Colorado Springs. This makes for a great discussions with the kids about the environment and the impact that even small creatures and lightning can have on forests.
The trail bends South, opening up to great views of Pikes Peak. You'll pass a small trail junction that leads right (west) out to the road. Continue past this and eventually you'll come to a decision to either go left (east) finish this 2-mile loop or bear right and extend your hike to make it a longer 2.5 to 3 mile hike. Consult the Fox Run Trail Map, and follow the wester and southern trails of your choice. However, this profile will follow the rest of the 2-mile loop.
Going right will lead into a central parking area. The trail goes east, cutting through the middle of this circle road and then splits. At the split, take a right to begin the approx. 1/4 mile segment back to the parking area and trailhead.
Tips & Resources for Hiking the Fallen Timbers Loop
- A Great Wedding Spot: I've attended two weddings at Fox Run. It's a beautiful and inexpensive option to host a wedding at the Wedding Gazebo. The gazebo can be reserved through the El Paso County reservation site.
- Taking Photos: The best time to get a photo of Pikes Peak will be in the early morning hours as the sun is rising over the plains. Photographers can capture some dramatic shots of the mountain as its skirts will still be in darkness and the peak bathed in soft light.
- Easy but Elevation: This is an easy hike, but if you are traveling to Colorado Springs from lower elevations, the 7300' starting elevation at Fox Run park may make this trail a challenge. if that's the case, take your time and oxygenate by drinking plenty of water.
- Trail Map: Trail Map for Fox Run Park
- Packing List: Always pack the 10 Essentials. Download our Hiking Guide to get the list and dayhiking packing checklist.
- Colorado Road Conditions: Colorado Road Conditions
- Photo: We would like to express our gratitude to Dave Jacquin , Mariana Wagner , and Nate Zoch for sharing such an amazing photographs of this hike to at Ute Valley Park.
- After the Hike: Serranos Coffee in Monument
Weather
Map & Driving Directions
Click for Driving Directions
Ute Valley Park Loop in Colorado Springs
Ute Valley Park offers an easy 3-mile loop hike in the heart of northern Colorado Springs with views to snow-capped Pikes Peak. The trails make for a quick break from the city to trail run or walk the dog. Get the trail details, map, and driving directions in our full trail profile.
Trail Snapshot: Ute Valley Park
| Hike Distance | 2.5 to 3 miles Round Trip |
|---|---|
| Difficulty | Easy |
| Duration | Approx. 1.5 |
| Trail Type | Loop |
| Starting Elevation | 6550′ |
| Elevation Gain | Approx +200′ |
| Seasons | Year Round |
| Dogs | Allowed On Leash |
| Hike Trail Map | Click for a Map of Ute Valley Park Trails |
| Denver Drive Time | 1 hr 15 min |
| Driving Directions to Ute Valley Park | Click for Google Map |
| Town Nearest Hike | Colorado Springs, Colorado |
| Beauty | Views of Pikes Peak, Pope Bluffs formation, Juniper and Ponderosa Pine, Desert Wildflowers |
| Activities | Hiking and Mountain Biking |
Parking & Trailhead Information for Ute Valley Park
From Denver, take Interstate 25 South to Colorado Springs, exiting on exit 149 and taking a right onto East Woodman Road. East Woodman will turn into Rockrimmon Road. Next, take a right onto Vindicator Drive. The entrance to Ute Valley Park will be up on your left, just after you pass the Middle School. There is a portable toilet at the trailhead and parking for about 20 vehicles.
The Hike: Ute Valley Park
Ute Valley Park is nestled in the subdivisions of Colorado Springs, North of the city center providing residents with a quick escape from town for an after work trail run, mountain bike, and place to walk the dog. There are about 20 different unnamed trail segments, but for our purposes, we will look at a 3 mile loop and a shorter 2.5 mile option.
From the trailhead, take the trail that heads south out of the lot and hike west towards the bluffs. This approach will take us on a counterclockwise loop hike of the trails. Alternatively, you can hike it counterclockwise by reversing this description. Ignore the other trails at the juncture and keep and heading south, the trail will gradually rise to gain the low ridge of Popes Bluff. Along this stretch you'll soak in the sunshine and views out to Pikes Peak.
This stretch of trail is the longest and goes for about a mile to an overlook at the southwest end of Ute Valley Park. You'll pass through one trail intersection before you come to that overlook point. However, if you want to cut off 1/2 a mile and make this a 2.5 mile loop, take a left at that juncture for a more rugged trail that cuts over to the east side of the park and reconnects with this loop. Though in the city, you'll be taking in the aromatics of ponderosa pine and the same juniper trees that are found along the trails in Garden of the Gods.
Continuing with our 3-mile loop description, at the overlook, you have a couple options, but we'll go straight through on the trail that wraps around the most southern end of Ute Valley. See the Ute Valley Park Trail Map for detail.
After about 0.4 of a mile, the trail will begin turning North, traveling along the eastern edge of the park. You'll encounter about 5-6 trail junctures along this stretch. At each juncture, continue on the easternmost trail (keep bearing to the right, or hike straight through). You'll cross over a footbridge and after approximately another another 1/2 mile will be back at the parking lot.
Tips & Resources for Hiking Ute Valley Park
- TIP: Sunscreen is a must as most of the trail is exposed to the sun.
- Trail Map: Ute Valley Park Map
- Packing List: Always pack the 10 Essentials. Download our Hiking Guide to get the list and dayhiking packing checklist.
- Colorado Road Conditions: Colorado Road Conditions
- Photo: We would like to express our gratitude to Patricia Henschen , Tim Marshall , and Rob Lucas for sharing such an amazing photographs of this hike to at Ute Valley Park.
- After the Hike: Kairons Coffeehouse for Coffee and Lunch
Weather
Map & Driving Directions
Click for Driving Directions
Crags Hike Near Colorado Springs
The Crags Trail takes hikers up a 2-mile gradual hike to the the dramatic granite pinnacles on the shoulders of Pikes Peak to take in views of snowcapped peaks. A shaded creekside hike great for families and out-of-town guests, the Crags shows off summer wildflowers in mountain meadows. Explore the full Crags hike profile below for trail map, driving directions, and more tips and details to help you enjoy this adventure in the Pikes Peak region.
Trail Snapshot: The Crags near Colorado Springs
| Hike Distance | 4.5 miles Round Trip |
|---|---|
| Difficulty | Moderate |
| Duration | Approx 2 hours |
| Trail Type | Out and Back |
| Starting Elevation | 10,900′ |
| Elevation Gain | Approx +800′ |
| Seasons | Year Round/Snow in Winter |
| Dogs | Allowed On Leash |
| Hike Trail Map | Click for a Map of The Crags |
| Denver Drive Time | 2 hr |
| Driving Directions to The Crags Trailhead | Click for Google Map </a |
| Town Nearest Hike | Divide, Colorado |
| Beauty | Rock Formations, Views to Snowcapped Mountains, Vistas, Wildflowers, and Creek. |
| Activities | Hiking, trail running, snowshoeing, photography |
Parking & Trailhead Information for The Crags
From Denver, you can get to the Crags by driving a direct route via I25 and HWY 24 or you can take a more Scenic Route through the foothills on 67.
The Direct Route
Take interstate 25 south to Colorado Springs, exit at 141 onto US 24 West. You'll drive for about 25 miles into the mountains and through the small town of Divide. Turn left/south onto Hwy 67. Signs should point the way to Mueller State park, which is also on this stretch of road. Just after the entrance to Mueller (on the left), the road you need for the Crags is on the left, CO RD 62. Taking a left onto 62, and drive for about 3 miles. The parking area for the Crags will be on the right side of the road and the trail will start on the left side of the road. Note that this last segment of road is improved dirt road, so the quality of the drive will depend on the current conditions, and may require 4WD in the Winter months.
The Scenic Route
From Denver, take Hwy 285 South toward Pine Junction. Take a left onto Pine Valley road. Here your journey becomes scenic and the roads curvy. Pay close attention while driving and be prepared for the drive to take longer than the 2 hours and 15 minutes posted by mapping software. You'll have some beautiful segments in here, especially the drive along the South Platte River. Cell service is spotty out here, so I always recommend having on hand the Colorado Gazetteer Map printed by DeLorme. The Road changes names to Deckers Road when it passes through the Buffalo Creek area. Eventually, it Deckers road will weave its way down into Deckers. There is a small restaurant here where we've stopped for ice cream. In Deckers, you'll continue straight (south) on 67, passing through Westcreek, until it ends at a stoplight in Woodland Park. Go right at the light, West on 24, until you come again to Hwy 67 just outside of Divide. Then follow the directions above on 67 to the Crags Trailhead.
The Hike: The Crags
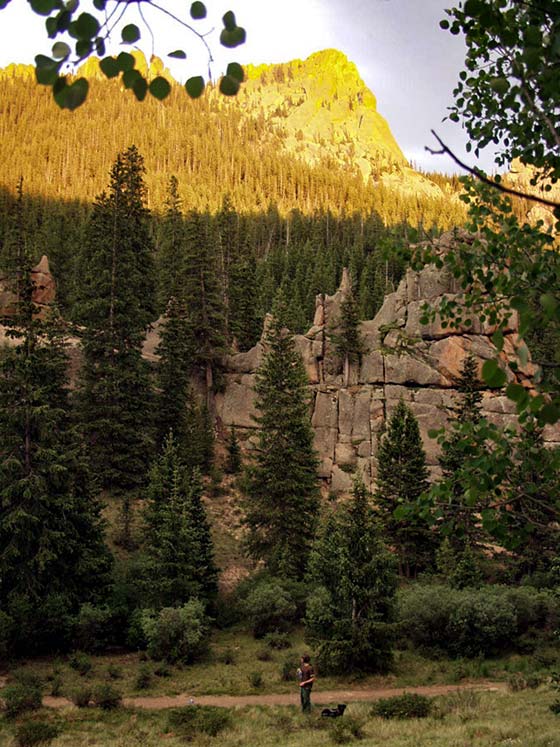
This is my favorite hike in the Pikes Peak Region because it's relatively easy, shows off a variety of landscapes, and has incredible views at the top. The trail starts off at the end of the Crags Campground loop and follows the drainage of Fourmile creek. Early on, hikers will come to a fork in the trail. The left-side branch is a more demanding hike, gaining elevation more quickly and has less shade. This trail profile will follow the right-branch, which is more gradual and offers more shade than the left branch. The left branch and right branch can be connected via a scramble at the top to form a loop trail. If taking this route, be aware of the conditions (snow and ice accumulate October through June). Scrambling is fun, but it's also easy to find yourself in a difficult and dangerous circumstance.
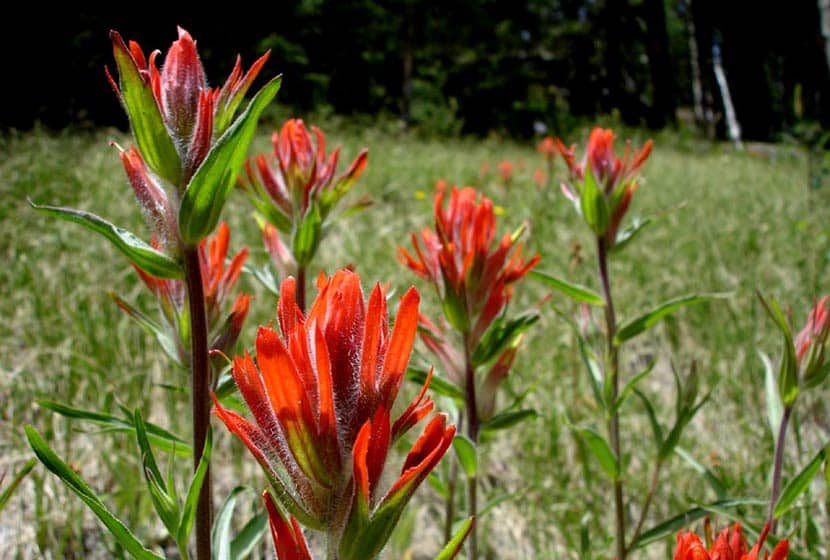
Taking the right branch, the trail will follow alongside Fourmile creek through evergreens and aspens until it opens out into a broad valley surrounded by orange and pink granite cliffs. Wildflowers, like the Indian Paintbrush, bloom in these meadows during the summer months. An interesting fact about Indian Paintbrush: the "flowers" are actually its leaves and there are oranges, reds, and even yellow types of this plant in Colorado.
In the valley, the trail will come to another fork. The main route goes straight up a gradual ascent to the crags and the right-branch is more steep, leading to another vista point. Continuing on the main route, the trail makes its way up gentle slopes, the grassy terrain giving way to cubic granite rock.
The pink and orange granite pinnacles come into view and the ground eventually opens up to a broad area where hikers gain views of the Sangre De Cristo Mountains in the south, of Pikes Peak, and Mueller State Park. This hike is great for families, but do keep a close eye on children as the rock gives way to steep segments of cliffs at the edges.
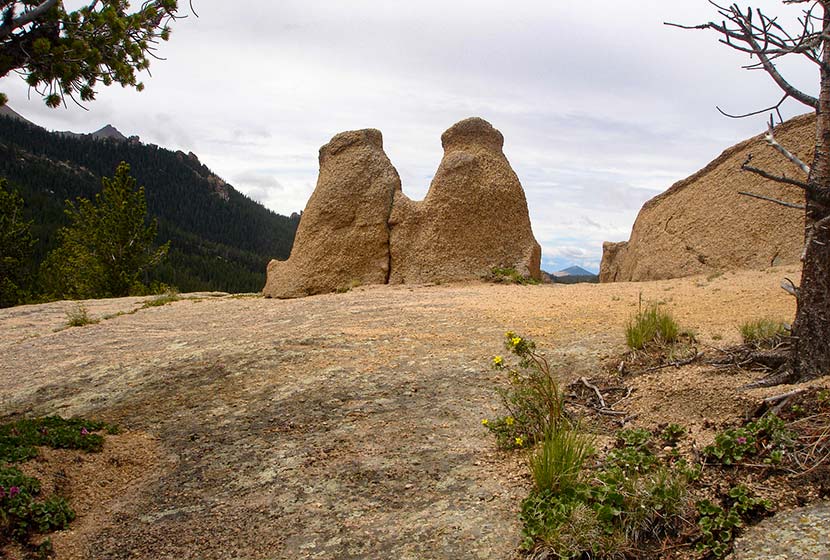
I'm not sure what the locals have named this formation pictured below, but I think of it as the Twin Bears, because it looks like a couple bears sitting on their haunches taking in the views.
I considered grading this an easy hike because the trail is so gradual, the total elevation gain is under 1000 feet. However, those who are hiking with kids or out-of-town guests, should consider it more moderate because it's almost 5 miles total and does gain 800 feet. It makes for a perfect picnic hike with friends.
If hiking in the later hours of the day, it's important to know that because most of the hike is in the folds of the mountain, it gets dark quickly. I always pack my headlamp, but it's especially relevant if you are hiking during these hours.


Tips & Resources for Hiking The Crags
- Dogs: While a dog friendly hike, the granite rock up top is jagged and can impact your dogs padded feet.
- Options: See the different trail options above to take in different unique views of the surrounding landscapes.
- Trail Map: The Crags Trail Map
- Packing List: Always pack the 10 Essentials. Download our Hiking Guide to get the list and dayhiking packing checklist.
- Colorado Road Conditions: Colorado Road Conditions
- After the Hike: Swirl Wine Bar in Manitou Springs
Weather
Map & Driving Directions
Click for Driving Directions

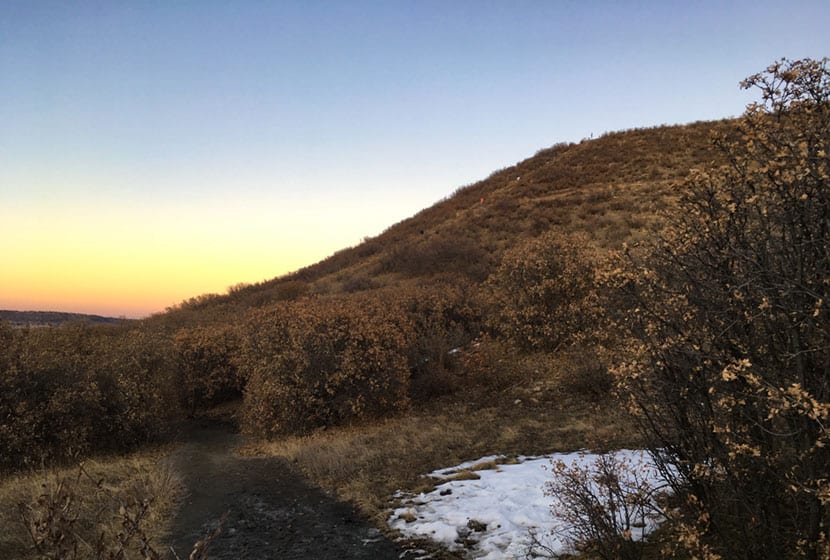
Incline at Castle Rock
The Incline at Castle Rock is a 0.6 mile loop that begins with a 200 step climb up the Challenge Hill to the top of a promontory. From the top, a trail winds down the side of the mesa for 1/2 a mile back to the bottom. It makes for a great workout in the outdoors, and is about 30 minutes south of the center of Denver. Explore the full Castle Rock Incline hike profile below for trail map, driving directions, and more tips and details to help you get active and enjoy the beauty of Colorado
Trail Snapshot: Incline at Castle Rock
| Hike Distance | 0.6 Mile |
|---|---|
| Difficulty | Moderate |
| Duration | Approx 30 min |
| Trail Type | Loop |
| Starting Elevation | Approx 6400′ |
| Elevation Gain | Approx +178′ |
| Seasons | Year Round |
| Dogs | Dogs Prohibited on Challenge Hill |
| Hike Trail Map | Click for a Map of Trails at Phillip S Miller Park |
| Denver Drive Time | 35 min |
| Driving Directions to Challenge Hill Parking Area | Click for Google Map |
| Town Nearest Hike | Castle Rock, Colorado |
| Beauty | Views of Pikes Peak to the South and Longs Peak and the Front Range to the North, Great Sunsets, Deer in Valley below. |
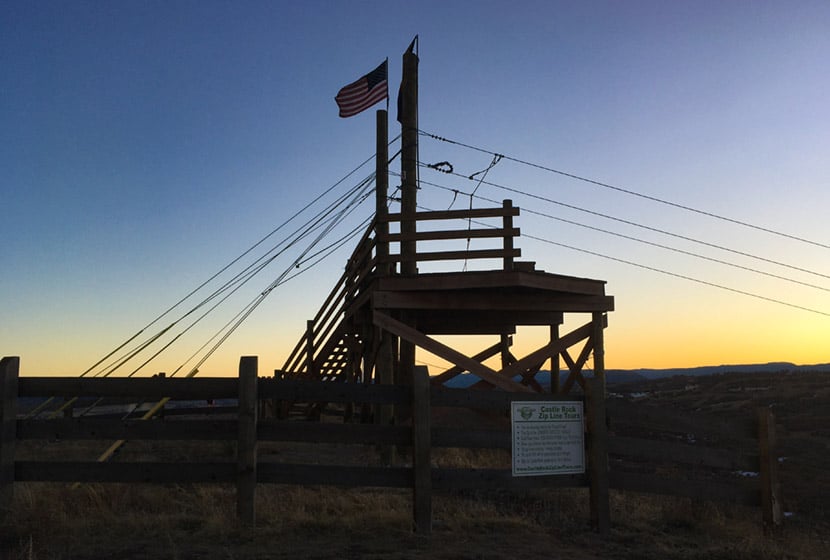
| Activities | Hiking and Trail Running, nearby playground and Zipline Tours. |
Parking & Trailhead Information for Incline at Castle Rock
Take interstate 25 south from Denver to the town of Castle Rock, exiting at Wilcox/Wolfensberger exit, taking a right onto Wolfensberger. At the roundabout, go around and take the left-hand exit (3rd option on the roundabout) onto West Plum Creek Parkway. Go 0.7 mile on West Plum Creek Parkway and the Phillip S. Miller Park entrance will be on the right. After entering the park, go left to the area behind the MAC facility and the parking area for the incline will be at the base of the incline.
The Hike: Incline at Castle Rock
Officially, these 200 steps are called The Challenge Hill, but the locals call it "the incline," and rightly so, because it's inspired by the Manitou Incline near Colorado Springs. Because it's just 5 minutes down the road, we've turned this into a regular family workout. It's a perfect place to get in some exercise and take in amazing sunsets over the Colorado Front Range.

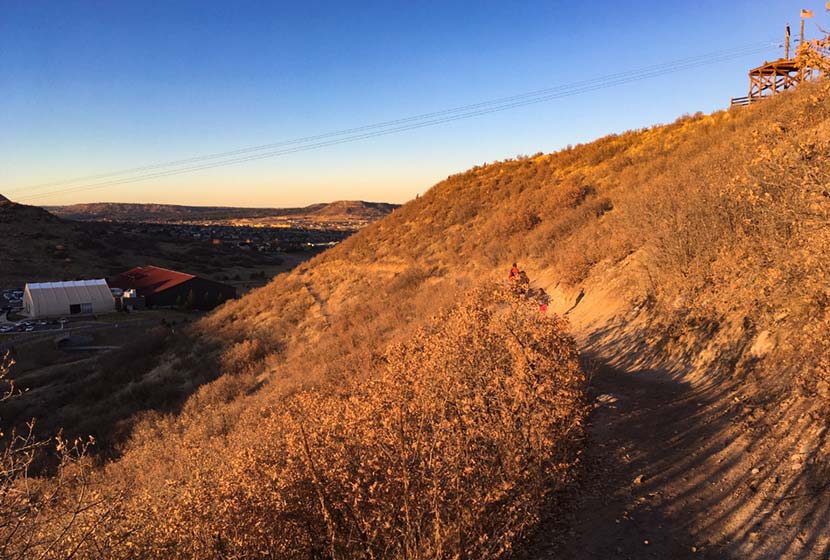
The first segment of the Castle Rock Incline is a 1/10th of a mile climb up 200 steps with close to 200' of elevation gain. This will kick your butt, especially if you take the steps back down. We prefer to run down the 1/2 mile loop trail, usually doing the loop a couple times. We've categorized this as a moderate trail because it has under 500' of total elevation gain and is only 0.6 miles, but many will find it difficult because of the grade of the ascent.
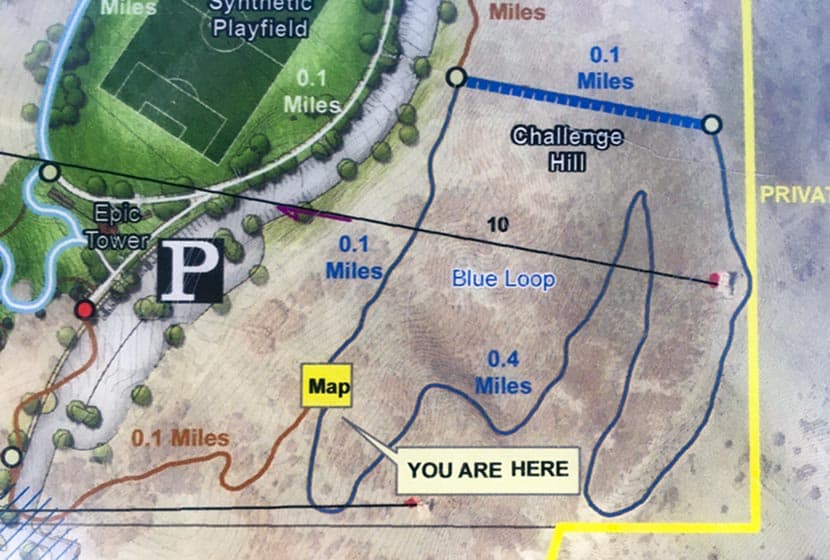
At the top of the Challenge Hill, you can take in views to the north and west of Longs Peak and Devil's Head. There's a wood bench if you want to rest or use it for stretching your legs after the climb. If you decide to descend via the steps be aware that the late afternoon sun can make it very difficult to see the steps.
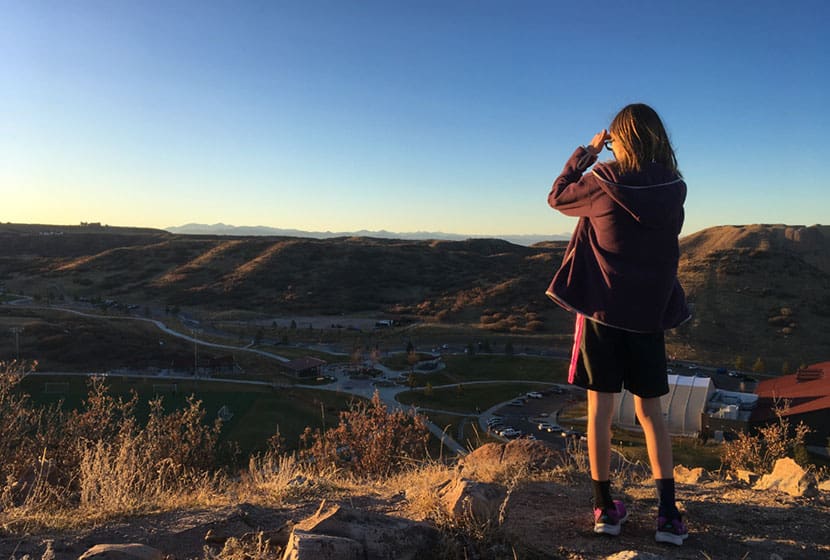
A Zipline platform stands at the peak of this promontory. It's fun to watch zipliners fly through the air across the park. The Zipline tours are operated by Castle Rock Zipline Tours. But don't keep your eyes on the sky because the trail down has a lot of loose gravel and the trail demands your attention.
The trail wraps around the mesa back to the West facing side. Snow and ice can take a while to melt free from the trail, especially in shaded spots. You can check on the trail conditions using the Castle Rock Trail Conditions Map online.
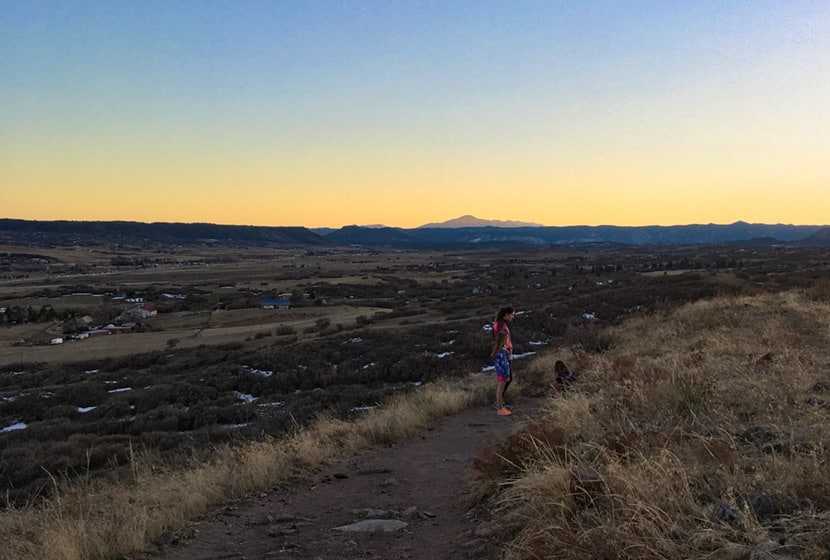
On the back side of the hill, you'll find panoramic views of Pikes Peak and the broad rolling country to the South of Castle Rock. This segment starts out rock then gives way to a gravel trail.
Trail Etiquette at the Castle Rock Incline
- The trail is popular with trail runners, so be aware of approaching runners and keep right to allow them to pass.
- Dogs are prohibited on the challenge hill, because--well, you can imagine why.
- Keep to the right on steps and in single file, especially when others are trying to pass or are coming the opposite direction.
- Let others know when you intend to pass them.
- Descent via the steps is not discourage by the park signage because it's easier to get injured.
- Hours are Dawn to Dusk
From the photo above, you can get a feel for the scale of the Challenge Hill. Much of the lower trail is in scrub oaks, and this next part may seem a bit overly cautious, but after reading a ton mountain lions, I always keep my kids close. As a local ranger told me, "On the Front Range, where there are deer, there are mountain lions." And a kid running fast through an area like this can incite the instincts of a lion. That I know of, we've not had any attacks in this area, but this is just a protocol our family follows on any hike or run--kids and adults always stay together.
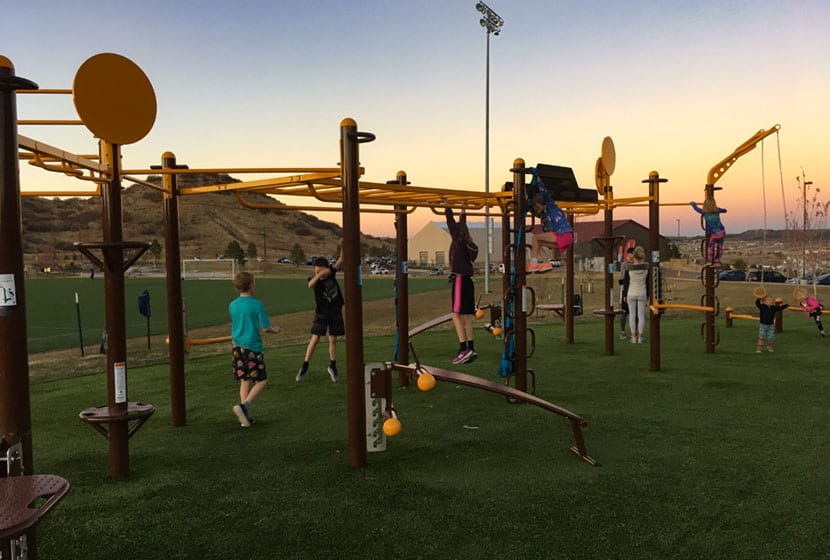
Speaking of the kids, the Phillip Miller park complex recently added (2019) a workout playground that looks like something out of Ninja Warrior competitions. After running the loop a couple times, we spend some time with the kids catching our breath and stretching at the playground.

Tips & Resources for Hiking the Incline at Castle Rock
- Check out Trail Conditions: Before going, check the trail conditions at the Challenge Hill at the Castle Rock Trail Conditions page.
- Pace Yourself: On the ascent, start with a sustainable pace. It gets way more steep and challenging at step 140.
- Trail Map: Incline at Castle Rock
- Packing List: Always pack the 10 Essentials. Download our Hiking Guide to get the list and dayhiking packing checklist.
- Colorado Road Conditions: Colorado Road Conditions
- After the Hike: Since I'm a local, I've got two absolute favorite spots for after the hike. The first is CRAVE Burgers. We love the Love Stinks Burger and the Not Yo Mamma's Burger (on the hidden menu) Crave Burgers in Castle Rock. The second is Manna, a a restaurant in the local hospital. But this is by no means hospital food! It's locally sourced food at great prices. Manna in Castle Rock
Weather
Map & Driving Directions
Click for Driving Directions
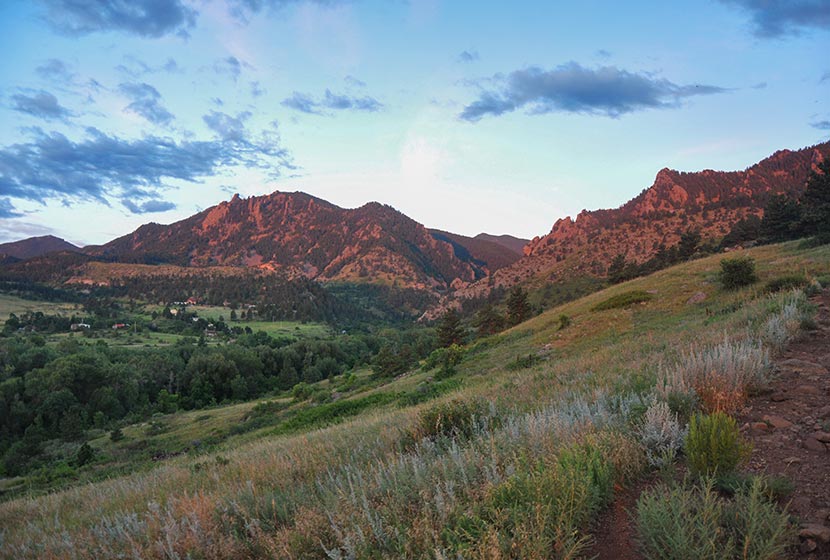
South Boulder Peak
South Boulder Peak is a demanding 3.7-mile hike (one-way) situated above the South Mesa in the famous Flatirons region near Boulder Colorado. Hikers can bag nearby Bear Peak on the same trip and return via Fern Canyon to make an 8.7 mile loop. Explore the full South Bolder Peak hike profile below for the trail map, driving directions, and more tips and details to help you enjoy this adventure near Boulder, Colorado.
South Boulder Peak Trail Snapshot
| Hike Distance | 7.4 Miles Round Trip or approx. 8.7 Mile Loop |
|---|---|
| Difficulty | Difficult |
| Duration | Approx 3-5 hrs |
| Trail Type | Out and Back or Loop Option |
| Starting Elevation | 5650′ |
| Elevation Gain | Approx +2900′ South Boulder Peak 8550' |
| Seasons | Year Round |
| Dogs | Allowed On Leash |
| Hike Trail Map | Click for a Map South Boulder Peak and South Mesa Trailhead |
| Denver Drive Time | 45 Minutes |
| Driving Directions to South Boulder Peak via South Mesa Trailhead | Click for Google Map |
| Town Nearest Hike | Boulder, Colorado |
| Beauty | Peak Top Views, Canyon, Wildflowers, Sunrise, Meadows, Wildlife: Deer, Bear, Birding. |
| Activities | Hiking, Trail Running, Photography |
Parking & Trailhead Information for South Boulder Peak
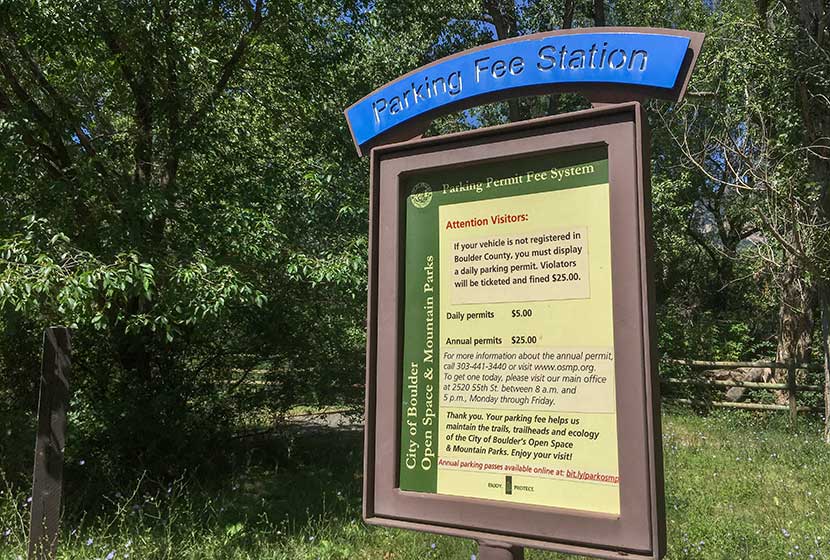
The trail to South Boulder Peak begins at the South Mesa Trailhead off of Eldorado Springs Drive just South of Boulder, Colorado. From Denver, drive North on interstate 25 to 36 toward Boulder. Take the McCaslin Blvd exit and then go South/West onto McCaslin. At the intersection of McCaslin and Marshall, take a right onto Marshall Road. Marshall will eventually intersect with Eldorado Springs Drive. Take a left onto Eldorado Springs Drive. About two miles down the road, you'll find the South Mesa Trailhead on the right. The South Mesa Trailhead is a part of the Boulder County Open Space and requires a daily parking fee, or an annual pass. I went online and bought an annual parking pass through the Open Space website. This gives you access to all the southern fee parking areas as well as the parking areas on Flagstaff Mountain. There are restrooms at the trailhead but not potable water.
The Hike: South Boulder Peak
If you study a map of the South Mesa area, you'll notice that it's a complex network of trails. Tis is great for exploring the mesa, but when summiting a peak, you'll want to preserve as much energy as possible by taking the most direct route. The first trail choice presents itself after crossing the bridge over small bridge that spans Boulder Creek.
We took the Homestead Trail, a 1.3 mile segment to a connector segment of the Mesa Trail. It will be marked "Mesa Trail" and have an arrow pointing left to the Shadow Canyon Trail and Right to the Towhee Trail. The way to South Boulder Peak will be to head left toward Shadow Canyon. During this first segment, you'll gain great views down into the entrance of Eldorado Canyon .
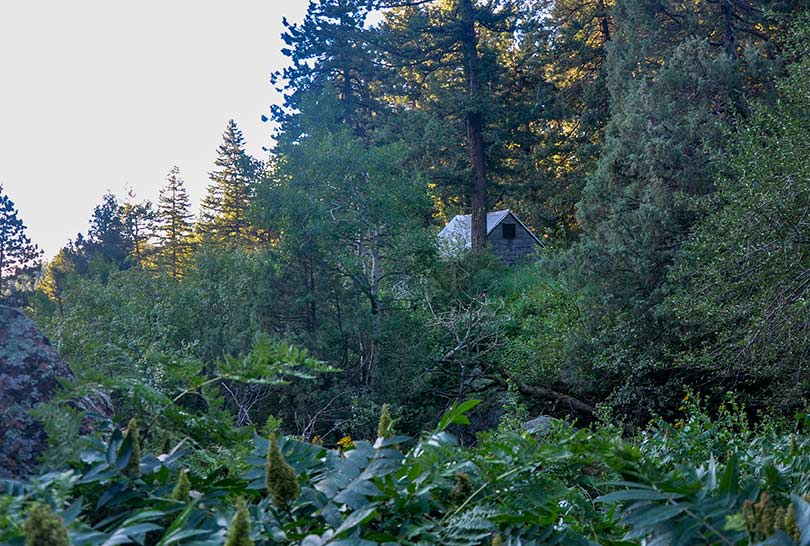
The first 0.4-mile segment of the Shadow Canyon South Trail is gradual. At any of the other trail intersections keep taking those marked "Shadow Canyon." Eventually, the trail leads into a densely wooded ravine where an old cabin is tucked away in the undergrowth
You'll know when you've entered Shadow Canyon because the trail becomes steep and demanding. It's more humid, too, so the rock can get slippery. Be mindful of your steps and prepared to ascend over a mile of fairly rugged terrain.
Shadow canyon is an access point for a prominent rock formation, Devils Thumb. Seasonal closures (see photo below) protect nesting raptors. Be sure to stay out of this area from Feb. 1st to July 31st. The Shadow Canyon Trail is not closed during this time, but refrain from going off-trail or taking social trails in the closure area during these periods.
The trail pops out of the canyon onto saddle between South Boulder Peak and Bear Peak. The first thing you'll notice is a burn area that stretches all the way to the top of South Boulder Peak. It's the result of the 2012 Flagstaff fire.
At the saddle ridge, another trail sign notes the way to South Boulder Peak, a 0.3 mile trail climbs to the summit. You'll notice that the trail to the right leads the same distance to Bear Peak.
At points, the trail becomes difficult to discern and requires a little bit of bouldering to make it to the top. Whenever I'm in these rocky segments, I try to be mindful of those behind me. It's easy to inadvertently cause a rock to shift and tumble toward the hikers below. Most of the rock is stable, but it's smart to be aware as you navigate these kinds of areas. The back side of the summit is exposed, so do not approach or descend the peak via this route. And be mindful of the exposure while on the peak.
The pink granite summit offers 360 degree panoramic views (see the video below).
You can also see the summit of Bear Peak just 0.6-mile to the Northeast. If you want to summit Bear Peak, be sure to review our Bear Peak Hike Profile.
From the summit of South Boulder Peak your options are to 1) Descend via the approach route (7.4 miles round trip), 2) Summit Bear Peak and return via the approach route (8 miles total), or 3) Summit Bear Peak and return via Fern Canyon (approx. 8.7 miles). It's important to know that the descent into Fern Canyon is more demanding than the return via Shadow Canyon. For the loop route via Fern Canyon, explore our Bear Peak Trail Profile.
Tips & Resources for Hiking to South Boulder Peak
- Hiking with Your Dog: Though dogs are allowed on leash, I wouldn't put South Boulder Peak on the dog-friendly list because of the rocky area at the summit and the ascent up fern canyon.
- TIP: Be ready for the hike down to be demanding on your knees and ankles, especially if you choose to descend via Fern Canyon. Trekking poles would be helpful.
- Weather: As with all hikes on the Front Range, especially peak hikes, be weather aware. Thunderstorms can emerge suddenly, especially in the early afternoon in the Summer months.
- Trail Map: South Boulder Peak Map from South Mesa Trailhead
- Packing List: Always pack the 10 Essentials. Download our Hiking Guide to get the list and dayhiking packing checklist.
- Colorado Road Conditions: Colorado Road Conditions
- After the Hike Cafe: Walnut Cafe in Boulder
- After the Hike Brewery: Sanitas Brewing Company
Weather
Map & Driving Directions
Click for Driving Directions