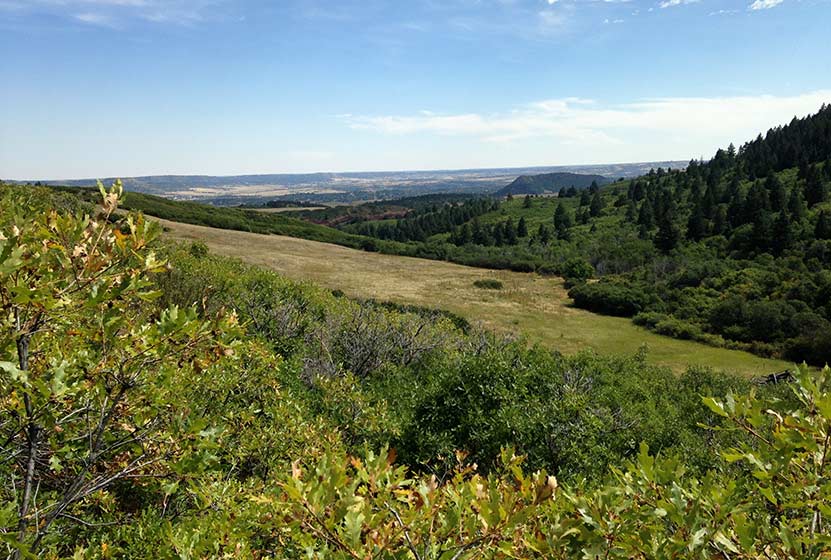
Beaver Loop Hike in Golden Gate Canyon
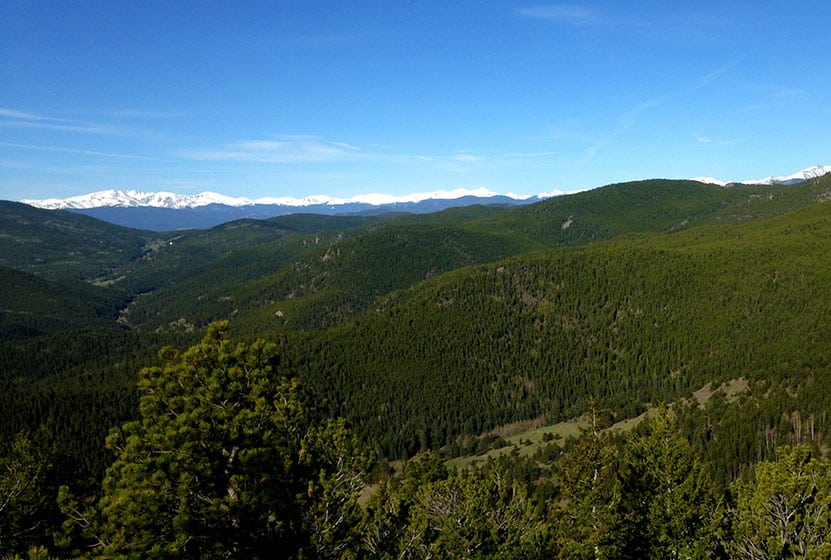
The Beaver Loop is a moderate 2.3-mile loop hike in Golden Gate Canyon State Park views of the snow-capped Rocky Mountains in the West. Add a short segment to Slough Pond to make this a 3-mile hike. Explore the trail profile for a trail map, driving directions, and tips for this hike near Golden, CO
Trail Snapshot: Beaver Loop in Golden Gate Canyon State Park
| Hike Distance | 2.3 miles |
|---|---|
| Difficulty | Moderate |
| Duration | Approx 1 hr |
| Trail Type | Loop |
| Starting Elevation | 8200′ |
| Elevation Gain | Approx +1050′ |
| Seasons | Best hiked May to October |
| Dogs | Allowed on 6' Leash |
| Hike Trail Map | Click for a Map of Golden Gate Canyon Trails |
| Denver Drive Time | 45 min |
| Driving Directions to Visitor Center | Click for Google Map |
| Town Nearest Hike | Golden, Colorado |
| Beauty | Views of Continental Divide, Treamont Mountain and Indian Peaks Wilderness Area, steep inclines, wildflowers, aspen trees< |
| Activities | Hiking, photography, snowshoeing in winter, picnic area, reservable camping shelter |
| Fee | Colorado State Parks Pass Required |
Parking & Trailhead Information for the Beaver Loop Hike
From Denver, take US-6 West to Golden. Just outside Golden, US-6 will turn left (West) into Clear Creek Canyon; it's at this intersection that you'll continue North on 93. After 1.3 miles on 93, turn left onto Golden Gate Canyon Road. Now, prepare for the rest of your drive being pretty windy. After 12.7 miles on Golden Gate Canyon Road, it will intersect with Crawford Gulch Road on a wide curve. Turn right onto Crawford Gulch road and the visitor center for Golden Gate Canyon State Park will be on your immediate right. This is the best parking area for the Beaver Loop. However, the parking here fills up fast, especially on the weekends. Another option is to park at the Ralston Roost Trailhead, located about 0.2 mile further down the road (see the State Park Map Link above). A third option is to begin your hike at Slough Pond. This will add about 3/4 of a mile to your hike, making it closer to a 3-mile trip.
The Beaver Loop Trailhead Across Golden Gate Canyon Road from the Visitor Center
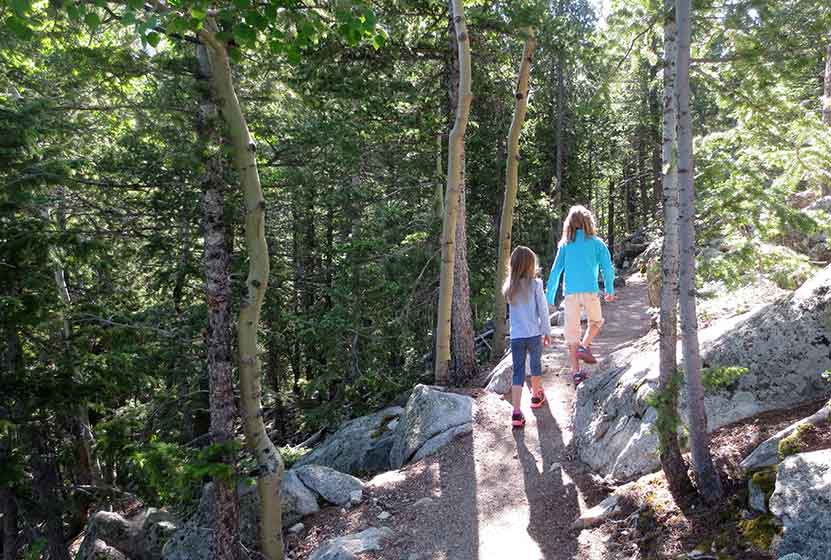
The Hike: The Beaver Loop Hike in Golden Gate Canyon
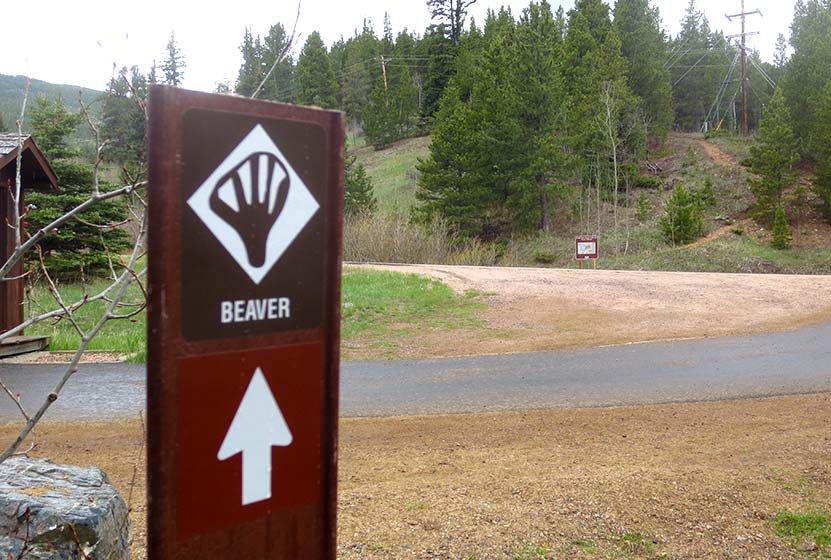
The Visitor Center at Golden Gate is worth exploring. Kids will be fascinated by the trout in the man-made creek and small pond surrounding the building. The Beaver Trail can be picked up just South of the Visitor Center by taking one of the paths around the perimeter of the building. The trail begins under the powerlines on the opposite side of Golden Gate Canyon road. Exercise caution crossing the road as vehicles may be descending the hill and not be looking out for pedestrians. Be alert for cyclists, as they frequent the road and come down the hill at high speeds.
First Trail Fork on the Beaver Loop
At the first trail fork, hikers have the option of taking the loop clockwise or counter-clockwise. I hiked this clockwise, taking the trail towards the shelter. The clockwise route offers a more gentle ascent, but steep descent on the back side of the loop. Taking it counter-clockwise will mean a steeper ascent and a more gentle descent on the way back, which is probably easier on the knees, but a more demanding climb.
You'll notice that the State Park trail map rates this trail as "most difficult." It's important to note that these ratings are relative to the other trails in the park. I 've classified the Beaver Loop as medium/moderate because, while it does have over 1000' of elevation gain, it is only a 2.3-mile hike. Add about 3/4 of a mile if you make the out-and-back trip out to Slough Pond. See our Hikes by Difficulty page for more hikes and the basic criteria we use to classify hikes. It should be noted that difficulty will differ by persons, so be sure to review the details of a hike before attempting it.
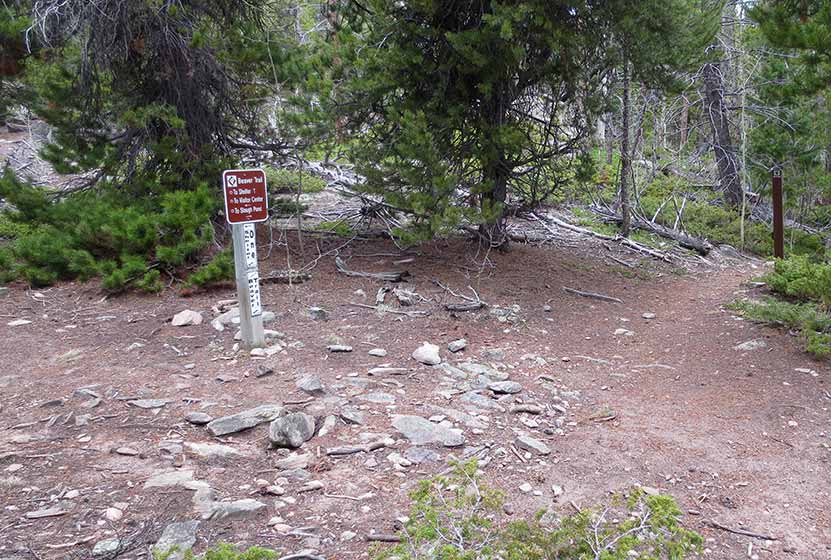
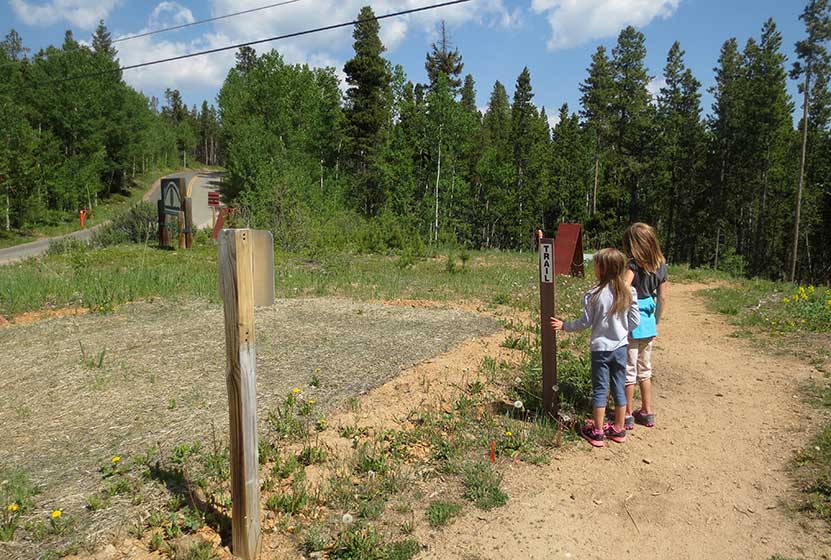
Sign Indicating Spur Trail to Shelter
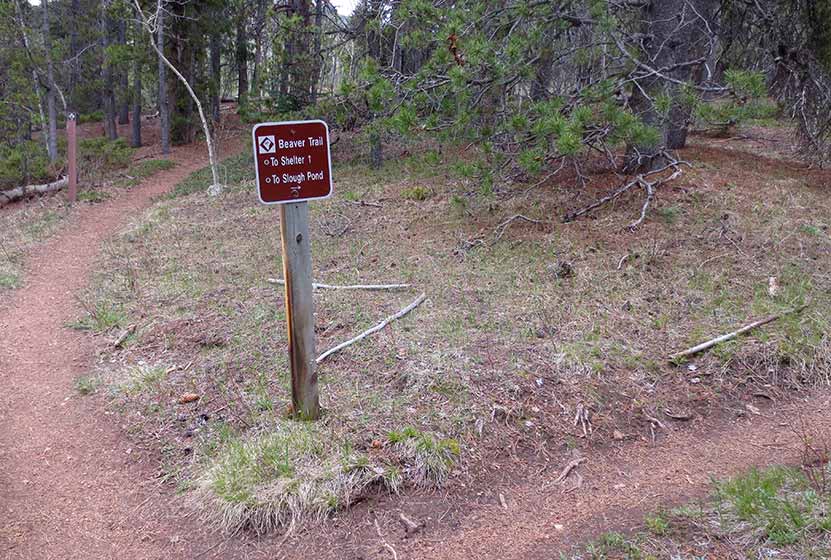
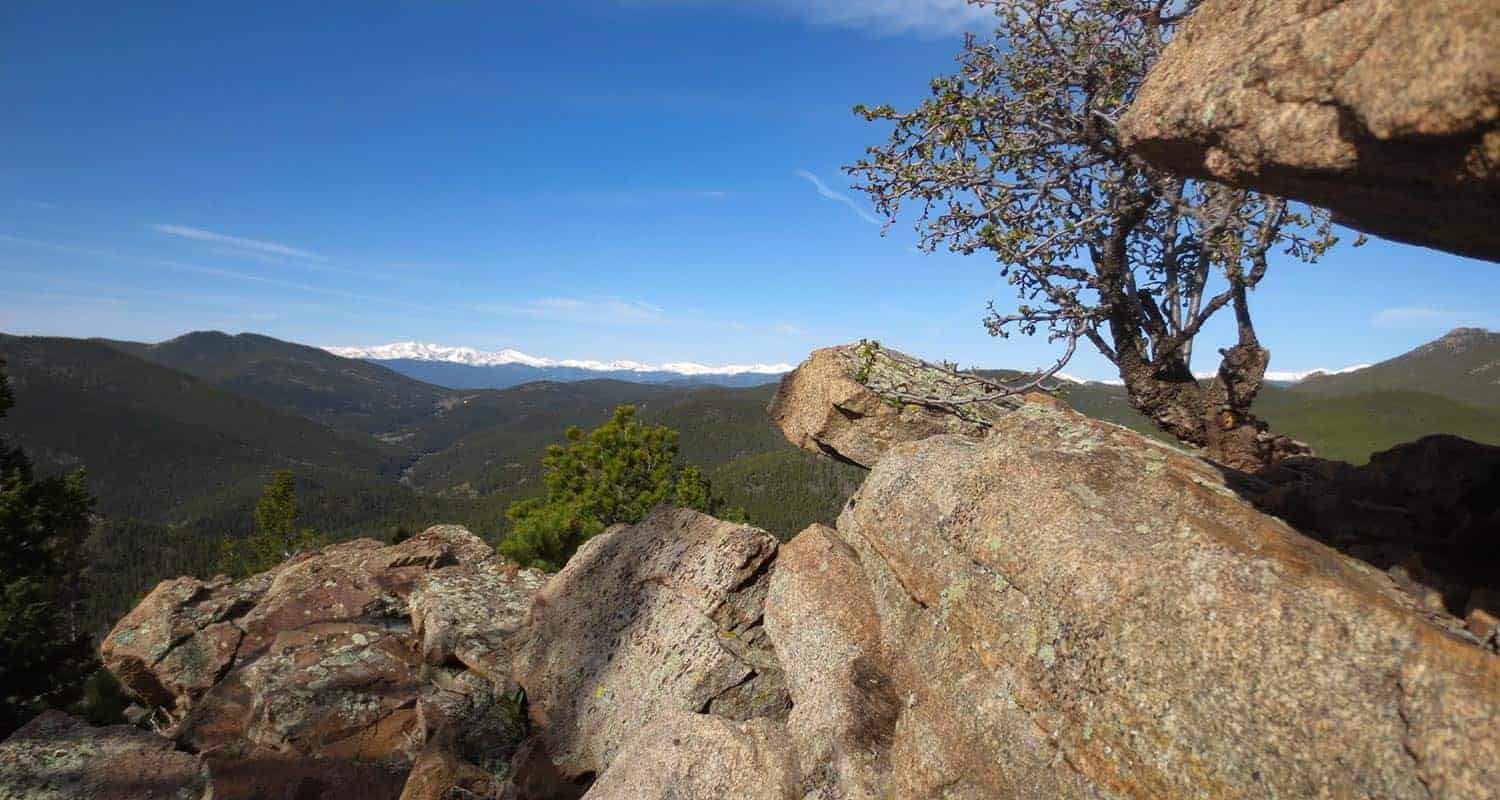
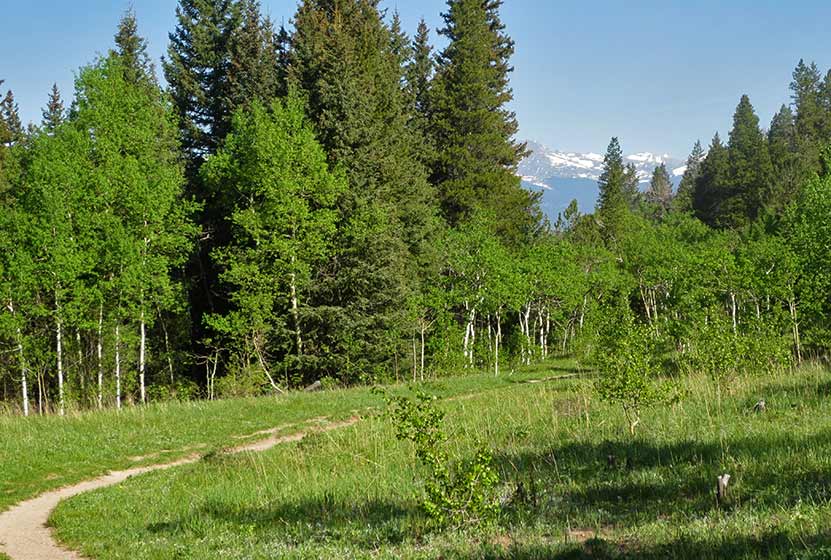
At approximately 1 mile into the loop, hikers will encounter a sign (pictured above) pointing to a 0.5-mile spur trail leading to a backcountry shelter. A permit is required to camp here and can be purchased online at the Golden Gate Canyon fees page. Continuing on the loop, the trail will soon lead to an overlook of views to the West. During most of the year, snow-capped peaks appear above a verdant green valley in these western foothills.
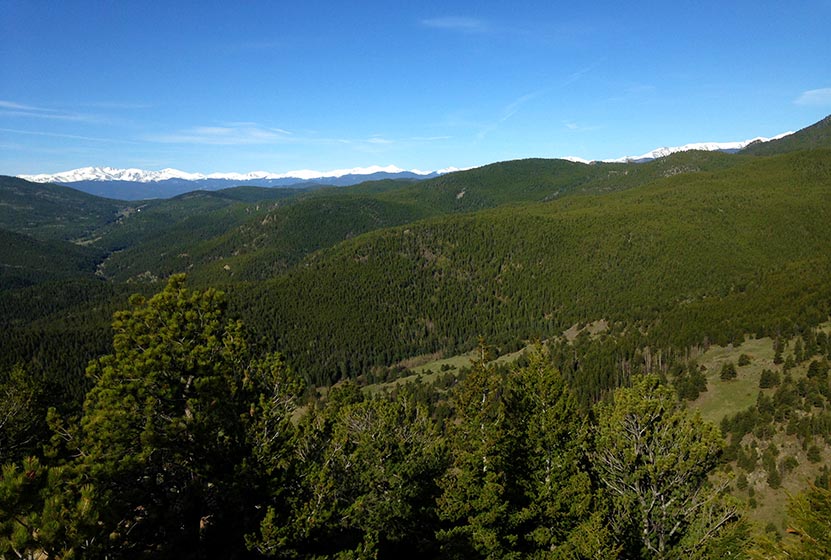
After the overlook, the trail begins a steep descent. I had brought my trekking poles (I always bring them), and was glad that I did. I would imagine that this trail gets slicked over with ice and hardened snow during the winter, making it really difficult to navigate. The trail then leads down to an intersection with the Slough Pond trail.
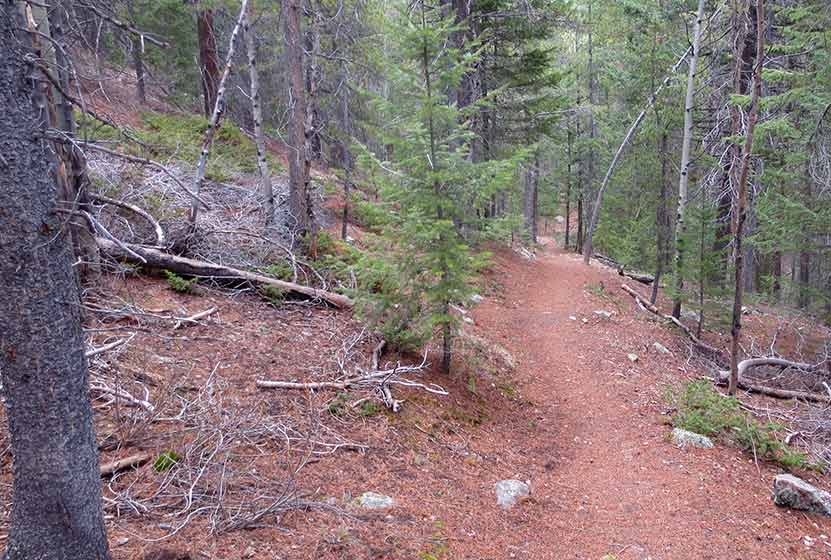
Downhill Trail Segment on the Beaver Loop
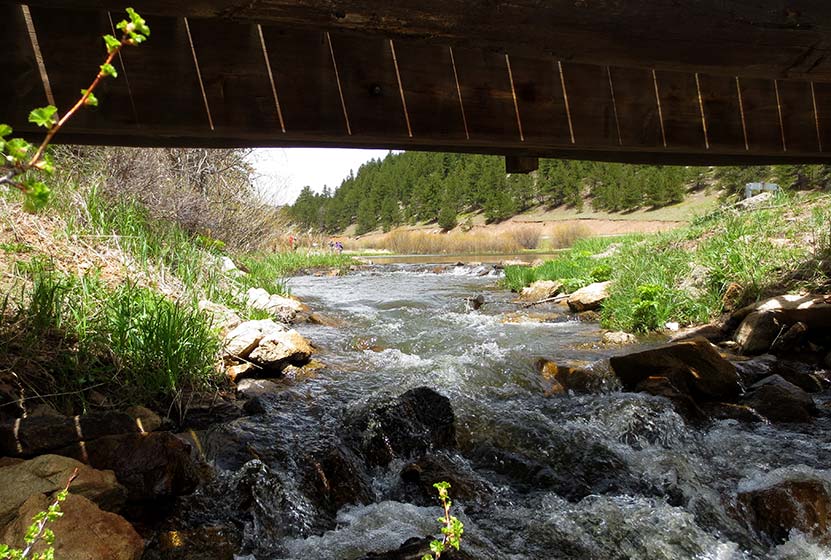
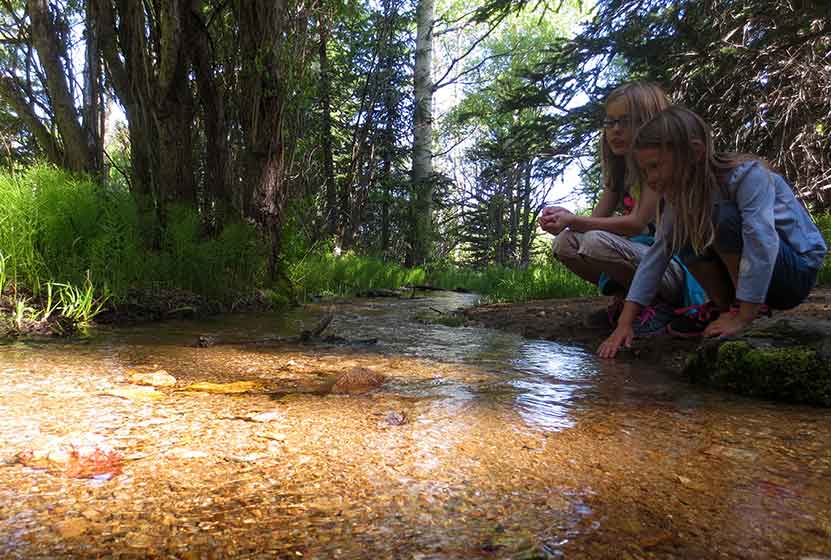
At this intersection at the bottom of the hill, you have the option of making the trip over to Slough Pond. The hike over to Slough Pond is pleasant and mostly flat. At the pond, a quaint creek flows out of the pond and under a footbridge. Slough Pond is a popular fishing spot and a great place for kids to learn to bait a hook. As mentioned above, adding this out-and-back segment to the hike, makes this closer to a 3 mile hike.
Tips & Resources for Hiking the Beaver Loop Hike
- TIP: Don't forget to bring food and water along this hike for refuelling.
- TIP: Pick up a paper map at the visitor center before hiking.
- TIP: Trekking poles will be a big help on the steeper portions of the trail. Traction devices are recommended for winter weather..
- Trail Map: Golden Gate Canyon Trail Map
- Packing List: Always pack the 10 Essentials. Download our Hiking Guide to get the list and dayhiking packing checklist.
- Colorado Road Conditions: Colorado Road Conditions
- After the Hike: Windy Saddle Cafe in Golden, Colorado
Weather
Map & Driving Directions
Click for Driving Directions to Visitor Center

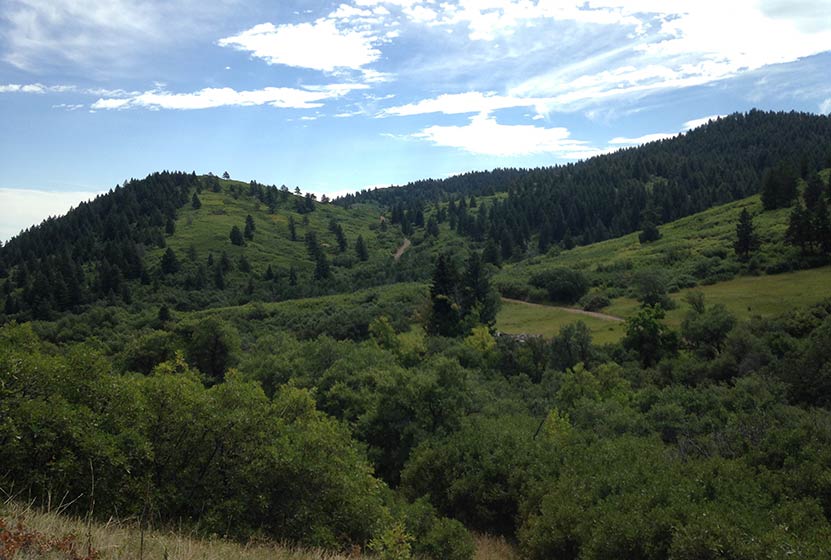
Windy Peak Hike in Golden Gate Canyon
Windy Peak is a summit hike in Golden Gate Canyon State Park. A moderate to difficult 6.4-mile loop hike that follows meltwater creeks, crosses green meadows replete with wildflowers, and offers great views at the summit of the snow-capped Rocky Mountains in the West. Explore the full Windy Peak Hike profile for trail map, driving directions, and many of the details you need to enjoy this adventure in Golden Gate Canyon State Park.
Trail Snapshot: Windy Peak in Golden Gate Canyon State Park
| Hike Distance | 6.4 miles Round Trip |
|---|---|
| Difficulty | Moderate |
| Duration | Approx 2-3 hrs |
| Trail Type | Lollipop-Loop with Spur to Summit |
| Starting Elevation | 7860′ |
| Elevation Gain | Approx +1300′ |
| Seasons | Best hiked May to October |
| Dogs | Allowed on 6' Leash |
| Hike Trail Map | Click for a Map of Golden Gate Canyon Trails |
| Denver Drive Time | 50 min |
| Driving Directions to Bridge Creek Trailhead | Click for Google Map |
| Town Nearest Hike | Golden, Colorado |
| Beauty | Panoramic views of snow-capped mountains, wildflowers, meadow, spruce, aspen |
| Activities | Hiking, photography, snowshoeing in winter, picnic area |
| Fee | Colorado State Parks Pass Required |
Parking & Trailhead Information for the Windy Peak Hike
From Denver, take US-6 West to Golden. Just outside Golden, US-6 will turn left (West) into Clear Creek Canyon; it's at this intersection that you'll continue North (not turning left) on 93. After 1.3 miles on 93, turn left onto Golden Gate Canyon Road. Now, prepare for the rest of your drive being pretty windy. About 4 miles down Golden Gate Canyon Road, you have the option of taking Crawford Gulch road to the Right or to stay on Golden Gate Canyon Road. Both routes will get you there.
I believe that Google Maps from Denver is going to default to Crawford Gulch Road. Do take your time and be alert for cyclists and motorcycles, especially on the weekend, as both Golden Gate Canyon Road and Crawford Gulch Roads are popular roads for riding. Eventually, Crawford Gulch Road will turn into Drew Hill Road, which runs through the heart of Golden Gate Canyon State Park. If you decide to take the Golden Gate Canyon Road option, it will intersect with Crawford Gluch/Drew Hill at the visitor center (on your right, just after the intersection on Crawford Gulch). If you take this route, the Bridge Creek Trailhead will be 2.3 miles down the road and on your left (north). One last thing to note is that Crawford Gulch Road has yet one more name, Ralston Creek Road. So, if you see that on any signage, just know you are on the right track.
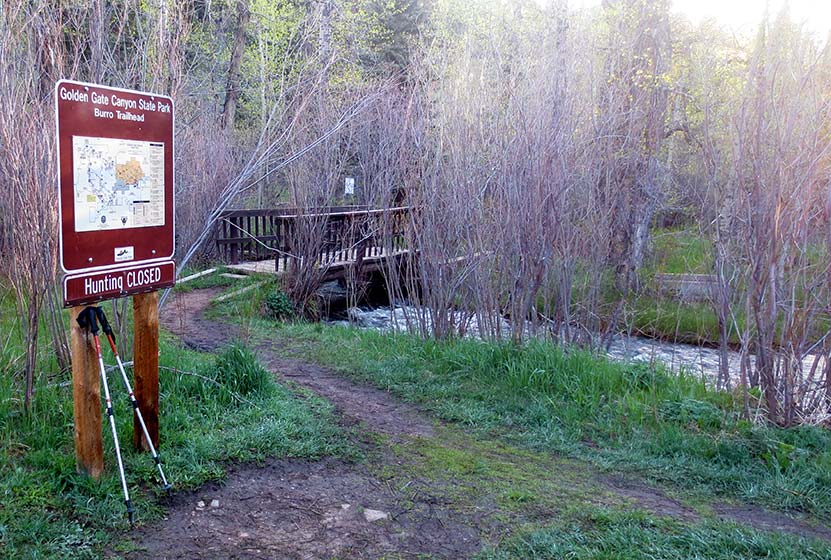
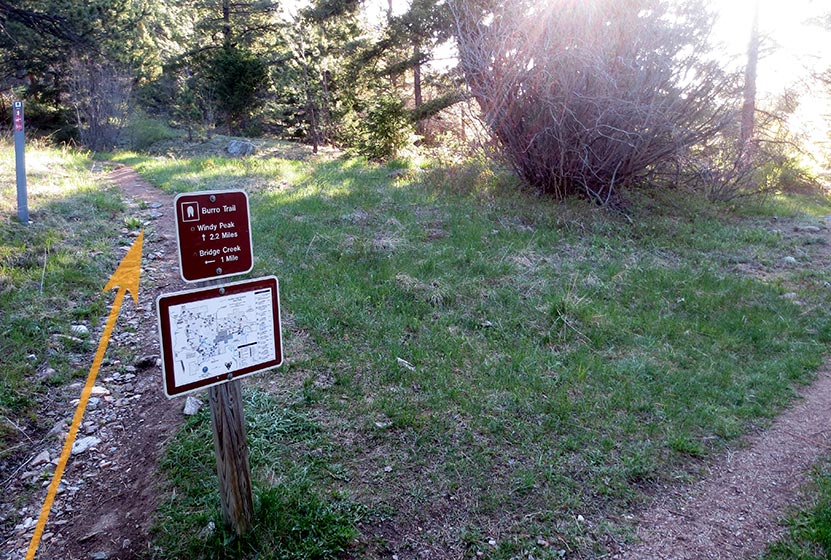
The Bridge Creek Trailhead is a bit unusual because it's composed of several parking areas along the on the north side of the road. However, all parking areas have trails that will lead hikers to the footbridge that crosses the trail and serves as the official start of the Burro trail and this hike. A sign (pictured above) reads "Burro Trailhead."
The Hike: The Windy Peak Hike in Golden Gate Canyon
This is a Lollipop-loop trail with a spur trail at the end that leads up to the summit. There are several trail junctions, which can make this the route a bit confusing. I've provided photos below of the trail junctions, but it's important to remember that weather can change the landscape and signage. The description here hikes the loop portion of the trail in a clockwise direction. We've classified this as moderate/medium in difficulty. However, its right on the edge because of the over 1000' elevation gain and more than 5 miles of trail. For some, this will be difficult. It's also on our list of dog-friendly hikes, but it's important to know that the peak is all rocky terrain that may be a bit tough on your dog's paws. As always, if you are taking your best friend, be sure to keep them on a leash out of respect for the wildlife, environment, and other hikers.
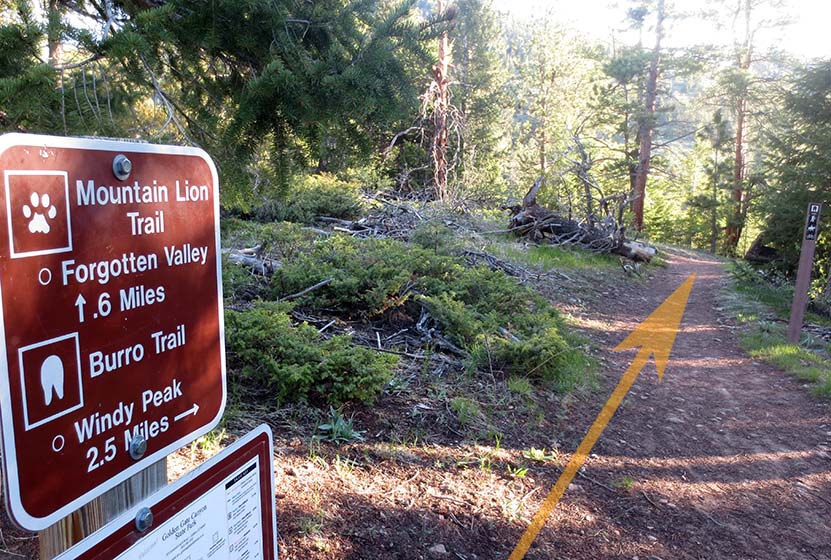
After crossing Ralston Creek, the trail makes its way up a gentle slope into the trees. At the first trail junction, stay on the Burro Trail (left). The second trail junction leads either straight on the Mountain Lion Trail to Forgotten Valley or right toward Windy Peak on the Burro Trail. The trail will make its way along a creek. Look for Calypso flowers, also called Pink Lady Slippers in this area. They grow along the creeks in Golden Gate Canyon State Park.
The loop begins at the third junction (pictured above), the way up to Windy Peak is clearly marked as the left-hand trail. From this point, it's 2.2 miles to the peak. Here the trail begins a steeper climb through an area with prominent chalk colored cliffs.

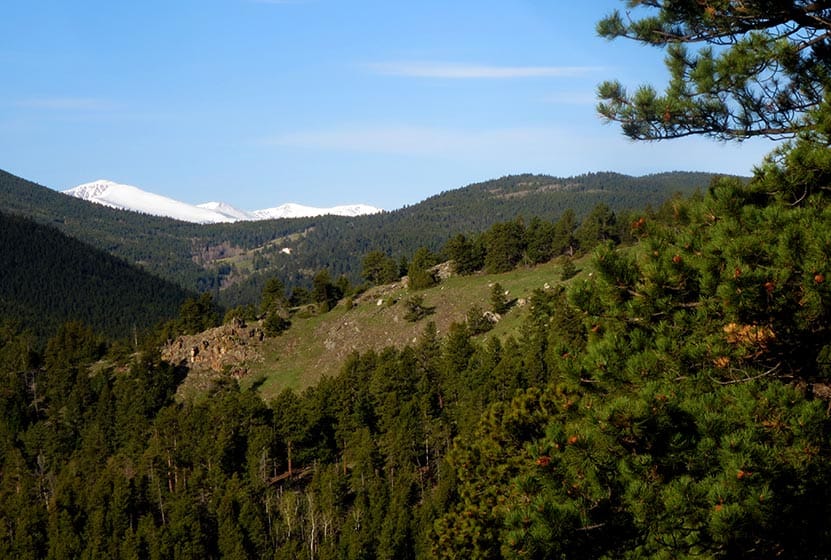
As you gain altitude, you'll gain views out to the Continental Divide rising above the green foothills of Golden Gate. The trail will then enter the shade of lodgepole forest.
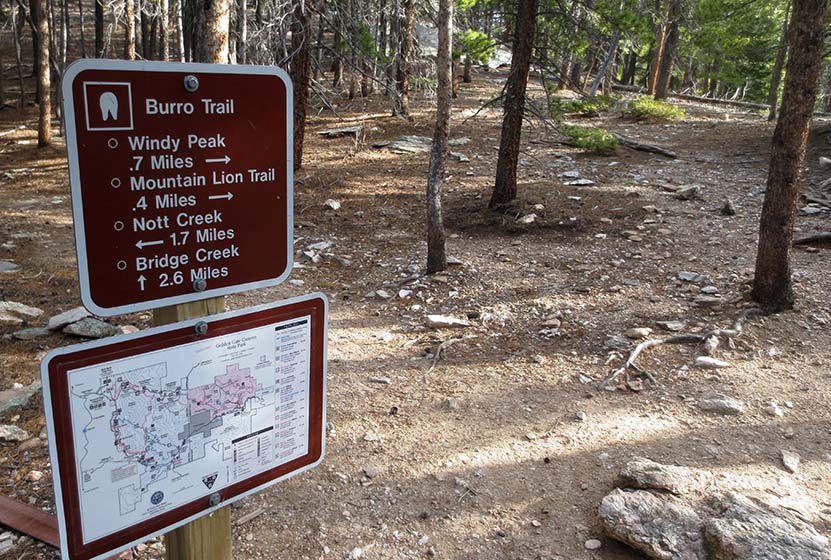
At the top of the loop, hikers will encounter the junction for the .7 mile spur trail that leads to the summit of Windy Peak (pictured below). There will be one more sign pointing the way at 0.4-mile below the summit.
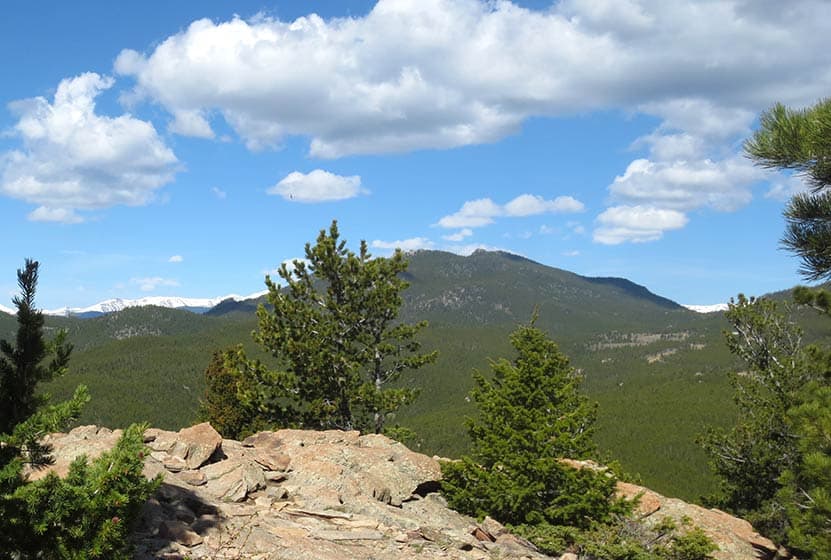
The summit of Windy Peak is one of my favorite places to read and journal. Be sure to bring a picnic lunch with you, because you'll want to spend some time here resting and refueling for the hike back to the trailhead. The spur trail will lead back to the main Burro loop trail. At this point, you can return the way you hiked in to the spur trail (a slightly shorter way back), or continue on the rest of the loop toward Nott Creek. The landscape on this back end of the loop is riddled with wildflowers, so it's well worth doing the full loop hike.
The trail will weave its way down into a valley with a dirt service road. Here, hikers will want to follow the Burro trail towards the Bridge Creek Trailhead as it makes its way on and off the service roads.
The trail will work its way through a green meadow, then along Nott creek, following it West until retracing the trails that lead back to Bridge Creek Trailhead.
Tips & Resources for Hiking to Windy Peak
- TIP: Don't forget to bring food and water along this hike for refuelling.
- TIP: We advise picking up a paper map of Golden Gate Canyon State Park at the visitor center before embarking on this hike.
- Trail Map: Golden Gate Canyon Trail Map
- Packing List: Always pack the 10 Essentials. Download our Hiking Guide to get the list and dayhiking packing checklist.
- Colorado Road Conditions: Colorado Road Conditions
- After the Hike: Windy Saddle Cafe in Golden, Colorado
Weather
Map & Driving Directions
Click for Driving Directions to Bridge Creek Trailhead
Heil Valley Ranch Ponderosa Loop Hike
Heil Valley Ranch near Boulder offers this rewarding lollipop-loop hike which features views of distant snowcapped mountains and geological features unique to this section of Colorado. Nestled in the foothills between Boulder and Lyons this singletrack trail is a great destination for both hikers and mountain bikers. However, soil erosion has required occasional trail closures, so be sure to check out the Boulder County Open Space Twitter feed for trail conditions. Explore the full Heil Valley Ranch hike profile below for trail map, driving directions, and more tips and details to help you enjoy this adventure in the Boulder County, Colorado.
Trail Snapshot: Heil Valley Ranch Ponderosa Loop
| Hike Distance | 7.6 miles Round Trip |
|---|---|
| Difficulty | Moderate |
| Duration | Approx 4 hrs |
| Trail Type | Lollipop-Loop |
| Starting Elevation | 6000′ |
| Elevation Gain | Approx +1000′ |
| Seasons | Year Round |
| Dogs | Dogs Not Allowed |
| Hike Trail Map | Click for a Map of Heil Valley Ranch |
| Denver Drive Time | 50 min |
| Driving Directions to Heil Valley Ranch Trailhead | Click for Google Map |
| Town Nearest Hike | Boulder, Colorado |
| Beauty | Views to snowcapped peaks, unique geology, wildlife: deer, coyote, squirrel |
| Activities | Hiking, mountain biking, and photography |
Parking & Trailhead Information for Heil Valley Ranch Hike
From Boulder, follow US 36 West toward Lyons, turn left onto Left Hand Canyon Drive. After 0.7 mile, turn right onto Geer Canyon Drive. After approx. 1.2 miles, you'll come around a curve and see a sign for Heil Valley Ranch. The parking area is on the right/North side of the roach.
The Hike: Ponderosa Loop at Heil Valley Ranch Trail
There are two trails located at the north end of the parking area, the Wapiti and the Lichen. For this longer loop hike, we'll be taking the Wapiti up to the Ponderosa loop. This trail is found just to the left/west of the Lichen Loop trail. These should be well-marked by signs and the Lichen loop trail will immediately cross a footbridge. The Lichen loop is a great option for families with small children being just 1.3-mile loop with about 230' of elevation gain over the course of the hike.
Taking the Wapiti trail, hikers will head North through a broad valley punctuated with Ponderosa Pine. After passing an intersection with the Lichen Loop, the Wapiti will soon enter the shade of more ponderosa pines as it makes its way through more rocky and steep terrain. At 2.5 miles in, the Wapiti will meet up with the Ponderosa Loop Trail.
The Ponderosa loop segment offers a great set of views, beginning with views of snowcapped peaks in the west. We recommend taking the Ponderosa loop counter-clockwise, which will take you up to a high point then back down into a beautiful meadow with views all the way out to Left-Hand Reservoir. A second overlook is gained after this section, providing great views out to Indian Peaks Wilderness and Longs Peak in the North. The trail will meet back up with the Wapiti trail for a descent back to the trailhead.
Tips & Resources for Hiking the Heil Valley Ranch Trail
- TIP: Keep alert for mountain bikers as much of the trail is singletrack and a popular mountain biking area..
- Trail Map for Heil Valley Ranch Trail near Boulder: Trail Map Link
- Packing List: Always pack the 10 Essentials. Download our Hiking Guide to get the list and dayhiking packing checklist.
- Colorado Road Conditions: Colorado Road Conditions
- Photo: We would like to express our gratitude to Jonathan Reyes for sharing such great photographs of this hike at Heil Valley Ranch.
- After the Hike: The Parkway Cafe
Weather
Map & Driving Directions
Click for Driving Directions
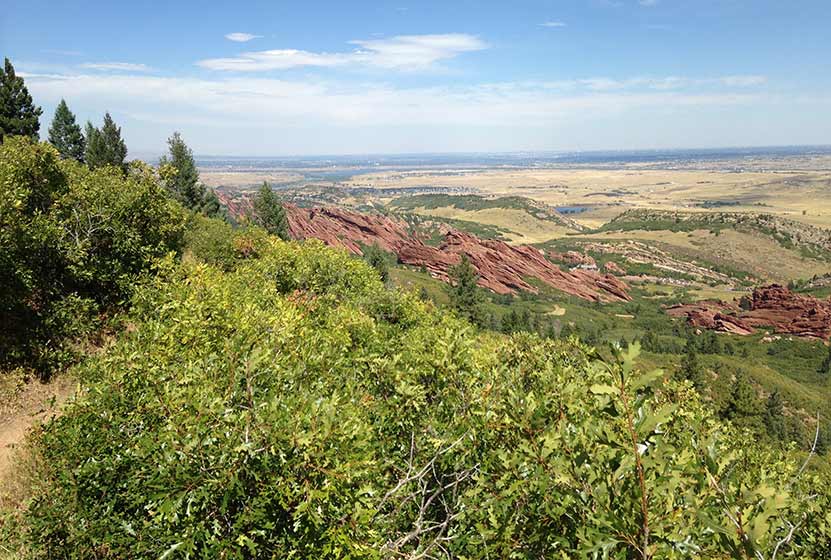
Elk Valley Trail in Roxborough State Park
The Elk Valley Trail in Roxborough State Park climbs to a lesser visited valley in the park. Incredible views of the red rock formations of Roxborough make this a great moderate hike near Denver. The hike to Elk Valley is a 4.8 mile out-and-back journey, but can be turned into one of two more strenuous loop hikes. Explore all the details below for trail map, driving directions, trailhead info, and photos of this hike near Littleton, Colorado.
Trail Snapshot: Elk Valley Trail at Roxborough State Park
| Hike Distance | 4.8 Mile with options |
|---|---|
| Difficulty | Moderate |
| Duration | 2-3hrs |
| Trail Type | Out-and-Back with Loop Options |
| Starting Elevation | 6200′ |
| Elevation Gain | +640′ |
| Seasons | Year Round |
| Dogs | Prohibited in the Park |
| Hike Trail Map | Click for a Trail Map |
| Denver Drive Time | 45 min |
| Driving Directions to Roxborough State Park | Click for Google Map |
| Town Nearest Hike | Littleton, Colorado |
| Beauty | Red rock formations, meadows, wildlife: mule deer, eagles, foxes, birds |
| Activities | Hiking, birdwatching, Visitors’ Center |
| Fee | Entrance Fee or State Parks Pass Required |
Roxborough State Park Parking Trailhead Information
Roxborough State Park is located south of Littleton, Colorado, at the base of the foothills near Pike National Forest. The last two miles of access road into Roxborough State Park are a maintained dirt road. This segment of road can get washboarded and can be tough on the car. Undulating green hills can be seen to the east where deer and antelope graze. Roxborough can fill up during the busy weekend hours. If that's the case, you can wait in line at the gatehouse until vehicles and a ranger gives you the signal to drive in. My guess is that the peak times are around 10AM-2PM. If the line looks long, you can always turn around and head over to Waterton Canyon or to South Valley Park--both are great options.
The 2.4 mile, one-way hike up to Elk Valley in Roxborough State Park begins at the main connector trail that runs south from the visitor center. Pictured above, this nearly 1/2 mile connector takes hikers through a passageway created by the scrub oak trees overarching the trail. The undergrowth in this segment of the hike contains a lot of poison ivy. While the poison ivy is off to the side of the trail, it's still easy to brush up against. So, be aware as you make your way through this part of your hike. Also, keep alert for the many birds that make this thicket their home, especially the Western Tanagers that visit in the Spring.
The trail emerges from the shade of the scrub oak into a meadow framed by red rock and yellow cliff bands. A lone cottonwood with a bench stands in the open field of tall grass. One of the great things about Roxborough State Park is the strategic placement of benches, many of them offering shade and wonderful views into the park. At the meadow, the trail will pass through a junction with the South Rim trail and cross a dirt service road. At this point, the trail becomes more demanding, working up a series of switchbacks that lead in and out of the forested sides of the foothills.
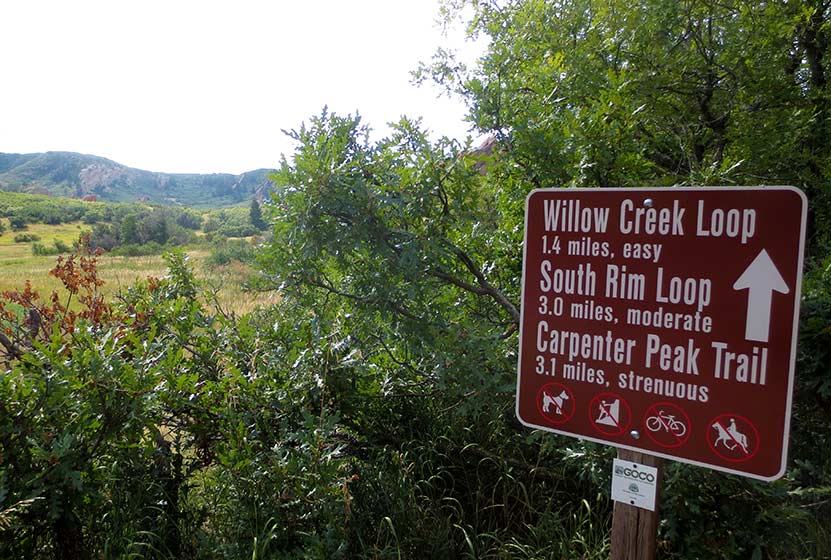
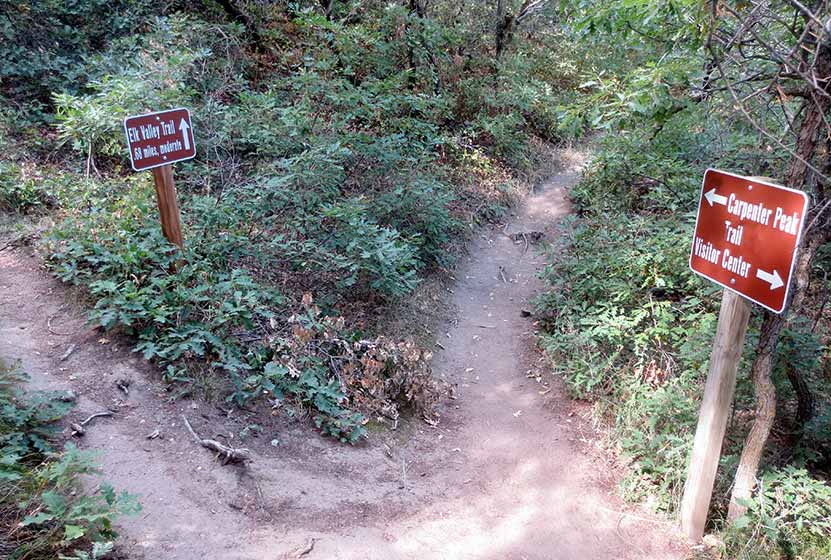
At 1.7 mile into the hike, the trail comes to a Y intersection (pictured below). The trail up the Carpenter Peak takes hikers to the right. The route to Elk Meadows and the Douglas Country Trails beyond it, lead off to the left.
The trail climbs through the forest then opens back to the oaks thickets where, in Autumn you'll hear the continual crunch of of acorns underfoot. Elk Valley comes into view before the trail comes to its end. Another bench sits in the shade of a pine tree and overlooks Elk Valley below. This is a quieter and less visited pat of Roxborough State Park and an ideal spot for viewing wildlife--especially in the early morning or at dusk.
Though the official Elk Valley hike ends at 2.4 miles in, the trail terminates at a junction with a set of Douglas County Trails and USFS trails. These can be used to create two different loop hike options.
Loop Hike Option #1: At the intersection, a 1.75 mile USFS Powerline Trail leads to the right, working its way North where it comes to a junction with the Carpenter Peak Trail. Here hikers can take a right, and hike approximately 1/2 mile to the summit of Carpenter Peak. From the summit, return to the visitor center by following the Carpenter Peak trail back down into the valley floor. This makes for a 7.7 mile strenuous loop hike.
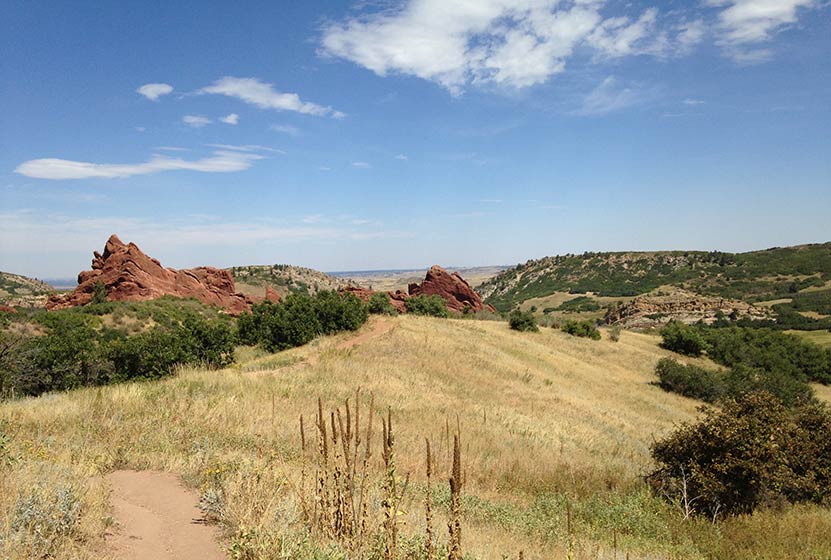
Loop Hike Option #2: At the intersection, a 1.28 stretch of Douglas County Trail leads off to the left. The trail works its way East over a small peak (pictured below), then descends to a junction with the Sharptail and Swallowtail trails. The route back into Roxborough State Park requires taking a left onto a dirt road, Iron Bark Drive. This .88 mile segment (pictured on the trail map) leads northwest back into the heart of the park. Back in the park, hikers can rejoin the trails that lead back to the visitor center. This demanding loop hike totals approximately 5.3 miles.
Tips & Resources for Hiking to Elk Valley in Roxborough
- Packing List: Always pack the 10 Essentials. Download our Hiking Guide to get list and dayhiking packing checklist.
- Dealing with Poison Ivy: You don't have to come into direct contact with poison ivy to get it. Often, it transfers from your clothing to your skin. So be sure to wash your clothing when you get home, if you think you have brushed up against it during your hike in Roxborough.
- Hiking in Winter: If you plan to hike Elk Valley in the winter, it is advised that you have traction devices like YakTrax because much of the trail will be in shadow, and ice will likely form on the trail.
- Trail Map for Roxborough State Park: Trail Map Link
- Colorado Road Conditions: Colorado Road Conditions
- After the Hike: Waterton Tavern in Roxborough
Weather
Map & Driving Directions
Click for Driving Directions
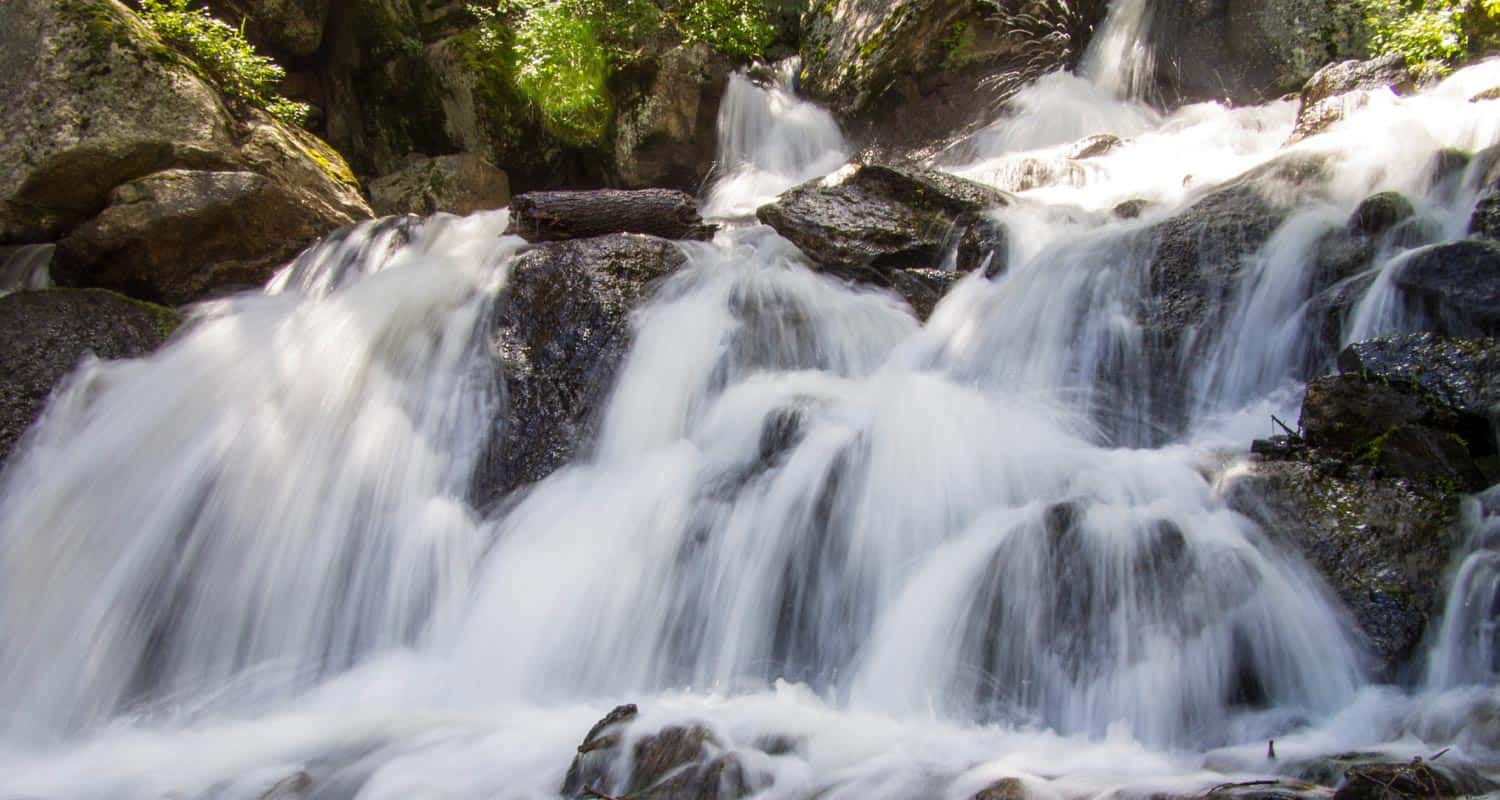
Catamount Falls Hike Near Colorado Springs
The hike to Catamount Falls is a moderate 2.8-mile loop hike about 25 minutes outside of Colorado Springs. This waterfall hike takes hikers to three different waterfalls and over two different creeks that spill down from the heights of Pikes Peak. It makes for a great weekend adventure, coupled with a great opportunity for brunch at the Pantry in Green Mountain Falls. Explore the full Catamount Falls hike profile below for driving directions, trail route description, and more tips and details to help you enjoy this adventure near Colorado Springs.
NOTICE: Catamount Trail access is closed from 8/4/21 to 9/1/21. For Details see Trails and Open Space Coalition Website.
Trail Snapshot: Catamount Falls in Colorado Springs
| Hike Distance | 2.8 miles |
|---|---|
| Difficulty | Moderate |
| Duration | Approx 1-2 hr |
| Trail Type | Loop |
| Starting Elevation | 7720' |
| Elevation Gain | Approx. +560' |
| Seasons | April through October |
| Dogs | Allowed On Leash |
| Denver Drive Time | 1 hr 30 min |
| Driving Directions to Ute Pass Avenue-Lake Street Trailhead | Click for Google Map |
| Town Nearest Hike | Green Mountain Falls, Colorado |
| Beauty | Waterfall, creek, mountain views, wildflowers |
| Activities | Hiking, photography |
Parking & Trailhead Information for Catamount Falls
The hike to Catamount Falls starts at Thomas Trailhead in the quaint mountain village of Green Mountain Falls. However, since there is no parking available at the Thomas trailhead, the hike must be started from the Gazebo Lake parking area in town. To get to Gazebo Lake, from interstate 25, take exit 141 and go west on Cimarron Avenue/US 24 for 13.5 miles to the Chipita Park/Green Mountain Falls exit. Following Green Mountain Falls Rd/Ute Pass Avenue for approximately 0.7 miles. Take a left onto Lake Street. Here you will find the parking area that lines the north side of the small lake.
The Hike: Catamount Falls Trail in Colorado Springs
The loop route below requires two segments along the streets of Green Mountain Falls. The first 0.4 mile segment of the hike will takes hikers from Gazebo Lake to the Thomas Trailhead. Beginning at Gazebo Lake, walk the roadside of Ute Pass Avenue that follows the southern edge of Gazebo Lake. Take a right at the first intersection onto Hotel Street. The streets can be a bit confusing in Green Mountain falls, and Hotel Street will soon turn into Park Avenue. Follow Park avenue as it winds up to its intersection with Boulder Street, a dirt (and sometimes muddy) road that terminates at the Thomas Trailhead.
Once on the Thomas Trail, yellow circle blazes mark the way. The initial stretch of trail leads to the base of the first waterfall on this hike, Crystal Falls @ 0.5 mile. This set of cascades is formed by Crystal Creek as it runs down the mountainside from a Crystal Creek Reservoir, one of the lakes situated above Green Mountain Falls on the flanks of Pikes Peak. A bit further up the trail, there is an observation area for taking in the larger leaps of the falls.
The next 0.7 mile segment of the Thomas Trail leads to the second waterfall, Catamount Falls, and is the more demanding portion of the hike. The trail climbs west/northwest until it arrives at Thomas Trail Memorial. After the memorial, Catamount Falls is just a short ways further up the trail. A spur trail leads from the left/south to the site of Catamount falls.
From Catamount Falls, the next segment of trail goes north to take hikers back into Green Mountain Falls. Yellow blazes mark the way across the creek and back to the Thomas Trail. Soon the trail will encounter an intersection with the Catamount trail at the Catamount Trailhead. Staying on the Thomas Trail, it will cross a small footbridge where a third small waterfall can be viewed. The trail then terminates at Belvedere Avenue.
Here, the final 1-mile segment of this loop hike begins. Taking a right onto paved Belvedere Avenue, it will lead east, back into town. Belvedere Avenue will eventually merge with Ute Pass Avenue. Going South/Right on Ute Pass Avenue then leads back to Gazebo Park.
You may be wondering, "What is a 'catamount?'" A catamount is a mountain lion, also known as a cougar. The Catamount Reservoir and Catamount Creek are both named after this creature that lives in the wilds of Colorado.
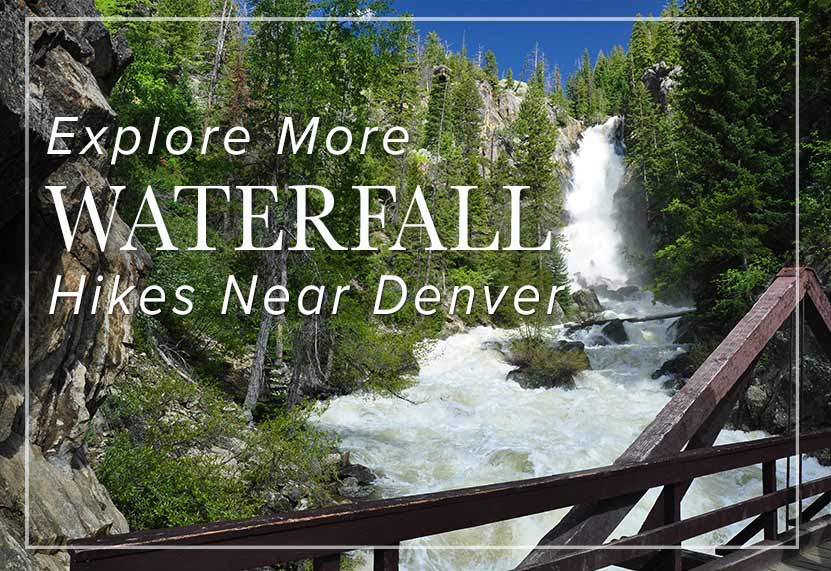
Looking for more waterfalls near Denver? Explore our more than 50 Colorado Waterfall Hikes, our favorite Waterfall Hikes in Rocky Mountain National Park, or 7 Waterfalls within One Hour of Denver.
Tips & Resources for Hiking to Catamount Falls in Colorado Springs
- Watch for yellow markers: These will guide you along the Thomas Trail.
- Get there early: This can be a crowded hike on the weekends.
- Parking: Out of respect for the residents of Green Mountain Falls, refrain from parking along the roads near the trailhead. Instead, park at Gazebo Lake and follow the trail description above.
- A Shorter Option: For those looking for a less demanding hike to just one waterfall, follow the route above to take in Crystal Falls only. This makes for a less demanding 1 mile, out-and-back hike.
- Packing List: Always pack the 10 Essentials. Download our Hiking Guide to get the list and dayhiking packing checklist.
- Colorado Road Conditions: Colorado Road Conditions
- Photo: We would like to express our gratitude to Ethan Beute for sharing such an amazing photograph of this hike to Catamount Falls in Colorado Springs.
- After the Hike: The Pantry Restaurant: One of our favorite breakfast places in all of Colorado
Weather
Map & Driving Directions
Click for Driving Directions

Raccoon Loop Hike in Golden Gate Canyon State Park
Our kids loved this 2.5 mile loop hike in Golden Gate Canyon State Park. The trail sports lots of shade, panoramic views of snowcapped peaks, wildflowers, and trickling brooks. Be sure to see the details below regarding an annual raptor closure that detours one segment of this hike. Explore the full Raccoon Loop Hike profile for trail map, driving directions, and many of the details you need to enjoy this adventure in Golden Gate Canyon State Park.
Trail Snapshot: Raccoon Trail Loop at Golden Gate Canyon
| Hike Distance | 2.5 miles |
|---|---|
| Difficulty | Easy |
| Duration | Approx 1.5 hr |
| Trail Type | Loop |
| Starting Elevation | 9120′ |
| Elevation Gain | Approx +500′ |
| Seasons | Year Round |
| Dogs | Allowed On 6' Leash |
| Hike Trail Map | Click for a Map of Golden Gate Canyon State Park |
| Denver Drive Time | 1 hr |
| Driving Directions to Panorama Point Trailhead | Click for Google Map |
| Driving Directions to Reverends Ridge Campground Trailhead | Click for Google Map |
| Town Nearest Hike | Golden, Colorado |
| Beauty | Mountain range views of snowcapped peaks, wildflowers, aspens |
| Activities | Hiking, mountain biking, photography, snowshoeing in winter |
| Fee | Colorado State Parks Pass Required |
Parking & Trailhead Information for the Raccoon Loop Hike
You can begin your hike at either the Panorama Point Trailhead or at the Reverend Ridge Campground Trailhead. Our family hiked this from the Panorama Point Trailhead. Though parking is limited, there is additional parking located directly across the street in a dirt lot. Reverend Ridge Trailhead, while a larger parking area, can fill up fast because it is located at the campground. Either one, however, is a good option. Driving directions for both trailheads are located in the trail snapshot above.
The Hike: The Raccoon Loop Hike in Golden Gate Canyon
We hiked the Raccoon Loop counter-clockwise from the Panorama Point Trailhead and found it to be easy to moderate in difficulty. Our kids (at the time of this post) are 5 and 8. Both were wearing tennis shoes and did well on the trail. There was a steep segment with loose rock, where our youngest needed me to hold her hand as she navigated here way down the trail.
The trail begins with incredible views of the snowcapped Indian Peaks stretched out against the western sky. Soon, views of Thorodin Mountain and Starr peak dominate the landscape as the trail winds to the east and crosses a seasonal brook. Raccoon Trail then gently drops into aspen groves and green meadows full of wildflowers.
Entering a more mature stand of aspens, the trail begins a more steep descent. This is where hikers will want to watch their footing on the loose rock and gravel surface of the trail. After this short descent, the trail crosses another brook over a small footbridge, then begins to climb a bit further west before turning sharply to the south.
Shortly after the brook is where we encountered the closure of approximately 0.5 mile of the Raccoon trail. These closures are announced on the front page of the Golden Gate Canyon State Park website, and we knew about it before making our trip.
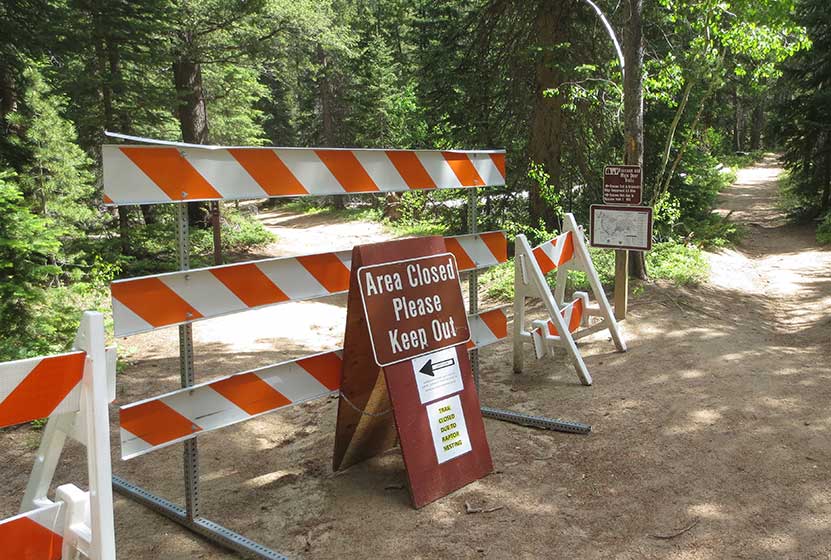
This rerouted us up to the Reverend Ridge Campground, then required that we hike down State Park Road for about 0.5 mile until we were able to pick up the Raccoon Trail again. Because the detour wasn't clearly marked, we've provided an image of the normal route vs. the detour route we took below.
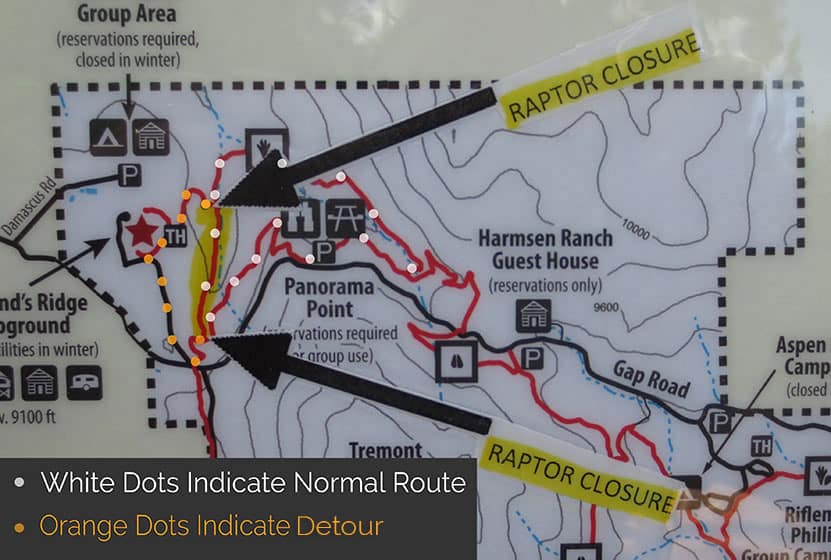
It probably goes without saying, but do exercise caution when walking the road, and assume that cars will not see you. There are several sharp turns/switchbacks. We were able to pick up the trail down where the road comes to a stop sign, then hike back to Panorama Point. The detour adds approximately 1 mile to the original hike, making this into a 3.5 mile loop hike.
This last section had some elevation gain, but still was moderate in difficulty. This is a great hike for visiting friends and family, but those who have not acclimatized to the altitude, or who are not in the best shape, may find this last part challenging. There is a bench strategically placed on the ascent, and rocks where you can rest your legs.
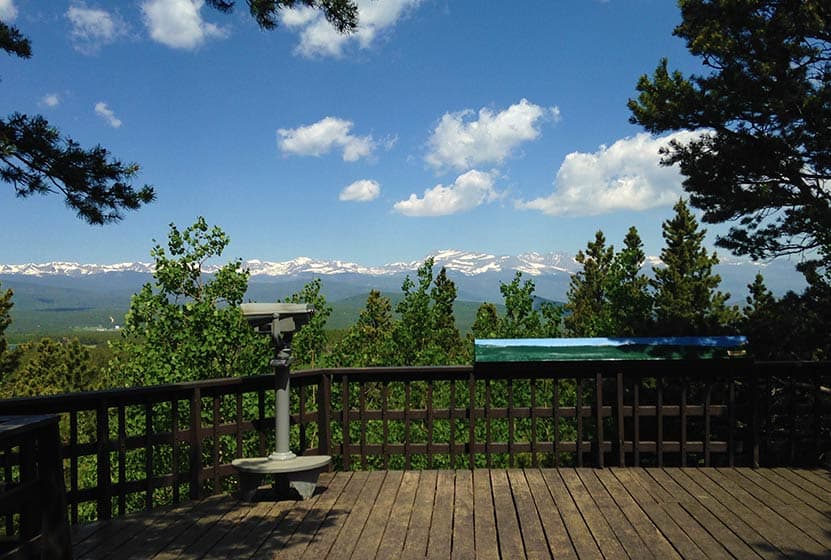
At Panorama Point, hikers will find a large deck and viewing area. It's one of the best accessible views you'll get of the Front Range near Denver.
Tips & Resources for Hiking the Raccoon Loop Hike
- Be Aware of Closures: The Raccoon Loop has seasonal closures when raptors are nesting. However, it's just one segment of the trail that is closed, and a (not-so-well-marked) detour is available.
- Look out for Mtn Bikers: We always find mountain bikers to be considerate on the trails near Denver. There is an established etiquette and they will call their pass. Still, it's good to know that this trail is popular with both mountain bikers and hikers, so keep your eyes and ears peeled and give them plenty of room to pass.
- Trail Map for Golden Gate Canyon State Park: Trail Map Link
- Packing List: Always pack the 10 Essentials. Download our Hiking Guide to get the list and dayhiking packing checklist.
- Colorado Road Conditions: Colorado Road Conditions
- After the Hike: Windy Saddle Cafe in Golden, Colorado
Weather
Map & Driving Directions
Click for Driving Directions to Panorama Point Trailhead
Cub Lake Loop in Rocky Mountain National Park
The Cub Lake Loop Hike in Rocky Mountain National Park is a great alternative to the an out-and-back hike up to Cub Lake. Along the way, hikers will pass by Windy Gulch Cascades, travel alongside the Big Thompson River, cross over an area called The Pool, journey through wetlands, and will be surrounded by sights of a glacial-shaped landscape. Explore the full hike profile below for trail map, driving directions, and all the details you need to enjoy this adventure in Rocky Mountain National Park.
Note: Rocky Mountain National Park now requires timed entry permits from May 27th through October 10th. See the RMNP permits page for more information.
Trail Snapshot: Cub Lake Loop in Rocky Mountain National Park
| Hike Distance | 6 miles |
|---|---|
| Difficulty | Moderate |
| Duration | Approx 2-4 hrs |
| Trail Type | Loop |
| Starting Elevation | 8080' |
| Elevation Gain | Approx. +540' |
| Seasons | Spring through Fall, Winter Snowshoeing |
| Dogs | Prohibited in RMNP |
| Hike Trail Map | Click for a Map of Cub Lake Loop RMNP |
| Denver Drive Time | 1 hr 40 min |
| Driving Directions to Cub Lake Trailhead | Click for Google Map |
| Driving Directions to Fern Lake Trailhead | Click for Google Map |
| Driving Directions to Park & Ride Trailhead | Click for Google Map |
| Town Nearest Hike | Estes Park, Colorado |
| Beauty | Sub-alpine lakes, mountain views, meadows, river, wildlife: Abert's squirrel, elk, deer, moose, duck, bear; yellow pond lilies and wildflowers |
| Activities | Picnicking, hiking trails, snowshoeing, horseback riding, backcountry camping (with a permit) |
| Fee | Park Pass Required |
Cub Lake Loop Hike Waypoints
A: 0.0 miles : Cub Lake Trailhead
B: 0.2 miles : Parking Lot
C: 0.8 miles : Fern Lake Trailhead
D: 2.5 miles : The Pool
E: 3.5 miles : Cub Lake Trail - Hollowell Park Trail Intersection
F: 3.7 miles : Cub Lake
G: 5.7 miles : Cub Lake Trail - South Lateral Moraine Trail Intersection
H: 6.0 miles : Cub Lake Trailhead
Parking & Trailhead Information for Cub Lake Loop
The Cub Lake Trailhead in Rocky Mountain National Park has a very small parking area where only 7 to 8 vehicles can park. Chances are, if you don't arrive early in the morning, you'll need to park just .3 mile further down the road at the Fern Lake Bus Stop parking area. If both lots are full, then your best bet is to park in the RMNP Park & Ride lot and use the shuttle service to get to the Cub Lake Trailhead. Please do not park alongside the road. This causes significant erosion and damage to roadside--and you might get a ticket.
The Hike to Cub Lake Loop in RMNP
This hike profile for the Cub Lake Loop in RMNP is hiked counter-clockwise from the Cub Lake parking area. However, it can be hiked the other direction--it's all a matter of preference. The hike can also be started at the Fern Lake Trailhead.
Beginning at the Trailhead, the first mile follows the dirt road past the Fern Lake bus stop, then through a grove of aspens to the Fern Lake trailhead. The first sight along the trail worth stopping to see are the Windy Gulch Cascades. They are about .4 mile into the Fern Lake Trail, tucked away in a gulch high above the valley. You'll hear them first, but a footbridge and water across the trail will key hikers into the location of the cascades. We've created a full hike profile on Windy Gulch Cascades, if you would like more detailed information on this hidden waterfall in Rocky Mountain National Park.
The next sight along the trail is Arch Rocks, where the trail winds through a series of boulders, including two massive rocks that fell from the cliffs above into the valley many eons ago. Shortly after Arch Rocks, the sounds of the Big Thompson River, Spruce Creek, and Fern Creek will fill the air. At the confluence of these streams, a bridge crosses the area named "The Pool."
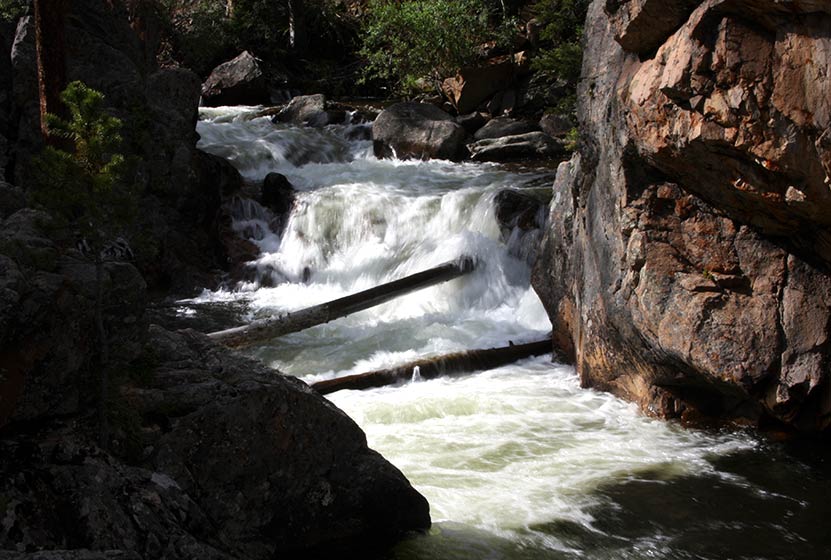
The Pool - Courtesy of Steve Wallace
After crossing the bridge at The Pool, the trail splits. The right-hand trail makes its way up to Fern Falls and Fern Lake. The left-hand trail leads to the lake--this left-hand trail is the correct trail for completing the loop. The trail then bends south, then turns east and climbs up the South Lateral Moraine. This 1.2 mile segment from the Pool to Cub Lake is the most demanding part of the hike. The trail encounters a second trail junction with the Hollowell Park Trail which bears to the right. The trail to Hollowell Park is a beautiful detour, but leads away from Cub Lake. To stay on the Cub Lake loop, hikers will continue east on the Cub Lake Trail.
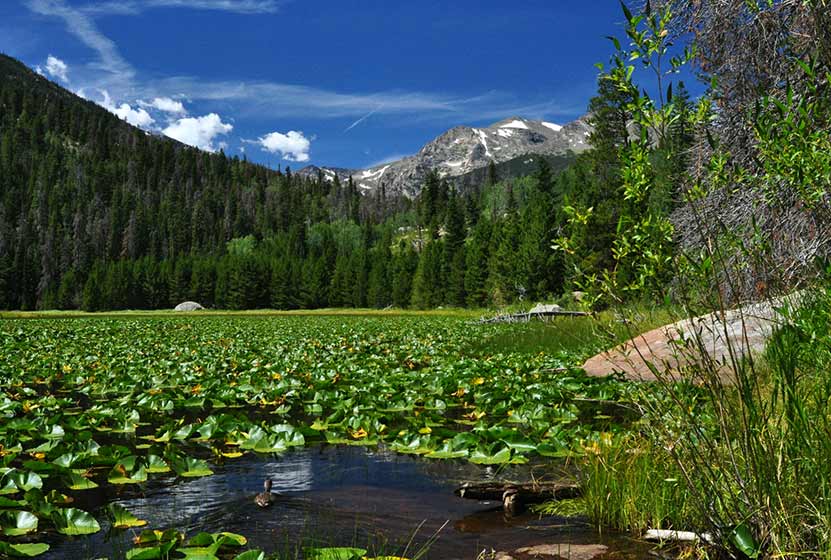
A Sea of Lily Pads on Cub Lake - Courtesy of Steve Harbula
Soon after the junction, the trail descends to Cub Lake. Some of the best views of the Lake come from this segment of trail. The trail then runs along the shore of the Lake before it makes a steep descent through a strange and wild area scraped by an ancient glacier and riddled with boulders.
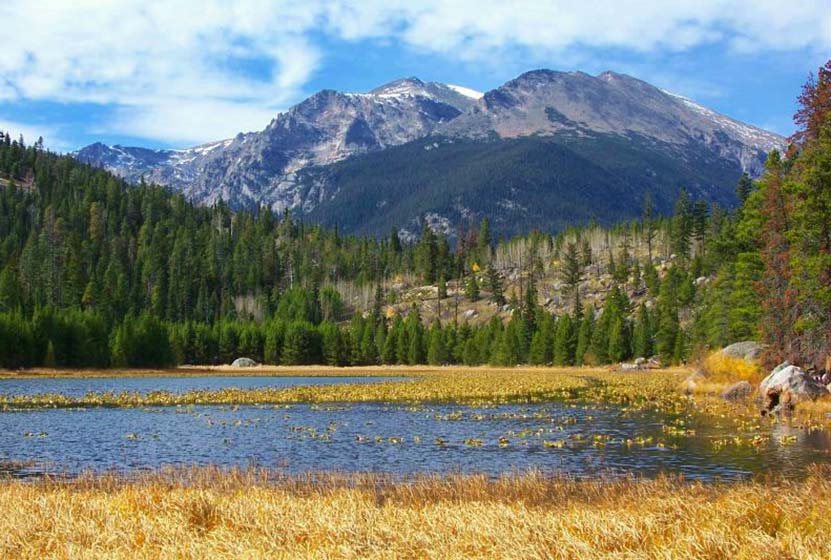
Cub Lake in RMNP - Courtesy of Barbara Morgan
The final trail segment leads through forest and marshland, across bridges, and down into the western edges of Moraine Park. Here, hikers will likely see elk grazing, and hear and see an extensive variety of birds among the shrubs and aspens. Before crossing into Moraine Park, the trail will split again. The right-hand trail leading along the South Lateral Moraine. The trail back to the Cub Lake and Fern Lake Trailheads, continues North/Left for about 1/3 of a mile back to the Cub Lake Trailhead.
Tips & Resources for Hiking to Cub Lake Loop in RMNP
- TIP: It is advisable to arrive early as parking is limited. One may opt to ride a shuttle that drops you off at the trailhead.
- TIP: Take advantage of the free park shuttle to get to the trailhead during peak seasons.
- Bring A Picnic Lunch: The banks along the Big Thompson River can be a great place for picnics.
- Bug Spray: Because of the amount of water along this hike, hikers will likely encounter a fair share of mosquitos; so, bring some bug spray.
- Trail Map for Bear Lake Corridor: Trail Map Link
- Packing List: Always pack the 10 Essentials. Download our Hiking Guide to get list and dayhiking packing checklist.
- Colorado Road Conditions: Colorado Road Conditions
- Photo: We would like to express our gratitude to Andrew Mace for sharing such an amazing photograph of this hike in RMNP.
- After the Hike: Mountain Home Café
Weather
Map & Driving Directions
Click for Driving Directions
Monarch Lake Loop Hike
The Monarch Lake Loop is a perfect family hike that leads 4 miles through shaded forest, across creeks, and along the shore of the lake. It's one of the more diverse, but easy, hikes in the area. Monarch Lake is a popular destination for canoeing, kayaking, and access to the Indian Peaks Wilderness area. Explore the full Monarch Lake Loop hike profile below for trail map, driving directions, and many of the details you need to enjoy this adventure in Grand County, Colorado.
Trail Snapshot: Monarch Lake Loop, Colorado
| Hike Distance | 4 miles |
|---|---|
| Difficulty | Easy |
| Duration | Approx 2-3hr |
| Trail Type | Loop |
| Starting Elevation | 8400′ |
| Elevation Gain | Approx +300′ |
| Seasons | All Year, Road open from June 16 to Nov. 14 |
| Dogs | Allowed On Leash |
| Hike Trail Map | Click for a Map of Monarch Lake Loop |
| Denver Drive Time | 2 hr 50 min |
| Driving Directions to Monarch Lake, CO | Click for Google Map |
| Town Nearest Hike | Granby, Colorado |
| Beauty | Lake, shaded forest, wetlands, wildlife: moose, elk, deer, fox, waterfowl |
| Activities | Hiking, canoeing, horseback riding, photography, fishing |
| Fee Required | ANRA Day Use Fee |
Parking & Trailhead Information for Monarch Lake, Colorado
Following the driving directions in the above trail snapshot for Monarch Lake, the road will end at the Monarch Lake Trailhead. Here, you'll find parking spaces for about 40 vehicles. The parking area fills fast and cars and trucks often line both sides of the road to the trailhead. An Arapahoe National Recreation Area day use pass is required and can be purchased at the kiosk at the Arapahoe Bay Pay Station. This pay station is located shortly after you turn onto County Hwy 6 and before crossing over the dam. While Monarch lake is open in the winter, and Hwy 6 is plowed, the approximately 1 mile final segment of road that leads into the trailhead is closed from Nov. 15 to June 15. Because of this, hikers will have to park and snowshoe, cross-country ski, or hike in to the trailhead.
The Hike: Monarch Lake, CO
From the trailhead, a shaded tunnel of trees leads down a short gravel path to the Wilderness Information Cabin. Here you can pick up trail maps and information about hikes up into the Indian Peaks Wilderness area. The trail description here is of hiking the Monarch Lake Loop in a clockwise fashion. Begin on the Cascade Creek trail #N1. This will follow the shoreline of the lake and soon enter the forested area along the Northern end of the lake. After approximately 1 mile, the landscape changes and enters a wetland marsh. Keep your eyes peeled for moose and other wildlife here.
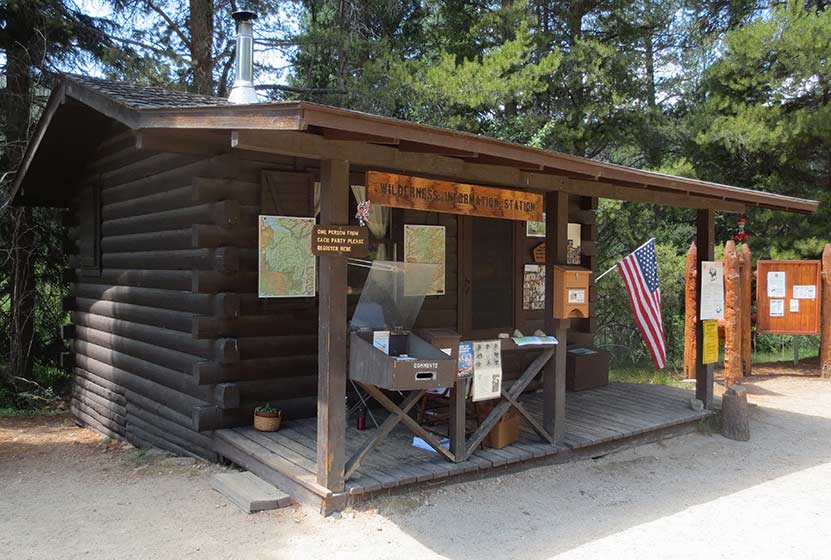
Wilderness Info Cabin at Monarch Lake
After 1.5 miles on the Cascade Creek Trail, the loop will be continued by taking a right onto the Arapaho Pass Spur Trail. This will head south, crossing Buchanan Creek, then Arapaho Creek. Here, after .8 mile, the spur trail ends and the Arapaho Pass trail begins. This last segment on the Arapaho Pass trail #N6 is 1.7 miles long.
Because of the pine beetle kill, there are many dead trees throughout the Monarch Lake Loop hike. Be alert for falling trees, especially when gusts of wind blow through. Hikers may also encounter deadfall across the trail. Be careful going under any fallen trees as they are often unstable and may only be supported by a few small, dead branches.
The hike continues on the south shore of the lake, passing an old, rusty steam engine. These "steam donkeys" were used to pull logs down out of the mountains back in the logging camps of the 1800's. After the steam engine, the trail will cross two more creeks, and finally make its way across the dam at the northwestern end of the Lake.
Because this hike is so perfect as a family outing, or for visiting family and friends, we recommend the following day trip:
1) Leave early (take breakfast with you) and arrive at the trailhead at or before 8AM (better chance of seeing wildlife and better parking)
2) Hike Monarch Lake
3) Drive over Trail Ridge Road (fee required--but worth every penny)
4) Eat a late Lunch in Estes Park (so bring snacks)
5) Head back home or drive in to Moraine Park in Rocky Mountain National Park.
Tips & Resources for Hiking the Monarch Lake Loop
- Fishing: Monarch Lake is a popular fishing spot for trout. Colorado State fishing regulations apply.
- Falling Trees: Because of the amount of dead trees in this area, hikers should be on alert for falling trees.
- Trail Map for Monarch Lake Area: Trail Map Link
- Packing List: Always pack the 10 Essentials. Download our Hiking Guide to get list and dayhiking packing checklist.
- Colorado Road Conditions: Colorado Road Conditions
- After the Hike: Mavericks Grill in Granby, CO
Weather
Map & Driving Directions
Click for Driving Directions
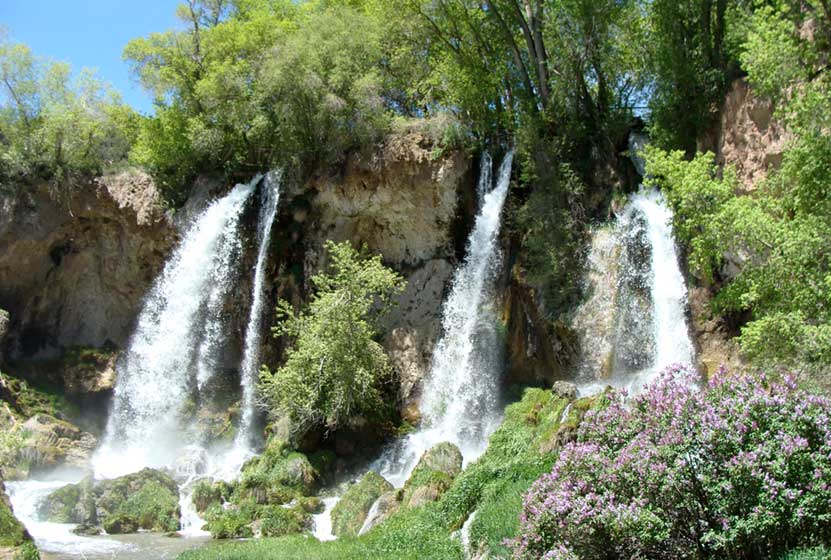
Rifle Falls Hike Colorado
Rifle Falls is a 70 foot, triple waterfall in Rifle Falls State Park. It's just .1 mile hike to the base of the falls along a paved, handicap accessible trail. The caves hidden along the waterfall beckon those looking for more adventure. Explore the full Rifle Falls hike profile below for trail map, driving directions, and more of the details you need for this short waterfall Hike in northwestern Colorado.
Trail Snapshot: Rifle Falls Colorado
| Hike Distance | 0.2 to 1.5 mile Round Trip |
|---|---|
| Difficulty | Easy |
| Duration | 30 minutes |
| Trail Type | Out & Back or Loop |
| Starting Elevation | 6500′ |
| Elevation Gain | Negligible to +100' |
| Seasons | Year Round |
| Dogs | Allowed On Leash |
| Hike Trail Map | Click for a Map of Rifle Falls State Park, Colorado |
| Denver Drive Time | 3 hr 30 min |
| Driving Directions to Rifle Falls | Click for Google Map |
| Town Nearest Hike | Rifle, Colorado |
| Beauty | Waterfall, Caves, Rifle Creek |
| Activities | Hiking, great picnic facilities, caves, fishing, photography |
| Fee | See the Rifle Falls Fees Page |
Parking & Trailhead Information for Rifle Falls, Colorado
Because Rifle Falls State Park is one of the more popular State parks to visit in Colorado, it often has very limited parking. We highly recommend that you arrive when the park opens at 7AM. If you do not have a Colorado State Parks pass, then you will need to pay the access fee for the park at the kiosk. If the lot is full, visitors will be turned away. As with almost all trailheads in Colorado, Monday through Thursday are the best days for avoiding traffic. However, in the busy summer season, when the weather is amazing and vacation season is in full swing, the park is often at capacity.
The Hike: Rifle Falls
The base of the waterfall can be accessed via 1/10th mile hike on a paved trail that is considered ADA accessible. The falls launch 70 feet over a limestone cliffside, reminiscent of Hanging Lake, near Glenwood Springs. It is a segmented waterfall, breaking into three distinct waterfalls. The spray and mist from the falls makes the surrounding scenery unique. Moss covered rock, flowers, brush, trees, and the roar of the falls make this a real oasis in the oft dry landscape of western Colorado.
The Coyote Trail crosses the creek and leads hikers on a 1.5 mile loop that includes both caves and the area above the waterfall. Following the loop counter-clockwise, the caves will soon become visible on the left-hand side of the trail. After the caves, the loop continues back towards the top of the waterfall area and crosses the creek before making its way back to the shaded picnic grove and parking area.
Rifle Falls in Winter
Rifle Falls State Park is open all year round. It's Colorado, so expect snow and ice on the trail in the late Autumn through late Spring.
Camping at Rifle Falls
There are 20 camping spots at Rifle Falls State Park. Thirteen are drive-in camping and seven are walk-in sites. All are along Rifle Creek. A number of the sites are reservable from May 1 to Oct. 31, and others are available on a first-come basis. Weekdays have better availability than weekends, and the campsites are in less demand November through April. Because Rifle Falls State Park is open year-round, camping is available year-round as well. Pets are allowed, but must be kept on a 6' leash.
Weddings at Rifle Falls
The Waterfall is also a popular place to tie the knot. The Mountain Mist Amphitheater is reservable and has a capacity of 50. All arrangements must be made ahead of time with the parks office (970) 625-1607. All vehicles must pay the fee or have a Colorado State Parks Pass. Because of the limited parking, those coming for a wedding should plan to car pool or be dropped off at the park.
Tips & Resources for Hiking at Rifle Falls State Park
- Go Early: Rifle Falls State Park is small and very popular. The park opens at 7AM, and we recommend that you arrive early for parking.
- Bring a Flashlight or Headlamp: If you plan to explore the caves, you'll need a light. Bring a flashlight or headlamp to light up some of the chambers you'll discover in the caves.
- Trail Map for Rifle Falls State Park: Trail Map Link
- Packing List: Always pack the 10 Essentials. Download our Hiking Guide to get list and dayhiking packing checklist.
- Colorado Road Conditions: Colorado Road Conditions
- After the Hike: Oliver Ridleys Coffee
- Photo: We would like to express our gratitude to Jimmy Thomas for sharing such an amazing photograph of this hike.
Weather
Map & Driving Directions
Click for Driving Directions
Bierstadt Lake in Rocky Mountain National Park
Bierstadt Lake is a short destination hike in Rocky Mountain National Park to a sub-alpine lake with great panoramic views. At Bierstadt Lake, the trail forms a 1 mile loop along its shores, making it a perfect leisurely hike with friends. Bierstadt lake can be accessed from several different trailheads with differing terrain and demand. Explore the full Bierstadt Lake hike profile below for trail map, driving directions, and more of the details you need to enjoy this adventure in Rocky Mountain National Park.
Note: Rocky Mountain National Park now requires timed entry permits from May 27th through October 10th. See the RMNP permits page for more information.
Trail Snapshot: Bierstadt Lake in Rocky Mountain National Park
| Hike Distance | 3.2 to 4.8 miles Round Trip (depending on trailhead and adding loop) |
|---|---|
| Difficulty | Easy to Moderate |
| Duration | Approx 2 hrs Round Trip |
| Trail Type | Out and Back or Lollipop Loop |
| Starting Elevation | 8850′ |
| Elevation Gain | +566' from Bierstadt TH, +255' from Bear Lake TH |
| Seasons | Spring through Fall, Winter Snowshoeing |
| Dogs | Dogs Prohibited in RMNP |
| Hike Trail Map | Click for a Trail Map |
| Denver Drive Time | 2 hr |
| Driving Directions to Bierstadt Lake Trailhead | Click for Google Map |
| Driving Directions to the Bear Lake Trailhead | Click for Google Map |
| Driving Directions to Park & Ride Trailhead | Click for Google Map |
| Town Nearest Hike | Estes Park, Colorado |
| Beauty | Sub-alpine lakes, mountain views, wildlife: Abert's squirrel, elk, deer, waterfowl, moose; aspen trees |
| Activities | Picnicking, Hiking Trails, Snowshoeing |
| Fee | Park Pass Required |
Parking & Trailhead Information for Bierstadt Lake Trail
Bierstadt Lake can be accessed from several trailheads in Rocky Mountain National Park. Driving directions to all of these trailheads are available in the Bierstadt Lake trail snapshot above. Review the options below to find the best fit for your hiking plans.
From the Bierstadt Trailhead: Limited parking and the most difficult route because of the elevation gain traversing Bierstadt Moraine. This route is 1.4 miles to the lake with +566' elevation gain.
From Bear Lake Trailhead: Recommended for those looking for a less demanding hike to Bierstadt Lake. This way is 1.6 miles to the lake with about +255' elevation gain.
From the Park & Ride lot in RMNP: There is a trail on the northwestern edge of the parking lot that leads directly to Bierstadt Lake. It is approximately 1.5 miles from the parking lot to Bierstadt Lake and a less demanding route than hiking from the Bierstadt Trailhead.
The Hike: Bierstadt Lake Trail in RMNP
The hike to Bierstadt Lake will be different depending on your starting point. I've hiked the trail starting at the Bierstadt Trailhead. It's demanding. The Bierstadt Moraine will require a lot from your quads. So, if you take this route, be sure to bring some trekking poles.
The route from Bear Lake can be accessed by hiking the paved path from the trailhead to Bear Lake, then taking the first right-hand trail, which is the one that leads to Flattop Mountain. You may be thinking, "Flattop is in the west, and Bierstadt Lake is in the east." You're right, and the trail will soon (after approx. 1/2 mile) split. At this first junction, the right-hand path will take you Northeast into the Mill Creek Basin area.
Down in Mill Creek Basin, a spur trail, to the right, will lead to Bierstadt Lake. If you want to make your hike a bit longer, you can pass this spur trail, and hike further through the basin for about another 1/2 mile until you encounter a 2nd spur trail that leads (to the right/east) over to Lake Bierstadt.
Hikers can pick a spot to rest and enjoy the sites of the lake, or they can continue around the 1 mile loop trail that encircles it. The best views are from the east side, and are worth the extra distance to take in some incredible views of the Rocky Mountains.
Tips & Resources for Hiking to Bierstadt Lake in RMNP
- Trekking Poles: For most hikes in RMNP, especially if you are traveling on unmaintained trails, we recommend using Trekking Poles. They take a lot of weight off the knees and help in navigating uneven terrain.
- TIP: The Bierstadt Lake trailhead has limited parking. You can opt to park at Bear Lake, or the Park & Ride trailhead instead.
- Fishing: Bierstadt Lake is not on the list of fishable lakes in RMNP.
- Trail Map for Bear Lake Corridor Trails: Trail Map Link
- Packing List: Always pack the 10 Essentials. Download our Hiking Guide to get list and dayhiking packing checklist.
- Colorado Road Conditions: Colorado Road Conditions
- Photo: We would like to express our gratitude to Chris for sharing such an amazing photograph of this hike to Bierstadt Lake in RMNP.
- After the Hike: Baba's Burgers & Gyros
Weather
Map & Driving Directions
Click for Driving Directions