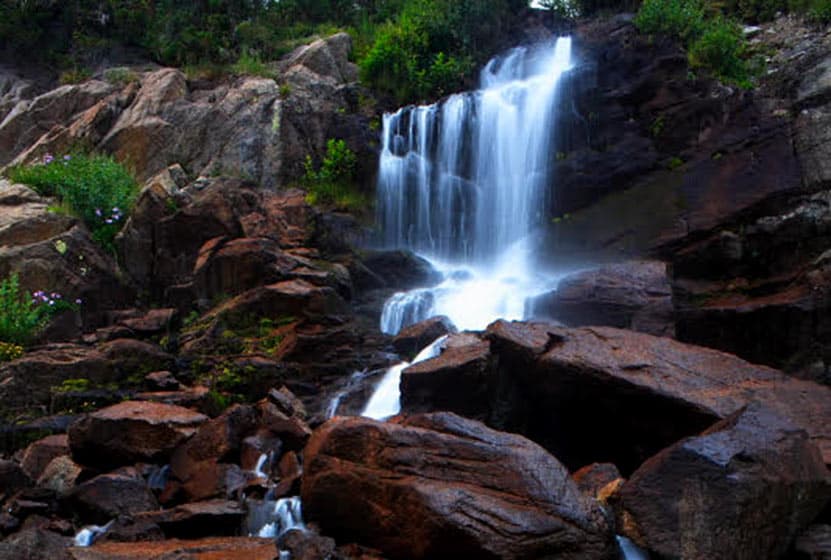
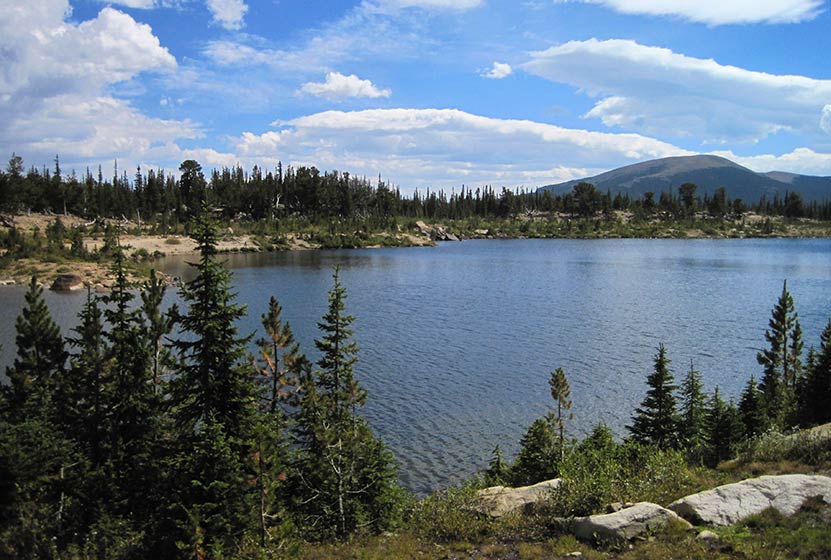
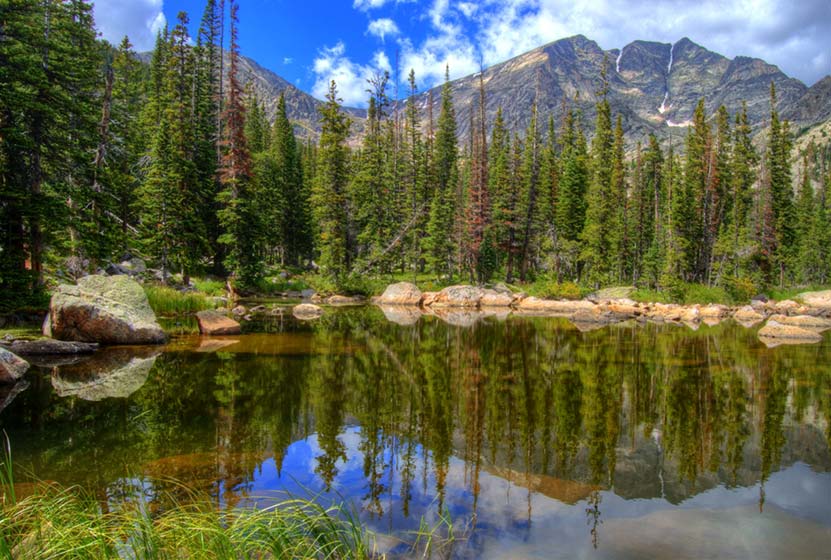
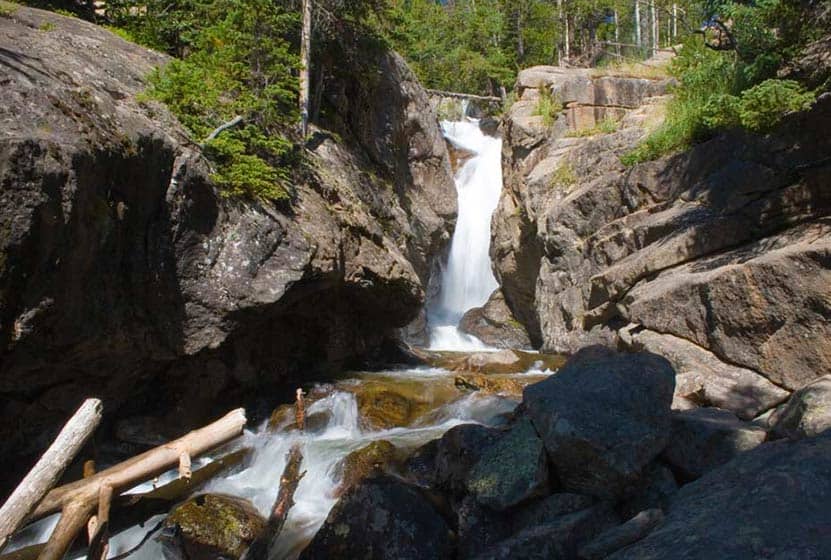
Horseshoe Falls in Rocky Mountain National Park
Horseshoe Falls in Rocky Mountain National Park is a favorite family hike near Estes Park, Colorado. It's a short and easy hike from the Alluvial Fan Trailhead, but the falls can also be viewed from the roadside. It's an extensive cascade waterfall, named for the way it bends its course through the rocky hillside. Explore the full Horseshoe Falls hike profile below for trail map, driving directions, and more tips and details to help you enjoy this adventure in Rocky Mountain National Park.
Note: Rocky Mountain National Park now requires timed entry permits from May 27th through October 10th. See the RMNP permits page for more information.
Trail Snapshot: Horseshoe Falls in Rocky Mountain National Park
| Hike Distance | 0.4 mile Round Trip |
|---|---|
| Difficulty | Easy |
| Duration | Approx less than 1 hr Round Trip |
| Trail Type | Out and Back |
| Starting Elevation | 8550' |
| Elevation Gain | Approx. +130' |
| Seasons | Spring through Fall, Winter Snowshoeing |
| Dogs | Prohibited in RMNP |
| Hike Trail Map | Click for a Map of Horseshoe Falls RMNP |
| Denver Drive Time | 1 hr 40 min |
| Driving Directions to West Alluvial Fan Trailhead | Click for Google Map |
| Driving Directions to East Alluvial Fan Trailhead | Click for Google Map |
| Town Nearest Hike | Estes Park, Colorado |
| Beauty | Waterfall, mountain views, meadows, river, wildlife: elk, big horn sheep, Abert's squirrel, deer, moose, bear; wildflowers |
| Activities | Picnicking, hiking trails, snowshoeing, horseback riding, backcountry camping (with a permit), photography |
| Fee | Park Pass Required |
Parking & Trailhead Information for Horseshoe Falls
Horseshoe Falls can be accessed just outside Estes Park, Colorado by taking Fall River Road to Old Fall River Road. The East Alluvial Fan Trailhead is approximately 1/2 mile up Old Fall River Road, and the West Alluvial Fan Trailhead is just about 1/4 of a mile further. Because Horseshoe Falls is popular destination in RMNP, the parking fills up fast. There is an additional parking area just before reaching the East Alluvial Fan Trailhead, see this link for driving directions and map.
The Hike: Horseshoe Falls Trail in RMNP
This short hike to Horseshoe Falls got even shorter because of the 2013 flooding in the Estes Park and Rocky Mountain National Park area. As of this writing (6/30/2016) both the East and West Alluvial Fan Trailhead parking areas have reopened. However, the trails are still buried under rock and debris, and the bridge--which used to be a great viewing platform for Horseshoe Falls--has not been replaced. This doesn't mean a short hike up to the base of the falls is impossible, but it does require a some care in navigating the terrain. The official RMNP communications ask hikers first consult posted signs or speak with a park ranger before making the trek. As with all off-trail hiking along rivers, it's important to exercise caution near fast moving water and on the surrounding slippery surfaces of rocks and logs.
When the trail is repaired (assuming that it will use the same route), the Alluvial Fan Trail can be hiked from either of the two lots to the bridge viewing area, which is just under 1/4 mile one-way.
Horseshoe Falls and the larger Alluvial Fan area have an interesting history. Before the establishment of Rocky Mountain National Park, a twenty-six foot high dam was built to enlarge Lawn Lake, which is located about 6.5 miles north of Horseshoe Falls and a major source of the Roaring River. On a perfectly normal day in the Summer of 1982, an almost 100 foot stretch of the dam collapsed and sent a 30-foot high wall of water careening down the valley. At Horseshoe Park, much of the wash settled into what is now known as the 42 acre Alluvial Fan, comprised of sorted gravel, boulders--some over 400 tons--and streams of sand. Three people lost their lives in the flood, one camper, and two folks who had ventured out to capture photos of the event. The river surged all the way into the downtown of Estes Park, carrying away trees and cars, and breaking through another dam before being contained by Lake Estes.
Tips & Resources for Hiking to Horseshoe Falls in RMNP
- For Closure Updates: See the Rocky Mountain National Park Flood Impact and Closure page for updates on the conditions of this trail.
- TIP: The Alluvial Fan and larger Horseshoe Park area are popular spots for viewing Elk.
- Get there early: Parking may be somewhat limited as with many hikes in RMNP area and can get full even early in the morning.
- Trail Map for Fall River Area: Trail Map Link
- Packing List: Always pack the 10 Essentials. Download our Hiking Guide to get list and dayhiking packing checklist.
- Colorado Road Conditions: Colorado Road Conditions
- Photo: We would like to express our gratitude to Joan Morris Holzer for sharing such an amazing photograph of this hike to Horseshoe Falls in RMNP.
- After the Hike: Mountain Home Café
Weather
Map & Driving Directions
Click for Driving Directions
Falcon Falls in Rocky Mountain National Park
Falcon Falls is one of two waterfalls that spill from the heights above Thunder Lake in this remote part of the Wild Basin. It's a difficult and demanding 16 mile round-trip hike that requires some land navigation and backcountry travel skills. Explore the full Falcon Falls hike profile below for trail map, driving directions, and more tips and details to help you enjoy this adventure in Rocky Mountain National Park.
Note: Rocky Mountain National Park now requires timed entry permits from May 27th through October 10th. See the RMNP permits page for more information.
Trail Snapshot: Falcon Falls in Rocky Mountain National Park
| Hike Distance | 15.5 - 16.5 miles Round Trip |
|---|---|
| Difficulty | Difficult |
| Duration | 8-11 hr Round Trip |
| Trail Type | Out and Back |
| Starting Elevation | 8566' |
| Elevation Gain | Approx. +2530' |
| Seasons | Spring through Fall |
| Dogs | Prohibited in RMNP |
| Hike Trail Map for Thunder Lake | Click for a Trail Map |
| Hike Trail Map for Falcon Falls | National Geographic Trails Illustrated Map--detailed topographic map |
| Denver Drive Time | 1 hr 30 min |
| Driving Directions to Wild Basin Trailhead | Click for Google Map |
| Driving Directions to Winter Recreation Parking for Wild Basin Hikes | Click for Google Map |
| Town Nearest Hike | Allenspark, Colorado |
| Beauty | Waterfall, lake, mountain views, meadows, river, wildlife: Abert's squirrel, elk, deer, moose, bear; wildflowers |
| Activities | Picnicking, hiking trails, snowshoeing, horseback riding, backcountry camping (with a permit), photography |
| Fee | Park Pass Required |
Parking & Trailhead Information for Falcon Falls
The southeast corner of Rocky Mountain National Park boasts one of the loveliest portions in the park known as the Wild Basin. The Wild Basin Trailhead is located just 15 minutes outside of Allenspark, Colorado along Highway 115. There is a ranger station at at the Wild Basin Trailhead with toilets and drinking water available.
In the winter (October-May), Hwy 115 may not be plowed to the trailhead, and hikers will need to park their vehicles at a winter parking lot for Wild Basin hikes. Be aware that hikes from the winter parking lot add on another 3 miles of hiking (one-way). There are other small parking areas, like the Finch Lake Trailhead, that may be accessible and allow hikers to park closer to the Wild Basin Trailhead. It's important to know that Hwy 115, though titled a "highway", is a maintained dirt road, which means that it can be used by 2WD vehicles. However, after heavy rains and other severe weather, its quality may degrade until it is repaired. 4WD may be needed when snow is on the ground.
The Hike: Falcon Falls Trail in RMNP
The hike up to view Falcon Falls leads hikers past three sets of cascade waterfalls, around the shore of Thunder Lake, and up some rugged and steep terrain to Fan Falls, where Falcon Falls can be viewed in the near distance, just to the northwest. The hike from Fan Falls to Falcon can be navigated, but it's difficult and should only be attempted by hikers who have experience with land navigation in the backcountry.
Beginning at the Wild Basin Trailhead, the trail passes by Copeland Falls, a set of two cascade waterfalls just 0.4 mile into the hike. For details on accessing both the lower and upper leaps of Copeland Falls, be sure to explore our full trail profile for Copeland Falls.
The trail then follows North Saint Vrain Creek, until it meets with a trail junction. The trail to the right leads past a series of backcountry campsites, and is a slightly more direct route to Thunder Lake and Fan Falls. However, the left-hand trail is not much longer and takes hikers past two more waterfalls, Calypso Cascades and Ouzel Falls. The rest of this trail profile will explain this route.
Having taken the left-hand trail, it will soon cross a hefty log bridge spanning North St. Vrain Creek. Stop here to enjoy an unnamed set of cascades. Soon the trail will meet with a second trail junction at Calypso Cascades. The right-hand trail leads hikers to the cascades, over another bridge that crosses Cony Creek at 1.8 miles, then weaves up a set of switchbacks to Ouzel Falls at 2.7 miles.
After Ouzel Falls, the trail comes to a junction with the Bluebird Lake trail at 3.7 miles. However, the way to Fan falls passes by this junction and keeps going straight/northwest. In approximately 1.5 mile from the Bluebird Trail junction @ 5.2 miles into the hike, the trail makes a final split. The right leads up to the Lion Lakes and to Thunder Falls. The trail to the left leads up to Thunder Lake, and off-trail access to Fan Falls, and Falcon Falls.
At Thunder Lake, the way to Fan Falls requires some listening and attention to the landscape. Hikers should be familiar with backcountry travel and land navigation because this remaining segment requires hiking on unmarked and lesser traveled social trails. Hiking along the right/north side of the lake, a social trail leads back into the forest. When the trees open up into a clearing, the sounds of Fan Falls become apparent. Following the sound of the waterfall and the creek, hikers can pick their way through rock, brush, and deadfall until reaching the base of Fan Falls.
Here at Fan Falls, Falcon Falls can be seen approximately 1/4 of a mile to the the northwest. Falcon Falls is formed by a creek that spills out of Falcon Lake, a small alpine lake located about 600' above Thunder Lake. The hike over to Falcon Falls requires first descending to where the landscape is not so steep and rocky, as a lateral hike would require travel through steep and difficult terrain. After descending to less steep terrain, look for the social trail that leads over to the creek flowing out of Falcon Lake. Hiking along and up the creek that flows out of Falcon Lake, through rock and thick brush, hikers will emerge at the base of Falcon Falls. This makes for an 8 to 8.25 mile one-way hike from the Wild Basin Trailhead.
Tips & Resources for Hiking to Falcon Falls in RMNP
- TIP: A patrol cabin is located on the northeast shore of Thunder Lake. Though kept locked, the eaves can offer some limited shelter from afternoon rainstorms.
- Camping: The Thunder Lake campsite and others along this route can be reserved through the Rocky Mountain National Park Wilderness Offices. Because this is an extensive hike in rugged country, it may be wise to make this expedition a part of a multi-day trip.
- TIP: There are food storage lockers available at the Wild Basin, Finch Lake, and Sandbeach Lake Trailheads. These are required for visitors staying overnight.
- Get there early: Parking may be somewhat limited as with many hikes in RMNP area and can get full even early in the morning.
- You're in Bear Country: Black Bears live in the Wild Basin area and are active on the months of April through November. Be aware, and dispose of your food responsibly.
- Recommended Map for Rocky Mountain National Park & Falcon Falls: The trail maps provided by Rocky Mountain National Park are usually sufficient. However, for the hike up to Fan Falls, we highly recommend purchasing a National Geographic Trails Illustrated Map.
- Packing List: Always pack the 10 Essentials. Download our Hiking Guide to get list and dayhiking packing checklist.
- Colorado Road Conditions: Colorado Road Conditions
- Photo: We would like to express our gratitude to Sam Cox for sharing such an amazing photograph of this hike to Falcon Falls in RMNP.
- After the Hike: Rock Creek Tavern & Pizzeria
Weather
Map & Driving Directions
Click for Driving Directions
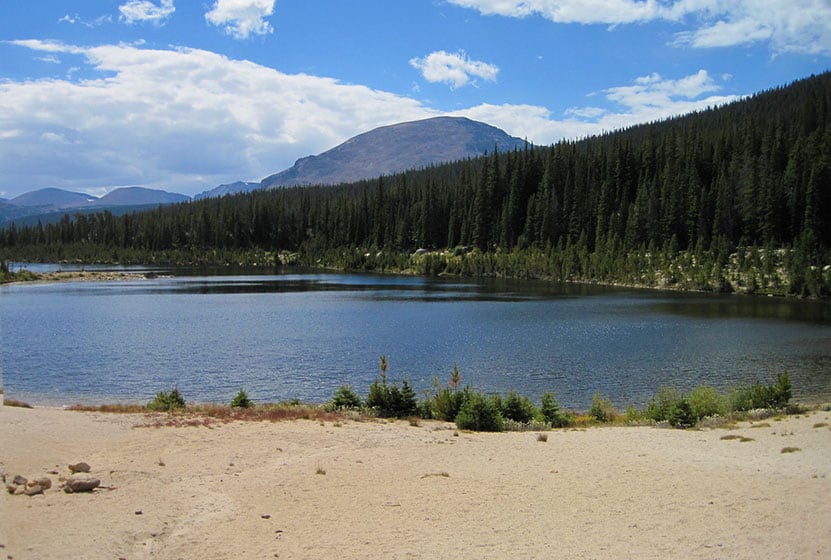
Sandbeach Lake Hike in Rocky Mountain National Park
Sandbeach Lake features great fishing and a beach! The lake got its name from its sandy shore that resembles that of a beach--making it one of best camping spots in Rocky Mountain National Park. It's a 4.5 mile moderate hike that climbs Copeland Moraine and crosses two creeks before arriving at this beautiful subalpine lake. With several reservable campsites along the way, Sandbeach Lake makes for a great initial multi-day backpacking trip for young families. Explore the full Sandbeach Lake hike profile below for trail map, driving directions, and more tips and details to help you enjoy this adventure in Rocky Mountain National Park.
Note: Rocky Mountain National Park now requires timed entry permits from May 27th through October 10th. See the RMNP permits page for more information.
Trail Snapshot: Sandbeach Lake in Rocky Mountain National Park
| Hike Distance | 8.4 miles Round Trip |
|---|---|
| Difficulty | Moderate |
| Duration | Approx 6 hr Round Trip |
| Trail Type | Out and Back |
| Starting Elevation | 8430′ |
| Elevation Gain | Approx +1971′ |
| Seasons | Spring through Fall, Winter Snowshoeing |
| Dogs | Prohibited in RMNP |
| Hike Trail Map | Click for a Map of Sandbeach Lake RMNP |
| Denver Drive Time | 1 hr 30 min |
| Driving Directions to Sandbeach Lake Trailhead | Click for Google Map |
| Town Nearest Hike | Allenspark, Colorado |
| Beauty | Lake, mountain views, aspen, ponderosa, limber pine, creek, wildlife: Abert’s squirrel, elk, deer, moose, bear; wildflowers |
| Activities | Picnicking, hiking trails, fishing, snowshoeing, horseback riding, backcountry camping (with a permit), photography |
| Fee | Park Pass Required |
Parking & Trailhead Information for Sandbeach Lake
The Sandbeach Lake Trailhead is located off of County Road 84 near, just about 1/2 mile west from its junction with Highway 7. See the driving directions link above for the detailed route. The trailhead is across the street from the Wild Basin Lodge and Event Center. The trailhead has toilet facilities and parking capacity of about 25 cars (includes gravel side-lot).
The Hike: Sandbeach Lake Trail in RMNP
The 4.5 mile hike (one-way) to Sandbeach Lake first heads north out of the Sandbeach Lake Trailhead, then begins a moderate climb to gain the ridge of the Copeland Moraine. The trail then follows the ridgeline west until it crosses Campers Creek at 2.3 miles. Here, the trail makes a short, but sharp, bend to the the south before continuing west/northwest. At 3.3 miles, the trail crosses a second creek, Hunters Creek, then makes a steady climb to the northern shores of Sandbeach Lake.
Campsites Along the Sandbeach Lake Trail
There are several backcountry campsites along the Sandbeach Lake Trail, making the hike up to Sandbeach Lake, a great opportunity for young families and first-time backpackers who want to do their first multi-day trip. Camping permits must be obtained through the RMNP Wilderness offices. A basic itinerary would be to drive into the park's Wilderness Office in the late morning, grab lunch, then hike to one of the campsites listed below. For a two-night trip, families could elect to camp at one of the earlier campsites: Hole in the Wall or Campers Creek. Then, day two would be a short hike up to Sandbeach Lake, a perfect place for a second night under an expanse of stars. Day three would consist of a 4.5 mile hike out to the trailhead. Be sure to call ahead to the Wilderness Office to book your sites.
Tips & Resources for Hiking to Sandbeach Lake in RMNP
- Packing List: Always pack the 10 Essentials. Download our Hiking Guide to get list and dayhiking packing checklist.
- Recommended Trail Map: We recommend the National Geographic Trails Illustrated Map which indicates the location of the Backcountry Camping Sites, and provides topo information, too.
- Get there early: Parking is limited. Arrive early to secure a parking spot at the trailhead.
- You’re in Bear Country: Black Bears live in the Wild Basin area and are active on the months of April through November. Be aware, dispose of your food responsibly, and don’t food or anything else with a strong scent in your vehicle.
- Trail Map for Wild Basin Area: Trail Map Link
- Colorado Road Conditions: Colorado Road Conditions
- Photo: We would like to express our gratitude to Reese Lloyd for sharing such great photos of this hike to Sandbeach Lake in RMNP.
- After the Hike: Meadow Mountain Cafe in Allenspark, Colorado
Weather
Map & Driving Directions
Click for Driving Directions
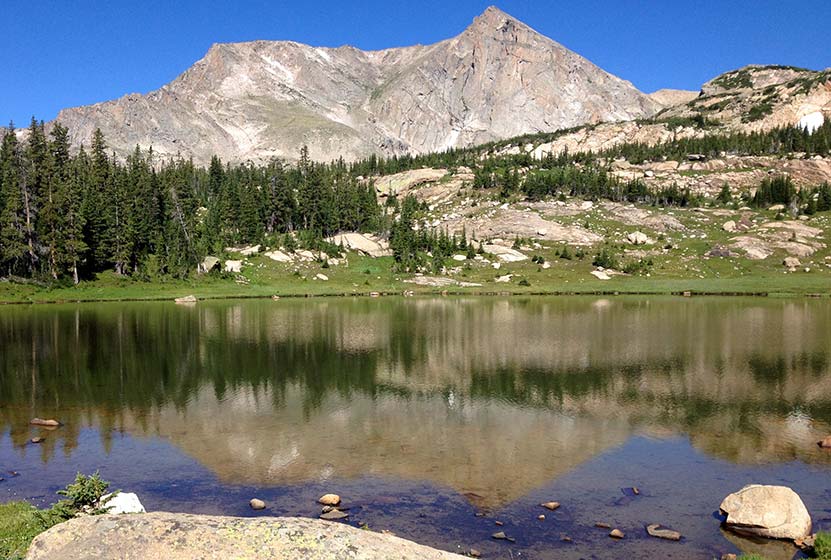
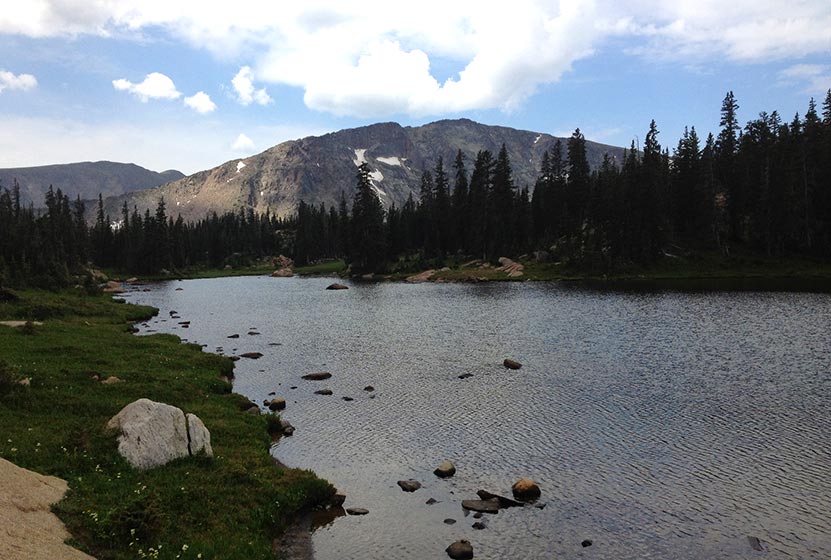
Ypsilon Lake Hike in Rocky Mountain National Park
The hike to Ypsilon Lake is a 9-mile round-trip journey along a heavily forested trail in the Mummy Range of Rocky Mountain National Park. Ypsilon Lake sits in a wooded basin along the eastern slopes of Ypsilon Mountain and Mount Chiquita. On this hike, you'll enjoy views of rugged mountains and Roaring River, a waterfall, and the two lakes found at the end of the trail. Explore the full Ypsilon Lake hike profile below for trail map, driving directions, and more tips and details to help you enjoy this adventure in Rocky Mountain National Park.
Note: Rocky Mountain National Park now requires timed entry permits from May 27th through October 10th. See the RMNP permits page for more information.
Trail Snapshot: Ypsilon Lake in Rocky Mountain National Park
| Hike Distance | 9 miles Round Trip |
|---|---|
| Difficulty | Difficult |
| Duration | Approx 5-6 hr Round Trip |
| Trail Type | Out and Back |
| Starting Elevation | 8540′ |
| Elevation Gain | Approx +2180′ |
| Seasons | Spring through Fall |
| Dogs | Prohibited in RMNP |
| Hike Trail Map | Click for a Map of Ypsilon Lake RMNP |
| Recommended Trail Map | We recommend the National Geographic Trails Illustrated Map - topographic with detailed information. |
| Denver Drive Time | 1 hr 40 min |
| Driving Directions to Lawn Lake Trailhead | Click for Google Map |
| Town Nearest Hike | Estes Park, Colorado |
| Beauty | Lake, waterfall, mountain views, aspen, ponderosa, meadows, river, wildlife: elk, Abert's squirrel; wildflowers |
| Activities | Picnicking, hiking trails, fishing, snowshoeing, horseback riding, backcountry camping (with a permit), photography |
| Fee | Park Pass Required |
Parking & Trailhead Information for Ypsilon Lake
The hike to Ypsilon Lake begins at the Lawn Lake Trailhead. Several other destinations in this lesser visited section of RMNP known as the Mummy Range, can be accessed from the Lawn Lake Trailhead, including Ypsilon Falls, Lawn Lake, Chipmunk Lake, and the Spectacle Lakes. The parking area is located on Old Fall River Road, just north of the intersection of Old Fall River Road and Highway 34.
The Hike: Ypsilon Lake Trail in RMNP
The hike begins on a 1.4 mile stretch of the Lawn Lake trail before the intersection with the Ypsilon Lake Trail. This initial segment climbs a series of switchbacks. While it may be tempting to cut the switchbacks, they are there for a couple important purposes: to control erosion and to preserve your energy. Because this area of the park has been severely damaged by floods, it's all the more important to stay the trail. There are areas of unstable terrain.
At 1.4 mile, the Ypsilon Lake trail junction will emerge on the left-hand side of the Lawn Lake trail. Here, the trail crosses the Roaring River--but the bridge has been washed out by a flood in the Spring of 2013. At the time of writing this trail profile (June 2016) the bridge has not been replaced. However, the river can be crossed at low water. It's easy to underestimate the hydraulic force of a river, so exercise care in crossing. If you're planning to hike to Ypsilon Lake, it's important to have a back plan, just in case you run into high water levels at the ford. Typically, the water levels are low, but both snowmelt and heavy rains can change levels quickly.
Approximately 0.5 mile after crossing the Roaring River (@ 2 miles), the trail begins a sustained climb along the ridge of a moraine. This longest segment of the hike leads through thick timber, then crests at 3.8 miles before descending to Chipmunk Lake @ 4.0 miles. The mountain peak reflections in Chipmunk Lake make this worth stopping for a photo.
There is a backcountry camping area with two individual sites just past Chimpmunk Lake at 10,640'. Camping permits can be obtained through the RMNP Wilderness offices. The trail from Chipmunk Lake to Ypsilon lake is just 0.5 mile, arriving at Ypsilon's western shore. Hikers who pause to listen may hear the sounds of Ypsilon Falls. This segmented and tiered cascade can be accessed by crossing a small footbridge, then hiking toward the sounds of the falls along Ypsilon's northwestern shore.
The return hike follows the same route back to the Lawn Lake trailhead, making this a 9-mile, round-trip journey.
Tips & Resources for Hiking to Ypsilon Lake in RMNP
- Packing List: Always pack the 10 Essentials. Download our Hiking Guide to get list and dayhiking packing checklist.
- Bridge Out: Due to the damage caused by a flood in September 2013, the bridge over Roaring River is missing. Cross only during low water, and see the RMNP flood closures page for updates.
- Get there early: Parking may be somewhat limited as with many hikes in RMNP area and can get full even early in the morning.
- Recommended Trail Map: We recommend the National Geographic Trails Illustrated Map which indicates the location of the Upper Chipmunk Backcountry Camping Site, and provides topo information.
- Colorado Road Conditions: Colorado Road Conditions
- Photo: We would like to express our gratitude to Roger Dellinger for sharing such an amazing photograph of this hike to Ypsilon Lake in RMNP.
- After the Hike: Mountain Home Café
Weather
Map & Driving Directions
Click for Driving Directions
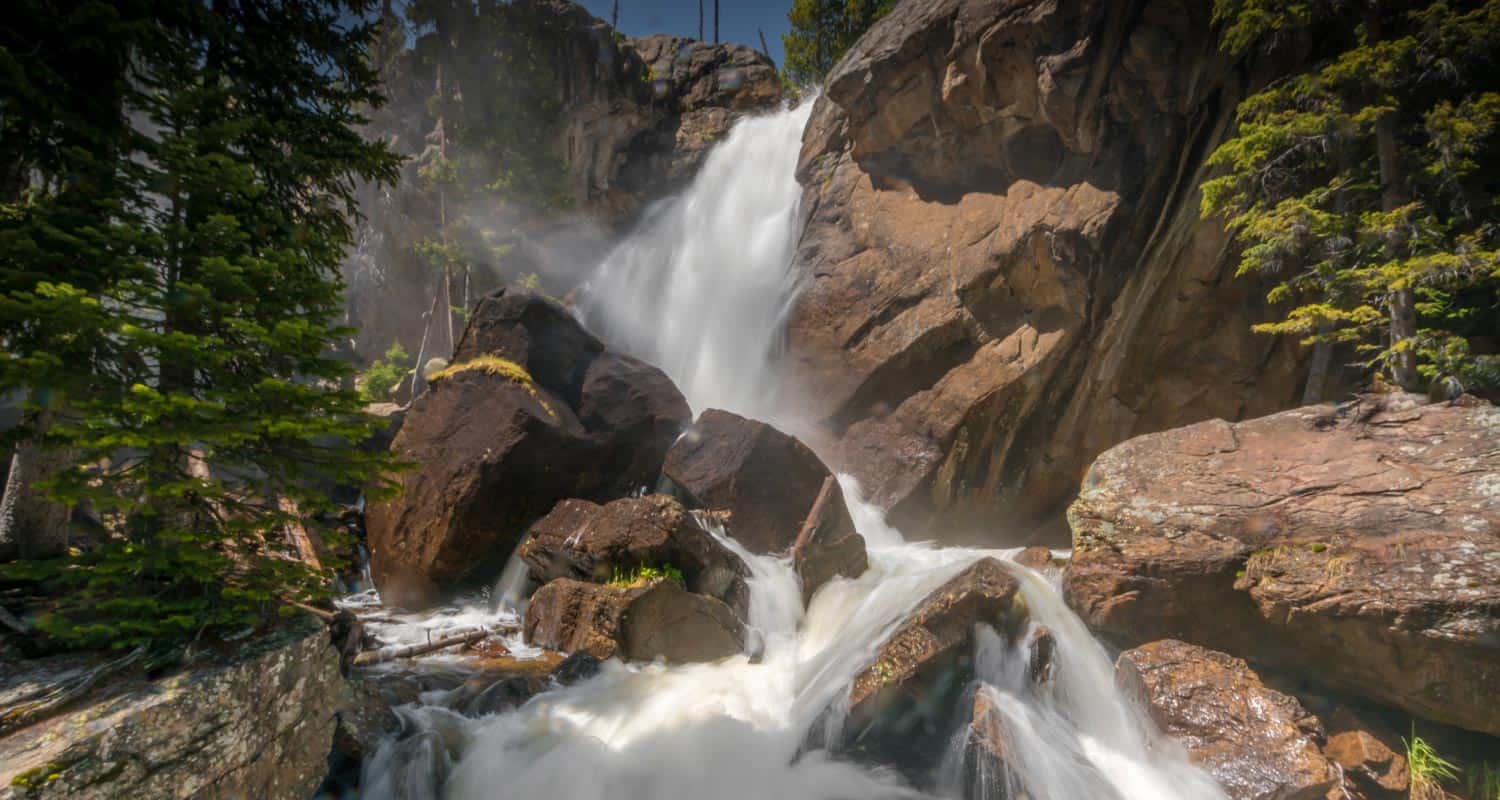
Chasm Falls in Rocky Mountain National Park
Chasm Falls in Rocky Mountain National Park bursts through a chasm in Fall River where the rock funnels its waters into a narrow gorge. It's one of the more accessible waterfalls in RMNP, located about 100 yards off of Old Fall River Road. The only drawback is that parking fills fast. However, there are several parking and hike options that we detail in this trail profile. Explore the full Chasm Falls hike profile below for trail map, driving directions, and more tips and details to help you enjoy this adventure in Rocky Mountain National Park.
Note: Rocky Mountain National Park now requires timed entry permits from May 27th through October 10th. See the RMNP permits page for more information.
Trail Snapshot: Chasm Falls in Rocky Mountain National Park
| Hike Distance | 0.1 mile, 2.8, or 4.8 miles (depending on parking area) |
|---|---|
| Difficulty | Easy |
| Duration | 20 minutes to approx 2.5 hrs Round-Trip |
| Trail Type | Out and Back |
| Starting Elevation | 9065' at the pulloff |
| Elevation Gain | Negligible (but more, if hiking up Old Fall River Road) |
| Seasons | Spring through Fall, Winter Snowshoeing |
| Dogs | Prohibited in RMNP but Allowed on certain days on Leash along Old Fall River Road (see details below) |
| Hike Trail Map | Click for a Map of Chasm Falls RMNP |
| Denver Drive Time | 1 hr 40 min |
| Driving Directions to a roadside pulloff area at Chasm Falls Trailhead | Click for Google Map |
| Driving Directions to EndoValley Parking Area | Click for Google Map |
| Driving Directions to West Alluvial Fan Parking Area | Click for Google Map |
| Town Nearest Hike | Estes Park, Colorado |
| Beauty | Waterfall, mountain views, meadows, river, wildlife: elk, big horn sheep, Abert's squirrel, deer, moose, bear; wildflowers |
| Activities | Picnicking, hiking trails, snowshoeing, horseback riding, backcountry camping (with a permit), photography |
| Fee | Park Pass Required |
Parking & Trailhead Information for Chasm Falls
Parking is tricky for Chasm Falls. Depending on where you are able to park, the hike will be a 0.1 mile, 2.8 mile, or 4.8 mile round-trip hike. It's also important to know that Old Fall River Road is closed during the winter months from Nov 30th until the end of March. However, the dirt road gets a lot of traffic and needs a lot of maintenance; so, there may be Spring and Summer closures for repairs. For example, Fall River Road will not open to vehicles in 2016 until early July. We recommend that you visit the Rocky Mountain National Park Road Status page to plan your trip to Chasm Falls and your drive up Old Fall River Road. Below, you'll find the three different parking options
Parking Options for Chasm Falls, Rocky Mountain National Park
#1 - Pulloff Near Chasm Falls - 0.1 Mile Jaunt - Driving Directions
#2 - Endovalley Picnic Area Parking - 2.8 Mile Round Trip Hike - Driving Directions
#3 - West Alluvial Fan Parking Area - 4.8 Mile Round Trip Hike - Driving Directions
During the busy summer months, all of these parking areas fill fast. Dogs are typically not allowed in RMNP, but on certain days, they are allowed along Old Fall River Road as long as they are leashed. See the Old Fall River Road status page for days when dogs are allowed. The scenic drive up Old Fall River Road is half the adventure--but not for the faint of heart. It's a steep dirt road with no guardrails and lots of switchbacks. When the road is open, park visitors can drive it all the way up to the Alpine Visitor Center, and take Trail Ridge Road back down into Estes Park, or take Trail Ridge Road over to the west side of the park in Grand Lake, Colorado.
The Hike: Chasm Falls Trail in RMNP
The hike from the pulloff along Old Fall River Road is well-marked with signs. The short trail of approx. 100 yards leads down stone steps and a steep dirt trail. The bottom of the trail opens to a viewing platform. Like the parking areas, the platform can get quite crowded during the busy summer months.
If hiking up Old Fall River Road from either Endovalley or West Alluvial Fall parking areas, be sure to be aware of vehicles as they make their way up and down the road. This this can be a great winter hike or snowshoe trip during the winter. Usually this means starting from the West Alluvial Fan parking area.
Tips & Resources for Hiking to Chasm Falls in RMNP
- Prepare: Bring water and high-energy food.
- Winter Road Closure: The road is closed to cars during winter. You may opt to plan on a longer hike during this season - starting from the West Alluvial parking area.
- Get there early: Parking may be limited at most of the trailheads in RMNP during the summer months. Go early to get a good spot. By early, we mean before 7:30 AM.
- Trail Map of Fall River Area: Trail Map Link
- Packing List: Always pack the 10 Essentials. Download our Hiking Guide to get list and dayhiking packing checklist.
- Colorado Road Conditions: Colorado Road Conditions
- Photo: We would like to express our gratitude to Tim Vo for sharing such an amazing photograph of this hike to Chasm Falls in RMNP.
- After the Hike: Mountain Home Café
Weather
Map & Driving Directions
Click for Driving Directions to Pulloff Near Chasm Falls

Raccoon Loop Hike in Golden Gate Canyon State Park
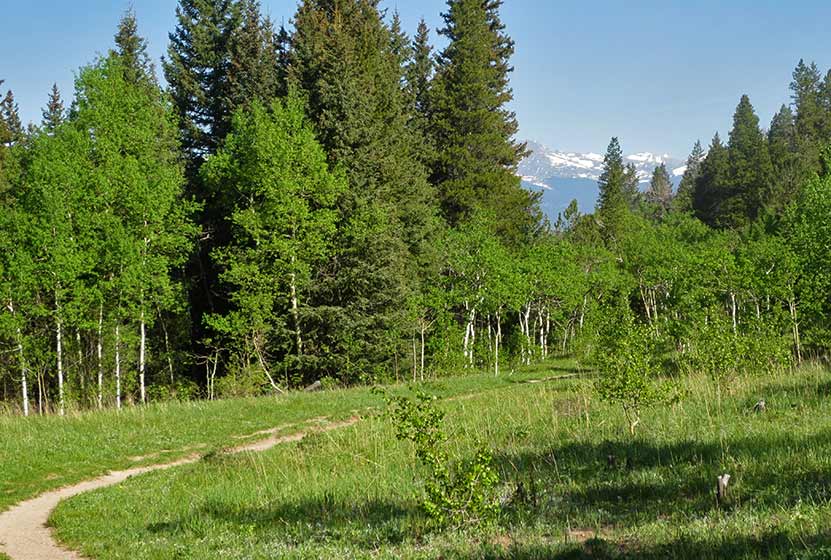
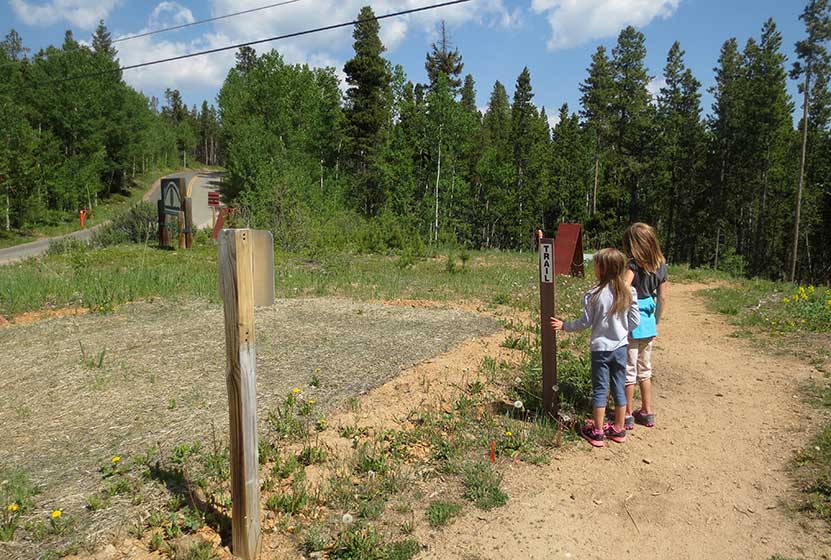
Our kids loved this 2.5 mile loop hike in Golden Gate Canyon State Park. The trail sports lots of shade, panoramic views of snowcapped peaks, wildflowers, and trickling brooks. Be sure to see the details below regarding an annual raptor closure that detours one segment of this hike. Explore the full Raccoon Loop Hike profile for trail map, driving directions, and many of the details you need to enjoy this adventure in Golden Gate Canyon State Park.
Trail Snapshot: Raccoon Trail Loop at Golden Gate Canyon
| Hike Distance | 2.5 miles |
|---|---|
| Difficulty | Easy |
| Duration | Approx 1.5 hr |
| Trail Type | Loop |
| Starting Elevation | 9120′ |
| Elevation Gain | Approx +500′ |
| Seasons | Year Round |
| Dogs | Allowed On 6' Leash |
| Hike Trail Map | Click for a Map of Golden Gate Canyon State Park |
| Denver Drive Time | 1 hr |
| Driving Directions to Panorama Point Trailhead | Click for Google Map |
| Driving Directions to Reverends Ridge Campground Trailhead | Click for Google Map |
| Town Nearest Hike | Golden, Colorado |
| Beauty | Mountain range views of snowcapped peaks, wildflowers, aspens |
| Activities | Hiking, mountain biking, photography, snowshoeing in winter |
| Fee | Colorado State Parks Pass Required |
Parking & Trailhead Information for the Raccoon Loop Hike
You can begin your hike at either the Panorama Point Trailhead or at the Reverend Ridge Campground Trailhead. Our family hiked this from the Panorama Point Trailhead. Though parking is limited, there is additional parking located directly across the street in a dirt lot. Reverend Ridge Trailhead, while a larger parking area, can fill up fast because it is located at the campground. Either one, however, is a good option. Driving directions for both trailheads are located in the trail snapshot above.
The Hike: The Raccoon Loop Hike in Golden Gate Canyon
We hiked the Raccoon Loop counter-clockwise from the Panorama Point Trailhead and found it to be easy to moderate in difficulty. Our kids (at the time of this post) are 5 and 8. Both were wearing tennis shoes and did well on the trail. There was a steep segment with loose rock, where our youngest needed me to hold her hand as she navigated here way down the trail.
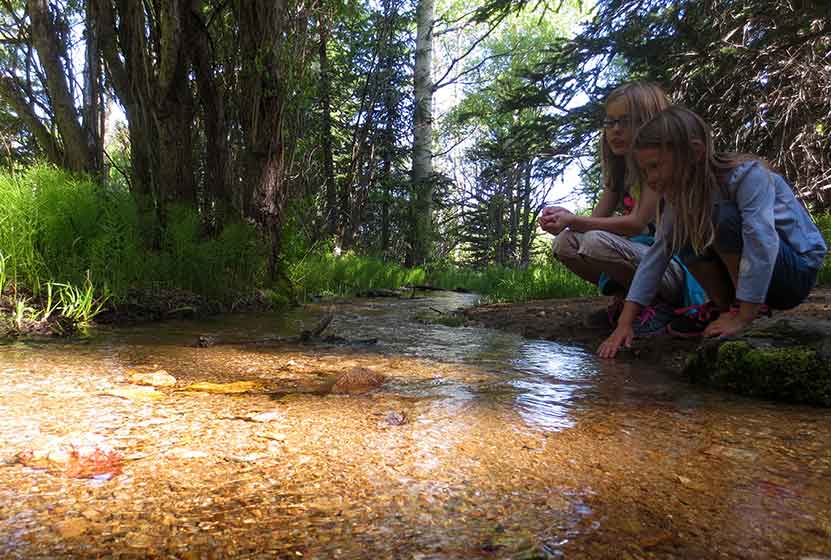
The trail begins with incredible views of the snowcapped Indian Peaks stretched out against the western sky. Soon, views of Thorodin Mountain and Starr peak dominate the landscape as the trail winds to the east and crosses a seasonal brook. Raccoon Trail then gently drops into aspen groves and green meadows full of wildflowers.
Entering a more mature stand of aspens, the trail begins a more steep descent. This is where hikers will want to watch their footing on the loose rock and gravel surface of the trail. After this short descent, the trail crosses another brook over a small footbridge, then begins to climb a bit further west before turning sharply to the south.
Shortly after the brook is where we encountered the closure of approximately 0.5 mile of the Raccoon trail. These closures are announced on the front page of the Golden Gate Canyon State Park website, and we knew about it before making our trip.
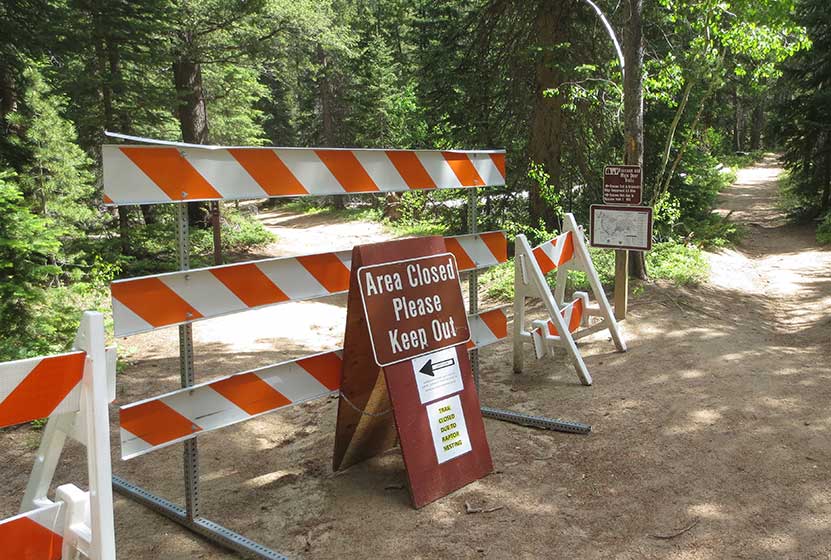
This rerouted us up to the Reverend Ridge Campground, then required that we hike down State Park Road for about 0.5 mile until we were able to pick up the Raccoon Trail again. Because the detour wasn't clearly marked, we've provided an image of the normal route vs. the detour route we took below.
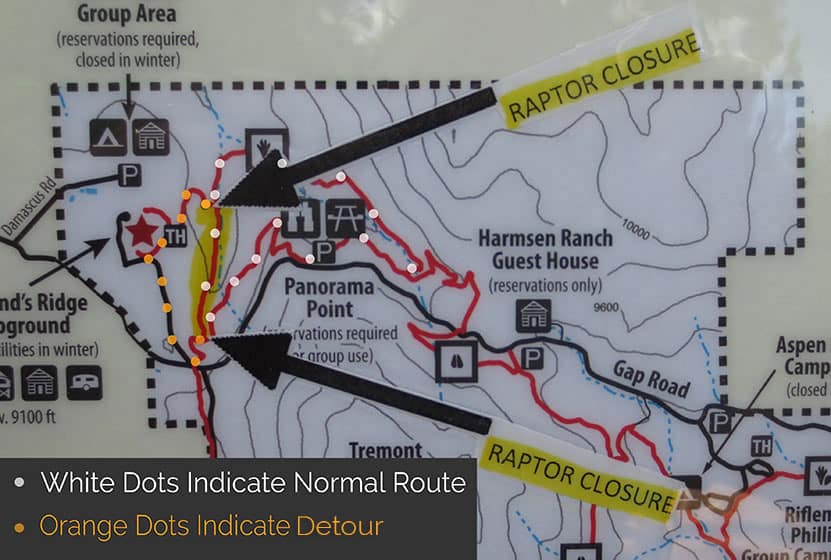
It probably goes without saying, but do exercise caution when walking the road, and assume that cars will not see you. There are several sharp turns/switchbacks. We were able to pick up the trail down where the road comes to a stop sign, then hike back to Panorama Point. The detour adds approximately 1 mile to the original hike, making this into a 3.5 mile loop hike.
This last section had some elevation gain, but still was moderate in difficulty. This is a great hike for visiting friends and family, but those who have not acclimatized to the altitude, or who are not in the best shape, may find this last part challenging. There is a bench strategically placed on the ascent, and rocks where you can rest your legs.
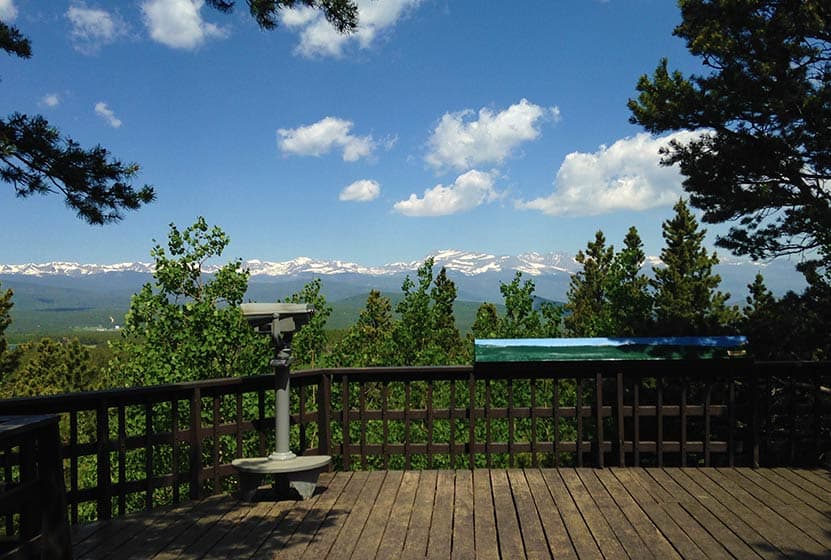
At Panorama Point, hikers will find a large deck and viewing area. It's one of the best accessible views you'll get of the Front Range near Denver.
Tips & Resources for Hiking the Raccoon Loop Hike
- Be Aware of Closures: The Raccoon Loop has seasonal closures when raptors are nesting. However, it's just one segment of the trail that is closed, and a (not-so-well-marked) detour is available.
- Look out for Mtn Bikers: We always find mountain bikers to be considerate on the trails near Denver. There is an established etiquette and they will call their pass. Still, it's good to know that this trail is popular with both mountain bikers and hikers, so keep your eyes and ears peeled and give them plenty of room to pass.
- Trail Map for Golden Gate Canyon State Park: Trail Map Link
- Packing List: Always pack the 10 Essentials. Download our Hiking Guide to get the list and dayhiking packing checklist.
- Colorado Road Conditions: Colorado Road Conditions
- After the Hike: Windy Saddle Cafe in Golden, Colorado
Weather
Map & Driving Directions
Click for Driving Directions to Panorama Point Trailhead
Trio Falls Hike in Rocky Mountain National Park
Trio Falls is among the most stunning waterfalls that you will encounter in Rocky Mountain National Park, or in Colorado. But it comes at a price: A 15-mile round-trip, demanding hike. Because of this, the hike up to Trio Falls may best be part of an overnight camping trip in the park. Explore the full Trio Falls hike profile below for trail map, driving directions, and more tips and details to help you enjoy this adventure in Rocky Mountain National Park.
Note: Rocky Mountain National Park now requires timed entry permits from May 27th through October 10th. See the RMNP permits page for more information.
Trail Snapshot: Trio Falls in Rocky Mountain National Park
| Hike Distance | 14.8 miles Round Trip |
|---|---|
| Difficulty | Difficult |
| Duration | Approx 8-10 hr Round Trip |
| Trail Type | Out and Back |
| Starting Elevation | 8566' |
| Elevation Gain | Approx. +2760' |
| Seasons | Spring through Fall |
| Dogs | Prohibited in RMNP |
| Hike Trail Map | Click for a Map of Trio Falls RMNP |
| Recommended Trail Map | National Geographic Trails Illustrated Map |
| Denver Drive Time | 1 hr 30 min |
| Driving Directions to Wild Basin Trailhead | Click for Google Map |
| Driving Directions to Winter Recreation Parking for Wild Basin Hikes | Click for Google Map |
| Town Nearest Hike | Allenspark, Colorado |
| Beauty | Waterfall, lake, mountain views, meadows, river, wildlife: Abert's squirrel, elk, deer, moose, bear; wildflowers |
| Activities | Picnicking, hiking trails, snowshoeing, horseback riding, backcountry camping (with a permit), photography |
| Fee | Park Pass Required |
Parking & Trailhead Information for Trio Falls
The southeast corner of Rocky Mountain National Park boasts one of the loveliest portions in the park known as the Wild Basin. The Wild Basin Trailhead is located just 15 minutes outside of Allenspark, Colorado along Highway 115. There is a ranger station at at the Wild Basin Trailhead with toilets and drinking water available.
In the winter (October-May), Hwy 115 may not be plowed to the trailhead, and hikers will need to park their vehicles at a winter parking lot for Wild Basin hikes. Be aware that hikes from the winter parking lot add on another 3 miles of hiking (one-way). There are other small parking areas, like the Finch Lake Trailhead, that may be accessible and allow hikers to park closer to the Wild Basin Trailhead. It's important to know that Hwy 115, though titled a "highway", is a maintained dirt road, which means that it can be used by 2WD vehicles. However, after heavy rains and other severe weather, its quality may degrade until it is repaired. 4WD may be needed when snow is on the ground.
The Hike: Trio Falls Trail in RMNP
The hike up to Trio Falls in Rocky Mountain National Park combines both distance and a fair amount of elevation gain to make this a very challenging hike. Because Trio Falls is 7 1/2 miles from the trailhead, few make the journey; but the solitude and the sights are worth it to those who make the effort. Because the round-trip hike is 15+ miles, it's advisable to make this hike a part of a multi-day camping trip in the park. If you are considering camping, there are several reservable backcountry camping spots in the Wild Basin area, and camping permits can be obtained through the RMNP Wilderness offices.
Trio Falls is located between Lion Lake #1 and Lion Lake #2 in the Wild Basin. For a detailed trail description of the almost 7-mile hike to Lion Lake #1, which takes hikers past three other waterfalls, be sure to explore the trail profile for Lion Lake #1.
At Lion Lake #1, there is a social trail that runs along the right/east side of the lake. Because this next segment is on unmaintained trails in a remote section of the park, hikers should possess both land navigation skills, map, and equipment. This social trail leads for about 1/2 mile along the lake, beyond into rocky terrain, and eventually to the waterfall.
There are a lower and an upper set of cascades to Trio Falls. Following the trail past the lower cascades requires a scramble and negotiating an passage through thick willows and rock. Hikers should exercise extra caution in this wet and rocky terrain.
Tips & Resources for Hiking to Trio Falls in RMNP
- Recommended Trail Map: We recommend the National Geographic Trails Illustrated Map which indicates the location of Trio Falls, and provides topo information.
- TIP: There are food storage lockers available at the Wild Basin, Finch Lake, and Sandbeach Lake Trailheads.
- Itinerary: It should go without saying, but be sure to always leave an itinerary with family and/or friends, and give them a call when you are back at the trailhead or within cell range.
- Another Waterfall: If you are lucky and there is an ample flow of water, another waterfall can be spotted pouring down from the cliffs near Trio Falls.
- Get there early: Parking may be limited as with many hikes in RMNP area and can get full even early in the morning.
- You're in Bear Country: Black Bears live in the Wild Basin area and are active on the months of April through November. Be aware, and dispose of your food responsibly.
- Trail Map for Wild Basin Area: Trail Map Link
- Packing List: Always pack the 10 Essentials. Download our Hiking Guide to get list and dayhiking packing checklist.
- Colorado Road Conditions: Colorado Road Conditions
- Photo: We would like to express our gratitude to Steven Bratman for sharing such an amazing photograph of this hike to Trio Falls in RMNP.
- After the Hike: Rock Creek Tavern & Pizzeria
Weather
Map & Driving Directions
Click for Driving Directions
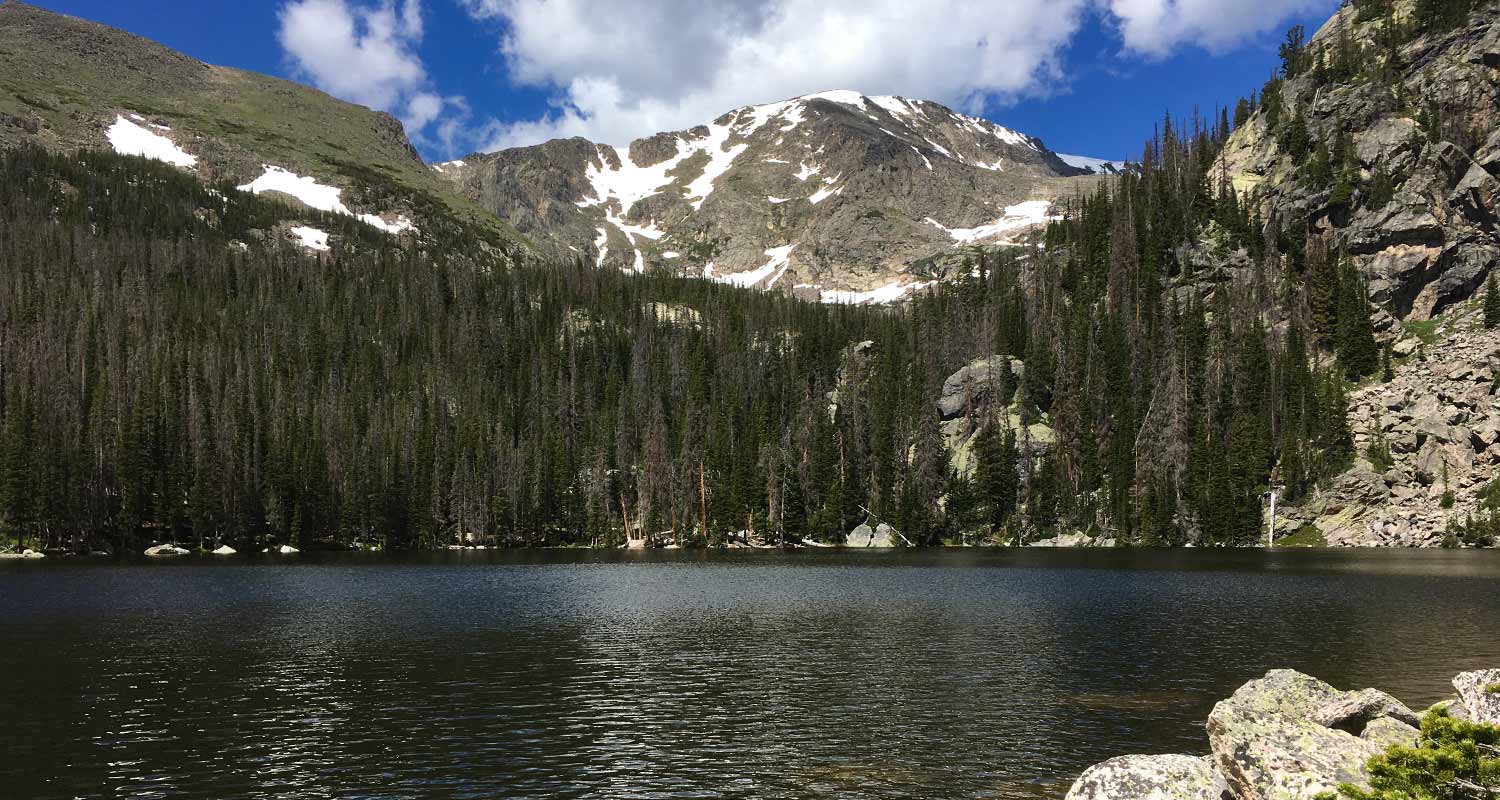
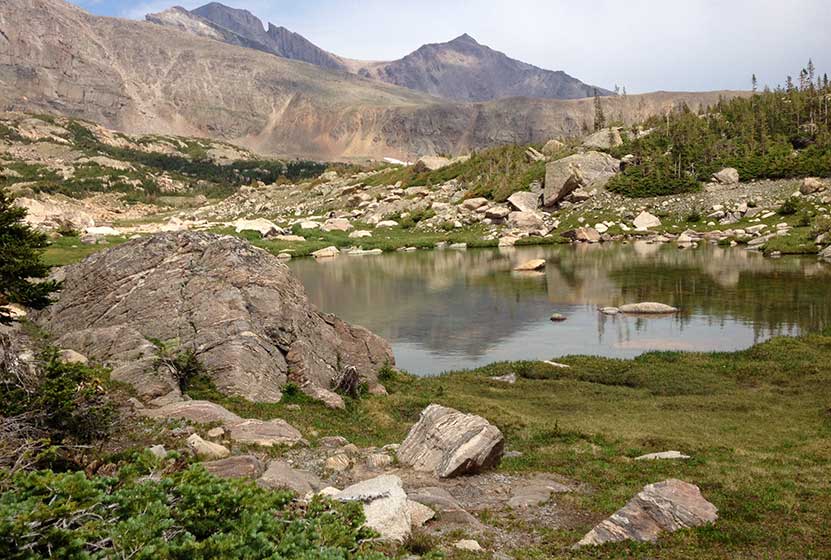
Lion Lake in Rocky Mountain National Park
The Lion Lake #1 in Rocky Mountain National Park boasts a dramatic alpine landscape hidden away in the northwestern corner of the Wild Basin. The trail to this high-mountain lake passes several waterfalls and offers access to other lakes and surrounding peaks. Because the Lions lake is more remote, a trip to it may require an overnight stay at one of RMNP's backcountry camping sites. Explore the full Lion Lake #1 hike profile below for trail map, driving directions, and more tips and details to help you enjoy this adventure in Rocky Mountain National Park.
Note: Rocky Mountain National Park now requires timed entry permits from May 27th through October 10th. See the RMNP permits page for more information.
Trail Snapshot: Lion Lake #1 in Rocky Mountain National Park
| Hike Distance | 14 miles Round Trip |
|---|---|
| Difficulty | Difficult |
| Duration | 7-10 hr Round Trip |
| Trail Type | Out and Back |
| Starting Elevation | 8566' |
| Elevation Gain | Approx. +2565' |
| Seasons | Spring through Fall |
| Dogs | Prohibited in RMNP |
| Hike Trail Map | Click for a Map of Lion Lakes RMNP |
| Recommended Trail Map | National Geographic Trails Illustrated Map |
| Denver Drive Time | 1 hr 30 min |
| Driving Directions to Wild Basin Trailhead | Click for Google Map |
| Driving Directions to Winter Recreation Parking for Wild Basin Hikes | Click for Google Map |
| Town Nearest Hike | Allenspark, Colorado |
| Beauty | Lake, waterfall, mountain views, meadows, river, wildlife: Abert's squirrel, elk, deer, moose, bear; wildflowers |
| Activities | Picnicking, hiking trails, snowshoeing, horseback riding, backcountry camping (with a permit), photography |
| Fee | Park Pass Required |
Parking & Trailhead Information for Lion Lake
The southeast corner of Rocky Mountain National Park boasts one of the loveliest portions in the park known as the Wild Basin. The Wild Basin Trailhead is located just 15 minutes outside of Allenspark, Colorado along Highway 115. There is a ranger station at at the Wild Basin Trailhead with toilets and drinking water available.
In the winter (October-May), Hwy 115 may not be plowed to the trailhead, and hikers will need to park their vehicles at a winter parking lot for Wild Basin hikes. Be aware that hikes from the winter parking lot add on another 3 miles of hiking (one-way). There are other small parking areas, like the Finch Lake Trailhead, that may be accessible and allow hikers to park closer to the Wild Basin Trailhead. It's important to know that Hwy 115, though titled a "highway", is a maintained dirt road, which means that it can be used by 2WD vehicles. However, after heavy rains and other severe weather, its quality may degrade until it is repaired. 4WD may be needed when snow is on the ground.
The Hike: Lion Lake #1 Trail in RMNP
It's seven miles one-way to Lion Lake #1, which requires that hikers get a very early start, or build this hike into a multi-day camping trip in Rocky Mountain National Park. If you are considering camping, there are several reservable backcountry camping spots in the Wild Basin area, and camping permits can be obtained through the RMNP Wilderness offices.
The trail begins at the Wild Basin Trailhead, and takes hikers through the central area of the Wild Basin, past three sets of cascade waterfalls, then up into the highest reaches of this lesser visited section of the National Park.
The first waterfall, Copeland Falls, is just 0.4 mile into the hike. For details on accessing both the lower and upper leaps of Copeland Falls, be sure to explore our full trail profile for Copeland Falls.
The trail then traces the path of North Saint Vrain Creek, until it encounters a junction. The trail to the right leads past a series of backcountry campsites mentioned above, and is a slightly more direct route to Lion Lake #1. However, the left-hand trail is not much longer and leads to two more waterfalls, Calypso Cascades and Ouzel Falls. The rest of this trail profile will explain this route.
Having taken the left-hand trail, you'll cross a large log bridge spanning North St. Vrain Creek. Pause when you hear the sounds of an unnamed cascade that can be viewed from the bridge area. Soon after the bridge, the trail will meet with a second trail junction at Calypso Cascades. Taking the right-hand trail, hikers will soon encounter the sight and spray of the cascades. Then trail will cross over another bridge at 1.8 miles, then things begin to get more challenging, as the trail weaves through a set of switchbacks to Ouzel Falls at 2.7 miles. Ouzel Falls, while not large when compared to Alberta or Fern Falls, may be one of the most stunning waterfalls in Rocky Mountain National Park.
After Ouzel Falls, the trail comes to a junction with the Bluebird Lake trail at 3.1 miles. However, the way to the Lion Lake passes by this junction and keeps going straight/northwest.
In approximately 1.5 mile from the Bluebird Trail junction, the trail makes a final split. The trail to the left leads up to Thunder Lake and Fan Falls. The right leads up to the Lion Lakes and is a hiker-only trail (no horses or pack animals beyond this point). Now you're entering the very heart of Rocky Mountain National Park.
The trail now becomes undulating, with spots of level ground, meadows, boulders, and marsh. It's the kind of diversity that characterizes the beautiful high-country of Colorado. On the approach to Lion Lake #1, Mt. Alice comes into view with it's sheer rock wall and pyramid peak. Moving into the Lion Lakes area, beautiful meadows and marsh hold the delight of wildflowers, and the nuisance of mosquitos.
Following a social trail from the shores of Lion Lake #1, hikers can push on to the Trio Falls and Lion Lake #2. Because this next segment is on unmaintained trails in a remote section of the park, hikers should possess both land navigation skills, map, and equipment.
Tips & Resources for Hiking to Lion Lake #1 in RMNP
- TIP: There are food storage lockers available at the Wild Basin, Finch Lake, and Sandbeach Lake Trailheads. These are required for visitors staying overnight. Make sure there is nothing that smells good to bears left in your car (that includes air fresheners).
- Get there early: Parking may be somewhat limited as with many hikes in RMNP area and can get full even early in the morning.
- Camping: The Thunder Lake campsite and others along this route can be reserved through the Rocky Mountain National Park Wilderness Offices. Because this is an extensive hike in rugged country, it may be wise to make this expedition a part of a multi-day trip.
- You're in Bear Country: Black Bears live in the Wild Basin area and are active on the months of April through November. Be aware, and dispose of your food responsibly.
- Recommended Trail Map for Lion Lake Hike: National Geographic Trails Illustrated Map
- Packing List: Always pack the 10 Essentials. Download our Hiking Guide to get list and dayhiking packing checklist.
- Colorado Road Conditions: Colorado Road Conditions
- Photo: We would like to express our gratitude to Shea Oliver for sharing such amazing photographs of this hike to Lion Lake in RMNP.
- After the Hike: Rock Creek Tavern & Pizzeria
Weather
Map & Driving Directions
Click for Driving Directions
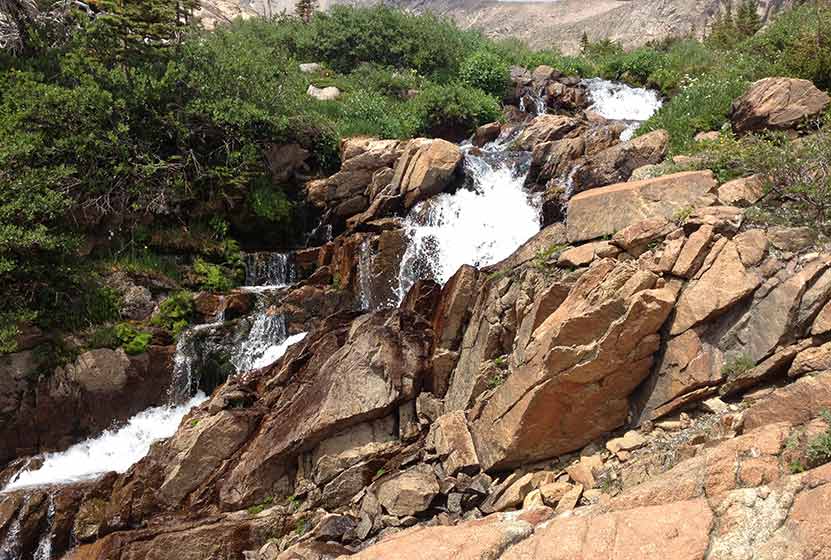
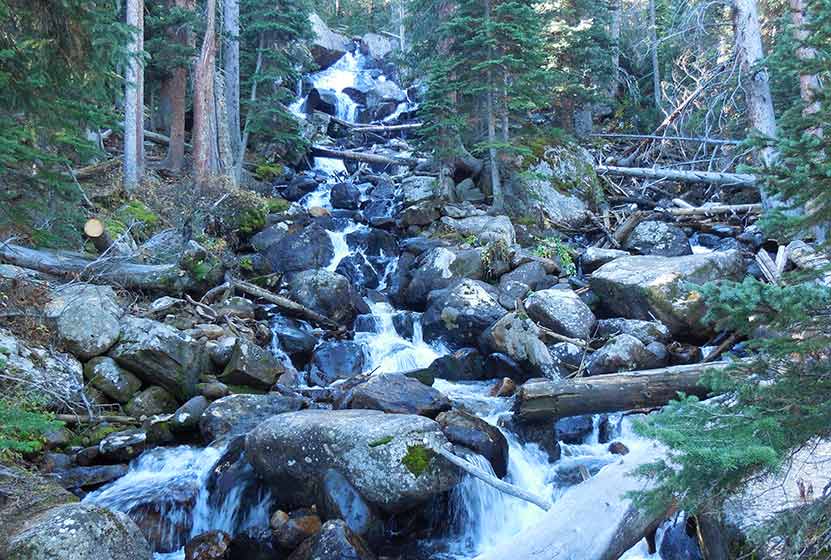
Fan Falls in Rocky Mountain National Park
Fan Falls is tucked away in the high reaches of the Wild Basin of Rocky Mountain National Park. This 15.5 mile, difficult trek, leads to a long set of segmented cascades spilling out of the heights and streaming down into Thunder Lake. This garden of water, wildflowers and rock is a perfect escape for those looking for a demanding hike to a more secluded spot. Explore the entire Fan Falls hike profile below for trail map, driving directions, and more tips and details to help you enjoy this adventure in Rocky Mountain National Park.
Note: Rocky Mountain National Park now requires timed entry permits from May 27th through October 10th. See the RMNP permits page for more information.
Trail Snapshot: Fan Falls in Rocky Mountain National Park
| Hike Distance | 15.5 miles Round Trip |
|---|---|
| Difficulty | Difficult |
| Duration | 8-10+ hr Round Trip |
| Trail Type | Out and Back |
| Starting Elevation | 8566' |
| Elevation Gain | Approx. +2530' |
| Seasons | Late Spring through Early Fall |
| Dogs | Prohibited in RMNP |
| Hike Trail Map | National Geographic Trails Illustrated Map |
| Denver Drive Time | 1 hr 30 min |
| Driving Directions to Wild Basin Trailhead | Click for Google Map |
| Driving Directions to Winter Recreation Parking for Wild Basin Hikes | Click for Google Map |
| Town Nearest Hike | Allenspark, Colorado |
| Beauty | Waterfall, lake, mountain views, meadows, river, wildlife: Abert's squirrel, elk, deer, moose, bear; wildflowers |
| Activities | Picnicking, hiking trails, snowshoeing, horseback riding, backcountry camping (with a permit), photography |
| Fee | Park Pass Required |

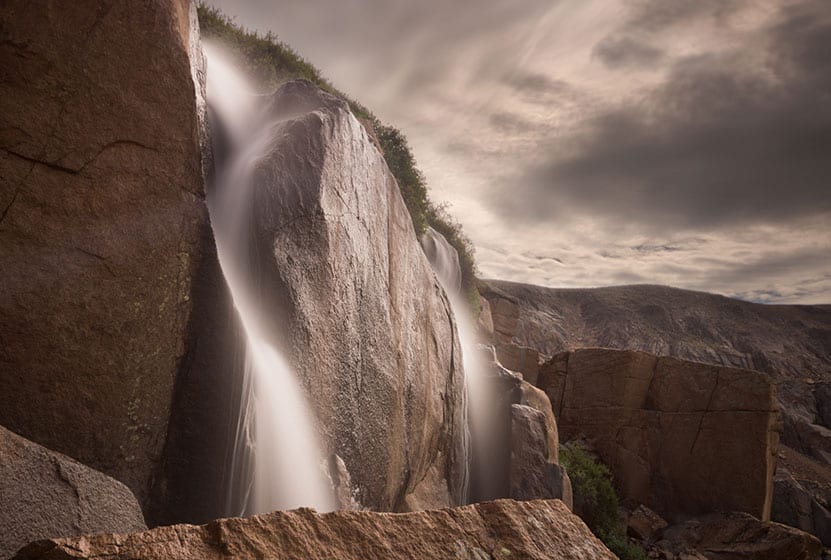
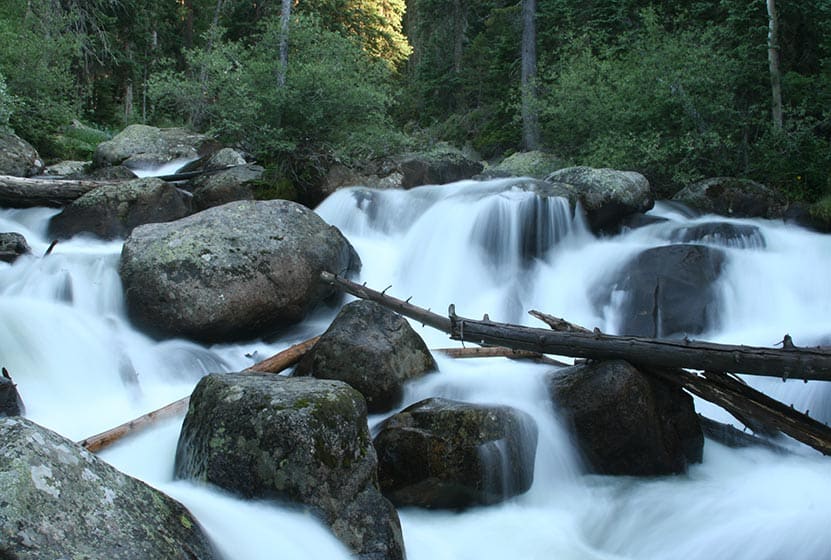
A Stream Along the Cascades of Fan Falls
Parking & Trailhead Information for Fan Falls
The southeast corner of Rocky Mountain National Park boasts one of the loveliest portions in the park known as the Wild Basin. The Wild Basin Trailhead is located just 15 minutes outside of Allenspark, Colorado along Highway 115. There is a ranger station at at the Wild Basin Trailhead with toilets and drinking water available.
In the winter (October-May), Hwy 115 may not be plowed to the trailhead, and hikers will need to park their vehicles at a winter parking lot for Wild Basin hikes. Be aware that hikes from the winter parking lot add on another 3 miles of hiking (one-way). There are other small parking areas, like the Finch Lake Trailhead, that may be accessible and allow hikers to park closer to the Wild Basin Trailhead. It's important to know that Hwy 115, though titled a "highway", is a maintained dirt road, which means that it can be used by 2WD vehicles. However, after heavy rains and other severe weather, its quality may degrade until it is repaired. 4WD may be needed when snow is on the ground.
The Hike: Fan Falls Trail in RMNP
The hike up to Fan Falls leads through the central area of the Wild Basin, taking hikers past three sets of cascade waterfalls, around the shore of Thunder Lake, and finally to a lonely creek dropping into a series of rocky cascades.
Beginning at the Wild Basin Trailhead, the trail passes by Copeland Falls, a set of two cascade waterfalls just 0.4 mile into the hike. For details on accessing both the lower and upper leaps of Copeland Falls, be sure to explore our full trail profile for Copeland Falls.
Copeland Falls - Photo Courtesy of Ben Graham
The trail then follows North Saint Vrain Creek, until it meets with a trail junction. The trail to the right leads past a series of backcountry campsites, and is a slightly more direct route to Thunder Lake and Fan Falls. However, the left-hand trail is not much longer and takes hikers past two more waterfalls, Calypso Cascades and Ouzel Falls. The rest of this trail profile will explain this route.
Having taken the left-hand trail, it will soon cross a hefty log bridge spanning North St. Vrain Creek. Stop here to enjoy an unnamed set of cascades. Soon the trail will meet with a second trail junction at Calypso Cascades. The right-hand trail leads hikers to the cascades, over another bridge that crosses Cony Creek at 1.8 miles, then weaves up a set of switchbacks to Ouzel Falls at 2.7 miles.
Calypso Cascades - Photo Courtesy of Jeff Kramer
After Ouzel Falls, the trail comes to a junction with the Bluebird Lake trail at 3.7 miles. However, the way to Fan falls passes by this junction and keeps going straight/northwest. In approximately 1.5 mile from the Bluebird Trail junction, the trail makes a final split. The right leads up to the Lion Lakes and to Thunder Falls. The trail to the left leads up to Thunder Lake and Fan Falls.
At Thunder Lake, the way to Fan Falls requires some listening and attention to the landscape. Hikers should be familiar with backcountry travel and land navigation because this remaining segment requires hiking on unmarked and lesser traveled social trails. Hiking along the right/north side of the lake, the way leads into the forest. When the trees open up into a clearing, the sounds of Fan Falls become apparent. Following the sound of the waterfall and the creek, hikers can pick their way through rock, brush, and deadfall until reaching the base of Fan Falls. Bluebells and other wildflowers grow out from between the rock, painting the splash and spray of the cascades with color.
A Pond Above Fan Falls in RMNP
The source of Fan Falls can be accessed by hiking higher to the area above the cascades. Here, a small pond holding the meltwater from the winter's snow reflects the towering and craggy peaks that surround it.
The return hike traces the same route. However, one change can be made: Instead of taking the trail back to Ouzel Falls and Calypso Cascades, hikers can take the trail that stays to the North/left of North St. Vrain creek and passes the several backcountry campsites.
Tips & Resources for Hiking to Fan Falls in RMNP
- Camping: The Thunder Lake campsite and others along this route can be reserved through the Rocky Mountain National Park Wilderness Offices. Because this is an extensive hike in rugged country, it may be wise to make this expedition a part of a multi-day trip.
- Lockers: There are food storage lockers available at the Wild Basin, Finch Lake, and Sandbeach Lake Trailheads. These are required for visitors staying overnight.
- Get there early: Parking may be somewhat limited as with many hikes in RMNP area and can get full even early in the morning.
- You're in Bear Country: Black Bears live in the Wild Basin area and are active on the months of April through November. Be aware, and dispose of your food responsibly.
- Recommended Map for Rocky Mountain National Park: The trail maps provided by Rocky Mountain National Park are usually sufficient. However, for the hike up to Fan Falls, we highly recommend purchasing a National Geographic Trails Illustrated Map.
- Packing List: Always pack the 10 Essentials. Download our Hiking Guide to get list and dayhiking packing checklist.
- Colorado Road Conditions: Colorado Road Conditions
- Photo: We would like to express our gratitude to Shea Oliver for sharing such amazing photographs of this hike to Fan Falls in RMNP.
- After the Hike: Meadow Mountain Cafe in Allenspark, CO
Weather
Map & Driving Directions
Click for Driving Directions
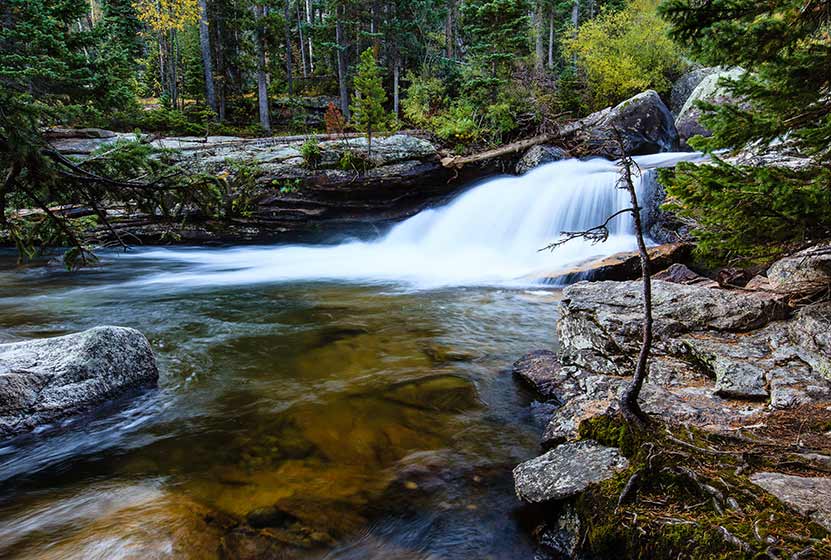
Calypso Cascades in Rocky Mountain National Park
Calypso Cascades is an easy 3.6 mile hike to one of several waterfall destinations along this section of trail. This waterfall in the Wild Basin of Rocky Mountain National Park is gets its name from the purple Calypso Orchids that bloom along the banks of Cony Creek. Explore the full Calypso Cascades hike profile below for trail map, driving directions, and more tips and details to help you enjoy this adventure in Rocky Mountain National Park.
Note: Rocky Mountain National Park now requires timed entry permits from May 27th through October 10th. See the RMNP permits page for more information.
Trail Snapshot: Calypso Cascades in Rocky Mountain National Park
| Hike Distance | 3.6 miles Round Trip |
|---|---|
| Difficulty | Easy |
| Duration | 2-3 hr Round Trip |
| Trail Type | Out and Back |
| Starting Elevation | 8566' |
| Elevation Gain | Approx. +700' |
| Seasons | Spring through Fall, Winter Snowshoeing |
| Dogs | Prohibited in RMNP |
| Hike Trail Map | Click for a Map of Calypso Cascades RMNP |
| Denver Drive Time | 1 hr 30 min |
| Driving Directions to Wild Basin Trailhead | Click for Google Map |
| Driving Directions to Winter Recreation Parking for Wild Basin Hikes | Click for Google Map |
| Town Nearest Hike | Allenspark, Colorado |
| Beauty | Waterfall, mountain views, meadows, river, wildlife: Abert's squirrel, elk, deer, moose, bear; wildflowers |
| Activities | Picnicking, hiking trails, snowshoeing, horseback riding, backcountry camping (with a permit), photography |
| Fee | Park Pass Required |
Parking & Trailhead Information for Calypso Cascades
The southeast corner of Rocky Mountain National Park boasts one of the loveliest portions in the park known as the Wild Basin. The Wild Basin Trailhead is located just 15 minutes outside of Allenspark, Colorado along Highway 115. There is a ranger station at at the Wild Basin Trailhead with toilets and drinking water available.
In the winter (October-May), Hwy 115 may not be plowed to the trailhead, and hikers will need to park their vehicles at a winter parking lot for Wild Basin hikes. Be aware that hikes from the winter parking lot add on another 3 miles of hiking (one-way). There are other small parking areas, like the Finch Lake Trailhead, that may be accessible and allow hikers to park closer to the Wild Basin Trailhead. It's important to know that Hwy 115, though titled a "highway", is a maintained dirt road, which means that it can be used by 2WD vehicles. However, after heavy rains and other severe weather, its quality may degrade until it is repaired. 4WD may be needed when snow is on the ground.
Calypso Cascades From Below
The Hike: Calypso Cascades Trail in RMNP
The hike to Calypso Cascades begins at the Wild Basin Trailhead, and at just .3 mile into the trail, passes by both the lower and upper leaps of Copeland Falls. Read our full trail profile on Copeland Falls for details on how to access both sets of cascades.
After taking in the views at Copeland Falls, the trail follows the course of North St. Vrain Creek as it flows out of the rugged high country and snowfields in this wild corner of Rocky Mountain National Park. Soon the trail will split. The right-hand trail leads through a segment of trail with 5 different backcountry camping sites and on towards Thunder and Lion lakes. These backcountry camping sites can be reserved through the RMNP Backcountry Offices. The left-hand trail leads south towards Calypso Cascades and Finch Lake Trail system.
Taking the Finch Lake Trail, hikers will cross a large log bridge spanning North St. Vrain Creek. Near the bridge, you'll discover an unnamed set of cascades. After crossing the bridge, the trail follows Cony Creek for about 0.4 mile to the site of Calypso Cascades. Calypso Cascades are reminiscent of Fern Falls: the waters of Cony Creek tumble over boulders and fallen trees in a moss-covered landscape. What makes Calypso Cascades unique are the Calypso Orchids (also known as Pink Lady Slippers) that bloom in the late-spring and early-summer along the creek.
Hikers can return to the trailhead to make this a 3.6 mile hike, or can continue on the Finch Lake trail for approximately 1 mile to the site of Ouzel Falls.
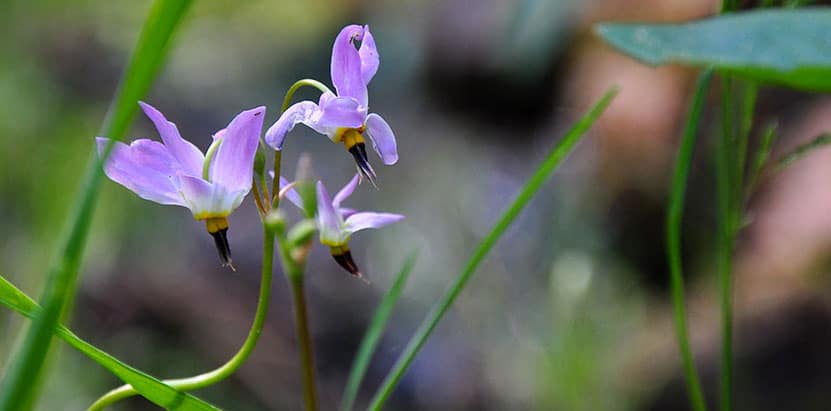
Pink Fairy Slipper Flower
Tips & Resources for Hiking to Calypso Cascades in RMNP
- TIP: The area near the bridge over North St. Vrain Creek can be a great spot for a picnic.
- Packing List: Always pack the 10 Essentials. Download our Hiking Guide to get list and dayhiking packing checklist.
- TIP: There are food storage lockers available at the Wild Basin, Finch Lake, and Sandbeach Lake Trailheads. These are required for visitors staying overnight.
- Get there early: Parking lot might get full even early in the morning.
- You're in Bear Country: Black Bears live in the Wild Basin area and are active on the months of April through November. Be aware, dispose of your food responsibly, and don't food or anything else with a strong scent in your vehicle.
- Trail Map for Wild Basin Area: Trail Map Link
- Colorado Road Conditions: Colorado Road Conditions
- Photo: We would like to express our gratitude to Jeff Kramer for sharing such an amazing photograph of this hike to Calypso Cascades in RMNP.
- After the Hike: Meadow Mountain Cafe
Weather
Map & Driving Directions
Click for Driving Directions