Garden of the Gods Ultimate Hiking Guide
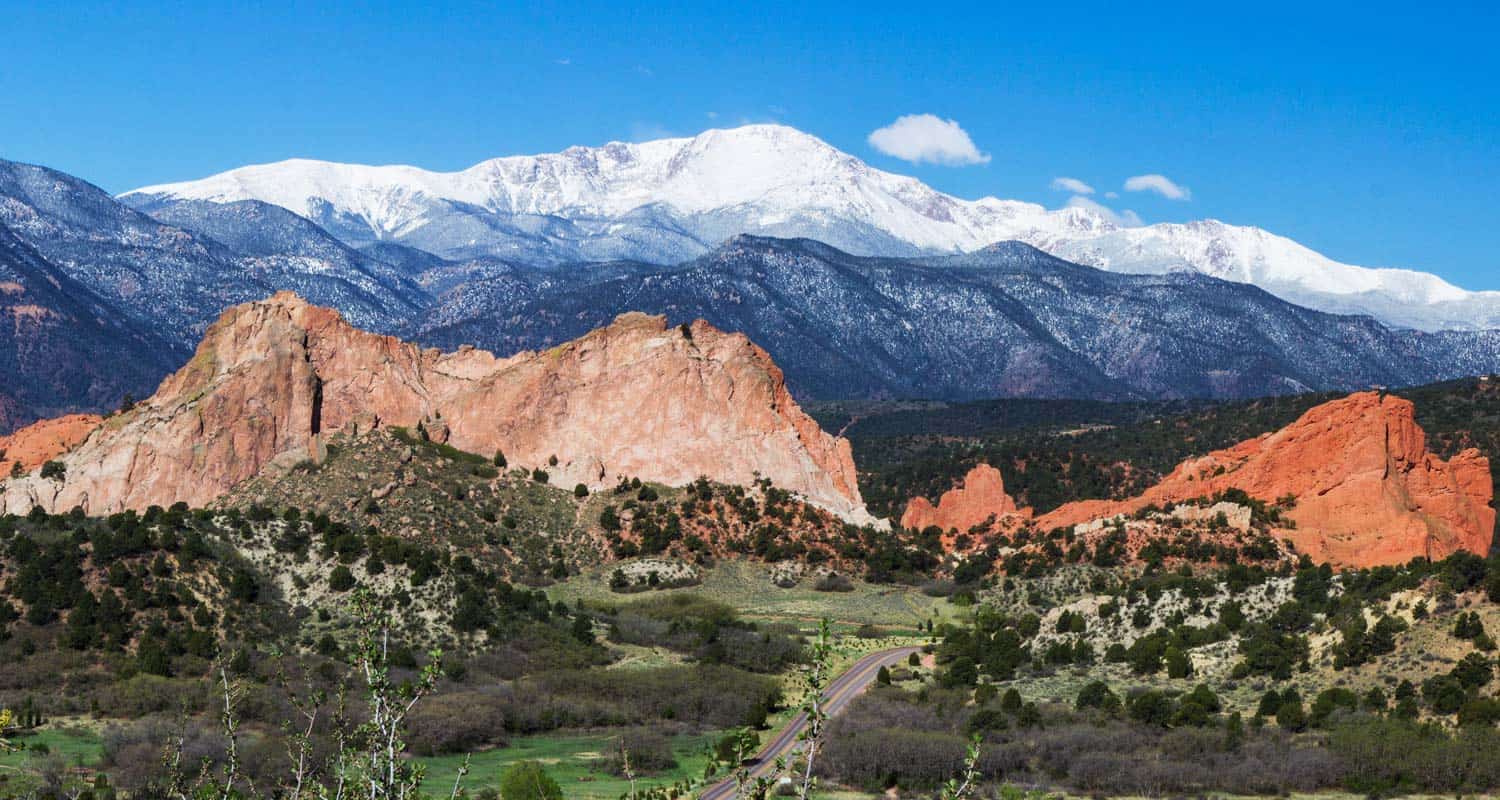
Garden of the Gods is argueabley the best place to hike in Colorado Springs. Designated a National Natural Landmark, the park is known for its towering red sandstone formations and panoramic views of Pikes Peak. Hiking, Horseback riding, mountain biking, birding, and climbing are among the activities that can be enjoyed here. This guide to the Garden of the Gods features 6 different hiking trail options, spanning from easy to moderate and 1/2 mile to 2.5 mile hikes.
We've attempted to create the definitive guide to hiking in Garden of the Gods. In this guide, you'll find: Driving directions to Garden of the Gods, Trail Maps, Photography tips, Camping information for the Garden of the Gods area, and other Resources for planning your Colorado Vacation. This guide to Garden of the Gods is extensive, so we have created a table of contents to help you navigate. Have fun exploring!
Garden of the Gods Hiking Guide Contents
- Trail Snapshot
- Driving Directions
- Hiking Trails
- Central Garden Trail
- Ridge Trail
- Siamese Twins Trail
- Palmer Trail
- Scotsman & Buckskin Charlie Loops
- Balanced Rock Trail
- Photography
- Hiking with Kids
- For Out-of-State Hikers
- Things to Do Nearby
- History and Geology
- Protect Garden of the Gods
Trail Snapshot: Garden of the Gods
| Hike Distance | Six Trails: 1/2 to 3 miles Round Trip - Depending on Trail |
|---|---|
| Difficulty | Easy to Moderate |
| Trail Type | Both Loop and Out-and-Back Hikes |
| Starting Elevation | 6200′ |
| Elevation Gain | Up to +300' |
| Seasons | Year Round |
| Hours | 5AM to 9PM |
| Cost | Free to the Public |
| Dogs | Allowed On 6' Leash |
| Hike Trail Map | Click for a Map of Garden of the Gods Area Hikes |
| Denver Drive Time | 1 hr 10min |
| Driving Directions | Click for Driving Directions to Garden of the Gods |
| Town Nearest Hike | Colorado Springs, Colorado |
| Beauty | Red Rocks, Views of Pikes Peak, Wildflowers, Meadows, Aspens, Wildlife: Mule Deer, Whitetail Deer, and Bighorn Sheep. |
| Activities | Hiking, Biking, Running, Horseback Riding, Rock Climbing (in approved areas with permit), Camping, Visitor & Nature Center, Free Guided Nature Walk, Geo-Trekker Movie, Outdoor Scavenger Hunt. |
Driving Directions to Garden of the Gods
Take interstate I-25 to Colorado Springs. Exit onto West Fillmore Road and head West. Fillmore will change names to Fontmore Road. Take a right onto North 30th Street, and you'll find the Garden of the Gods Visitor Center just 1.2 miles up on the right/east side of the road. We recommend you stop at the Visitor Center to pick up a free color trail map. The main parking area for hiking is located on the North end of the park. You'll find Gateway Road (the access road into Garden of the Gods) directly across from the Visitor Center. Head west on Gateway road, then right at the intersection with Juniper Way Loop Road. The main parking area is located on the left-hand/South side of the first bend of the Juniper Way Loop. There are restroom facilities available at both the main parking area and at the visitor center.
- Driving Directions to the Main Parking Area at Garden of the Gods
- Driving Directions to Garden of the Gods Visitor and Nature Center
- Driving Directions to the Trading Post at Garden of the Gods
Before you park, consider driving around the entire Juniper Way loop to take in the sites and get your bearings. It's one of the most beautiful drives in Colorado, especially during sunrise and sunset. The loop is one way, has a low speed limit, and is frequented by cyclists. So, it also makes for a great bike ride-- the northbound loop is a gradual but demanding climb. Be attentive to hikers and cyclists as you drive in the park.
6 Hiking Trails at Garden of the Gods
Trail Option #1 - The Central Garden Trails
| Hike Distance | 1 Mile Round Trip |
|---|---|
| Difficulty | Easy |
| Trail Type | Lollipop Loop |
| Elevation Gain | Approx. +30' |
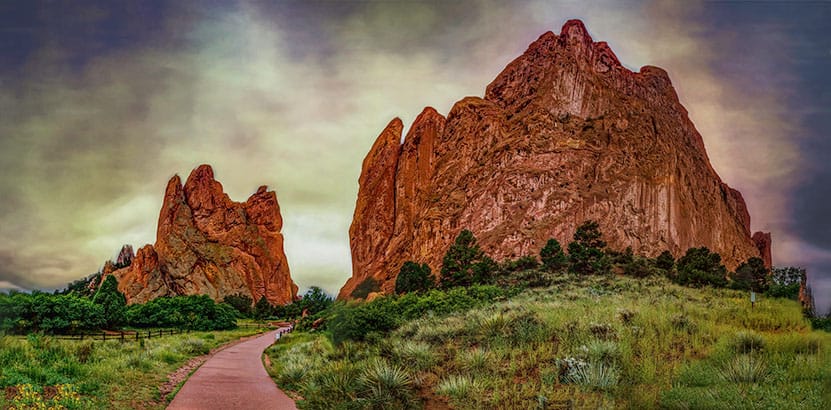
We've put this loop hike first on our list because it takes you right into the heart of the park. It's also paved and wheelchair and stroller accessible. From the parking lot, hikers will head south on the main trail (pictured above). On your right will be the largest of the sandstone Monoliths, North Gateway Rock. The tower on its north end is called the Tower of Babel, and its south end marks the gateway into the famous central valley. But before you enter the valley, be sure to look up at the Kissing Camels formation located at the middle-top of North Gateway Rock.
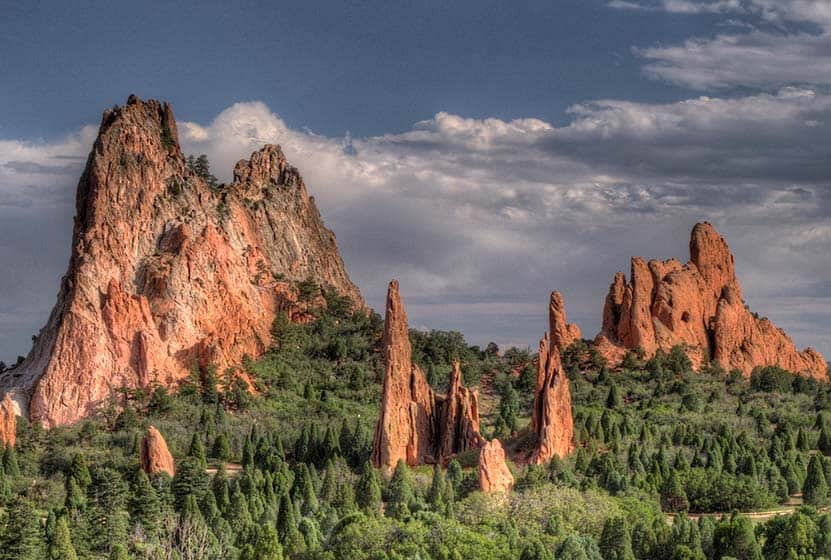
The loop begins right after you enter through the gateway at the twin spires of Sentinel Rock. Going left will take you on a clockwise circuit around the valley. You'll first pass between the Three Graces and Pulpit Rock before the trail bends to the North. Finally, the trail will bend South and meet back up with the trail that leads back to the main parking lot. There are many other trails that come off of the main loop trail, so bring a map with you if you plan to explore some of the nooks and crannies of the park.


Looking for more places to hike with your dog? Explore more Dog-Friendly hikes near Denver by visiting our 25+ Dog Friendly Hikes and our Top 10 Dog Hikes Near Denver.
Trail Option #2 - The Ridge Trail at Garden of the Gods
| Hike Distance | 0.5 Mile Round Trip |
|---|---|
| Difficulty | Easy |
| Trail Type | Loop |
| Elevation Gain | Approx. +100' | Ridge Trailhead Driving Directions | Click for Directions to South Garden Parking Area |
The Ridge Trail is a short, half-mile loop on the southeastern end of the park. From the parking area indicated in the table above, the trail is located across the street to the left by takign a crosswalk. Before you cross, be aware of cars and cyclists (often the cyclists come around the curves of the park much faster and can take you by surprise). The Ridge trail makes it way to the foot of The Sleeping Giant formation before bending back toward the parking area.

Siamese Twins Rock Formation - Courtesy of Matt Santamarco
Trail Option #3 - The Siamese Twins Trail
| Hike Distance | Approx 1/2 Mile |
|---|---|
| Difficulty | Easy |
| Trail Type | Loop |
| Elevation Gain | Approx. +150' |
| Trailhead Driving Directions | Click for Directions to Siamese Twins Trailhead |
To hike to the Siamese Twins formation, take the trail on the north end of the parking lot that leads North. As you hike, you'll observe a very different landscape to the West, desert terrain that stretches out and up to Rampart Range Road. At the Siamese Twins, be sure to grab a photo of Pikes Peak framed by the window in the rock. Be sure to adjust your camera to take it's light reading from the distant mountain rather than the foreground (on your phone, simply press your screen to readjust the reference point for the lighting and focus). The trail heads South and will pass the parking area as it bends around and back up to it.
Trail Option #4 - The Palmer Trail (Chambers/Bretag Loop)
| Hike Distance | 2.5 as Described Miles |
|---|---|
| Difficulty | Moderate |
| Trail Type | Loop |
| Elevation Gain | Approx. +250' |
| Trailhead Driving Directions | Click for Directions to Main Parking Lot Trailhead |
This 2.5 mile loop hike is a great way to take in the full spectrum of terrain and rock formations in the park. The route, as describe below is about 2.5 miles, and mileage may vary depending on the side trails you decide to take. From the main parking area/trailhead, the Palmer Trail can be picked up by crossing Juniper Way directly North of the lot. Heading left/West on the Palmer trail, it will wind around South, roughly following the main road through Garden of the Gods.
To make the loop, at about 1.3 miles on the Palmer Trail hikers will cross Juniper Way at the Scotsman Picnic Area and join up with the Scotsman Trail. It will dips South initally, then heads Northeast to meet up with the trails of the Central Valley. This area can be quite a labyrinth and the best way to pick up the Eastern side of the loop will be to keep an eye out for the gateway, the space between North Gateway and South Gateway Rocks. Once through the gateway, hikers will pick up the Garden Trail, head East, and join up with the Susan G. Bretag Trail, by crossing Juniper Way where it intersects with Gateway Road. Heading North on the Bretage Trail, it will eventually come to a fork. Taking the left-hand/West trail (Palmer Trail) will lead back to the parking lot.
Trail Option #5 - The Scotsman and Buckskin Charlie Loops
| Hike Distance | Scottsman Loop Approx. 1 Mile; Scotsman+Buckskin Charlie Approx. 2 Miles |
|---|---|
| Difficulty | Moderate |
| Trail Type | Loop |
| Trailhead Driving Directions | Driving Directions to the Scotsman/Buckskin Charlie Trailhead |
These are two loops found just South of the Central Valley area. The parking area is small and will likely be full during most days during the Summer months. One alternative is to begin your hike at the main lot, then pick up the Scotsman trail on the South end of the Valley.
The Scotsman Loop is 1.1 mile in its entirety. Picking up the trail from the Scotsman Picnic ground by following social trails East, the Scotsman dips South then winds Northeast before making a sharp turn South and back to the parking area. Bring your trail map, or have it up on your phone to keep oriented.
The Buckskin Charlie Trail can be added to double your hike. Hikers will pick up the Buckskin Charlie Trail on the southern bends of the Scotsman. The trail winds around until it begins again to head North, following the line of the main road, Juniper way, until it joins back up with the Scotsman and returns home to the Scotsman Picnic area.

Trail Option #6 - The Balanced Rock Loop Hike
| Hike Distance | 0.7 Mile |
|---|---|
| Difficulty | Easy |
| Trail Type | Loop |
| Trailhead Driving Directions | Best Trailhead for Balanced Rock Loop Best Parking for Viewing Balanced Rock |
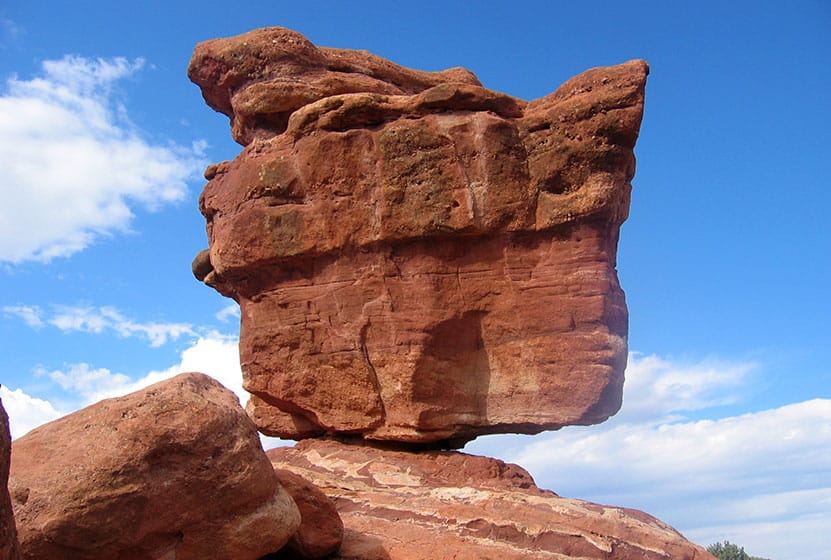
You don't have to hike to Balanced Rock (see driving directions in the table above). In fact, this loop hike is named "the Balanced Rock Trail" only because it is near Balanced Rock, not because it takes you there. For visitors entering through the South end of the park, Balanced Rock will be the first stop, then on to the Trading Post. In fact, the best way to pick up the Balanced Rock Trail is from the Northern end of the Trading Post lot. Hikers will find a connector trail that goes directly from the lot North, crosses the road, and immediately picks up the Balanced Rock Loop trail. Hiking counter-clockwise, the trail follows alongside Garden road, then leads North until it terminates at another section of the road. Hikers can cross the road (watch for cars and cyclists) and pick up the Cabin Canyon Trail across the street. Taking the Cabin Canyon Trail South, it will come to a crosswalk where you can pick the Balanced Rock Trail up again and back to the parking area.
Photography: Great Photos in Garden of the Gods
- All year round and any time of the day, Garden of the Gods is already photogenic. However, the best times to take photos are during the golden hours of sunrise and sunset when the rock faces are lit up and cast their shadows across the landscape. Going early in the morning will also help you avoid having people in your photos.
- Snow adds its white contrast during the Winter months and early Spring. If you want a snowcapped Pikes Peak in the background, you'll likely need to get that shot before mid-June.
- Wildflowers appear most noticeably in April through July.
- After heavy rains, standing water can form what look like small ponds (but are really giant puddles). These offer the rare opportunity to capture the reflection of the rock formations on water.
- One classic vantage point is to take your photo from the North End of the Palmer Trail at Sunset. This will give you one of the best photographs of the Central Valley area.
- For sunrise, a great place to capture Garden of the Gods with Pikes Peak in the background is from the parking area up on Mesa Road that overlooks the park.
Hiking with Kids at Garden of the Gods
- Hydrate: This goes for adults as well, but is even more important with kiddos. Almost all the trails in Garden of the Gods are exposed to the sun. You're also in a High-Plains Desert environment, so you simply need more water. Then add onto that physical exertion. So, bring water and hydrate.
- Pack Snacks or Bring a Lunch: Even though the hikes are not long in Garden of the Gods, it always helps to have fuel. Plus, nothing beats finding a great view of Pikes Peak and kicking back to rest and enjoy a picnic.
- Climbing can result in injury: Having hiked often in Garden of the Gods, I've witnessed people--usually young people--who have climbed up into areas and gotten themselves in a tough spot. Children should know that climbing up into an area is a lot easier than getting down.
Visiting Garden of the Gods From Out-of-State
- Download our Hiking Guide for a list of hiking tips, 10 essentials that everyone should pack for their dayhike, and recommended hiking snacks.
- Free Full-Color Map: Don't get lost. Pick up this freebie at the Garden of the Gods Visitor & Nature Center information kiosk.
- Bring Lots of Water: It can be very hot and dry, and there may not be a chance to refill, so bring a full water bottle.
- Altitude: If you are visiting Colorado from out-of-state, chances ar that it will take you a few days to adjust to teh altitude. The good news about hikes in Garden of the Gods is that they are relatively easy. However, a little exertion at altitude can result in feeling naseauted, winded, and just plain tired. So, don't overdo it if you are not feeling well. Hydrate, Hydrate, Hydrate (because it oxygenates your blood), and get good rest.
- Garden of the Gods Visitor CenterThe Visitor Center is a must-do, especially if you are visiting from out-of-state. They now have a cafe with a family-friendly and healthy menu.
- Free Guided Nature Walks led by a naturalist, from the north parking lot
- Geo-Trekker Movie Experience at the Geo-Trekker Theater in the Visitor Center.
- Outdoor Scavenger Hunt with a guide that will be provided
- Park Tours on Bus, Jeep, or Segway
- Garden of the Gods Trading Post: This gift shop and art gallery is located at the southwest edge of the park.
- Breakfast and Lunch: A favorite local go-to is the Mountain Shadows Cafe--a great place to refuel after your hike.
- Mediterranean Food: A great mediterranean option is the nearby Heart of Jerusalem Cafe.
- Amazing Sandwiches: You've got to be patient for this one, because, at the Mate Factor, they take their time crafting your sandwich--but it's worth it. Step inside and you'll agree that you've never been to a place like this before. Mate Factor, Manitou Springs.
- Stay the Trail: The sandstone in the parks is easily eroded, and because this area sees a lot of visitors the impacts of individuals quickly adds up. So keep on established trails during your hikes.
- Keep Dogs on a 6' Leash: And be sure to bring bags for picking up after your pet.
- Pack Out All Trash: It should go without saying but be sure to pick up after yourself. In the last few years it seems that litter along trails in Colorado has grown to be a real problem. Do your part to keep the park and our State beautiful. One of our family hiking habits is to pick up trash as we hike.
- Climbing and Bouldering: Climbing and Bouldering in Garden of the Gods require both the proper equipment and permits. You can pick up permits at the Visitor Center or online at the City of Colorado Springs climbing permit page.
- Thanks goes out to Joel Tonyan for his great photo of Garden of the Gods and snow-dusted foothills.
- Care for the Rock: This should also go without saying, but don't carve or deface the rock in any way.
- Let them sit and grow: Removing rocks, plants, or animals is prohibited.
- Mountain Biking: Mountain biking is limited to designated trails.
Camping Near Garden of the Gods
Camping is prohibited in Garden of the Gods, and it's important to understand that the Park is located in the town of Colorado Springs--it's not a backcountry experience. Those looking to camp will need to explore campgrounds and tent camping options outside the immediate area. However, there is a nearby campground in Manitou Springs that offers cabins, bunkhouses, and RV spots. It's pet-friendly and even offers bike rentals. You can find current rates and more at Garden of the Gods RV Resort. Most of the tent camping is going to be out near Rampart Range Reservoir or further West past Woodland Park, CO.
Things to Do and Places to Eat Near Garden of the Gods
History and Geology of Colorado’s Garden of the Gods
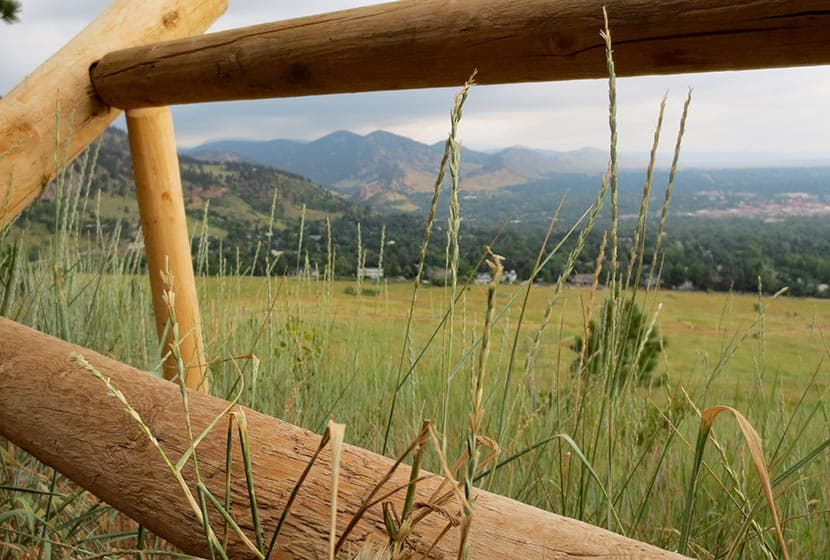
Imagine a prehistoric landscape of sand dunes plunged and crushed into the earth by some violent upheaval involving tectonic and hydraulic forces. That's how the red rock fins of Garden of the Gods were formed in the womb of the earth. Then another cataclysm. The Pikes Peak massif gets thrust to the sky along with the surrounding red sedimentary rock. Some at angles and some perpendicular to the land. Then the forces of wind and water began to wear down the loose rock creating the unusual holes and across the surfaces of the rocks. You'll find these types of rock formations stretching from North of Ft. Collins down into Southern Colorado. Some of the most notable are Roxborough State Park and South Valley Park near Littleton and Red Rocks Park in Denver.
After his death in 1907, the children of railroad tycoon, Charles Elliott Perkins, fulfilled their father's wishes by donating 480 acres of Garden of the Gods to become a permanent park and free to the public. The park has expanded over the years to over 1,300 acres. The park got its name from a German surveyor mapping out the land in 1859.

How You Can Protect the Garden of the Gods Area
Weather
Map & Driving Directions

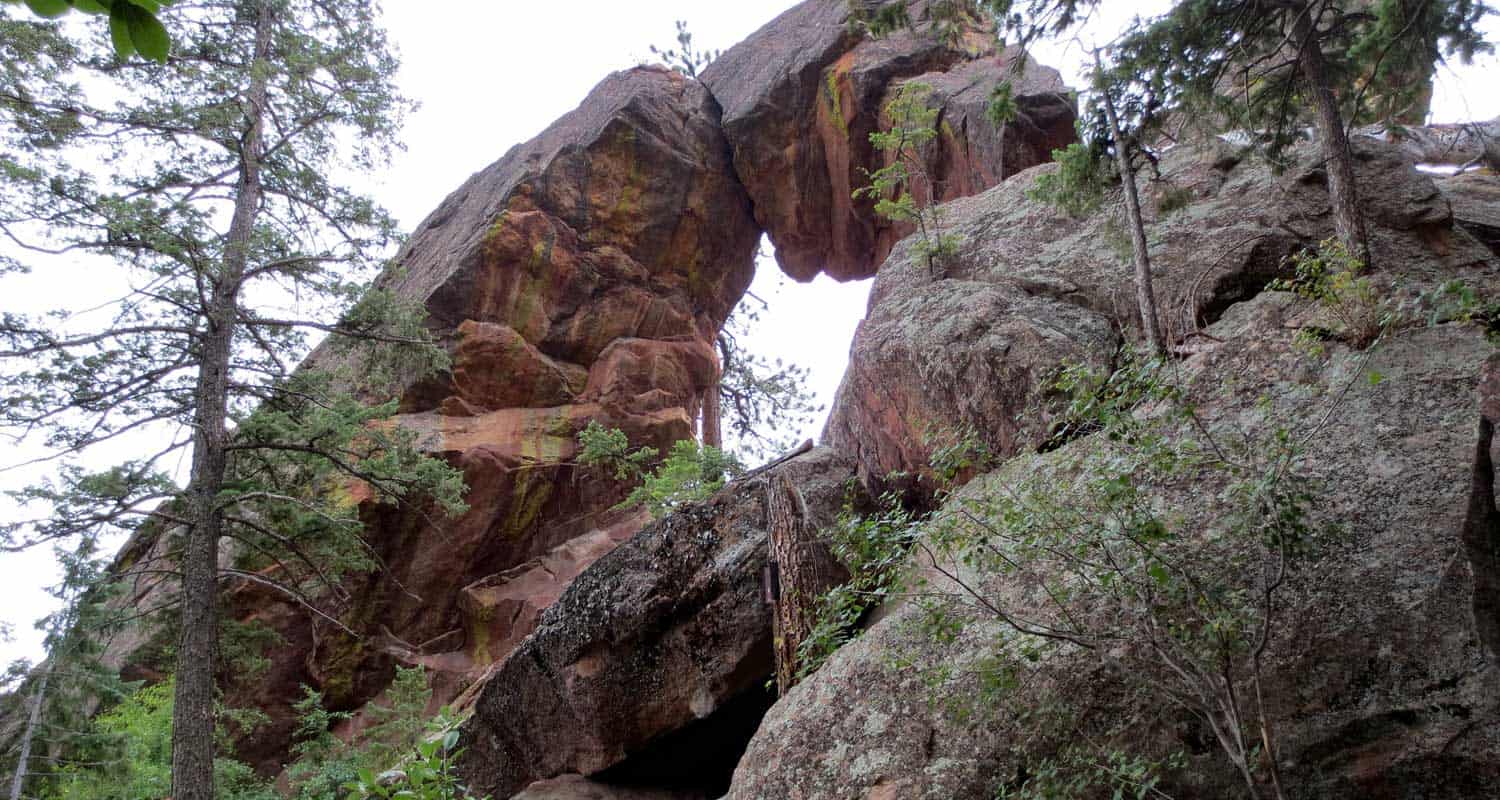
Royal Arch Trail
The hike up to Royal Arch in Boulder's Chautauqua Park is a serious workout, but the beauty of Bluebell canyon and the view of Royal Arch make it worth the journey. Our most important tip for making this an enjoyable hike is to go when it's not so crowded, during the early morning or on weekdays. Scroll down to get all the details you need for this hike in Boulder, Colorado: trail map link, driving directions, weather forecast, and more tips.
Trail Snapshot: Royal Arch Trail in Chautauqua Park
| Hike Distance | 3.5 miles Round Trip |
|---|---|
| Difficulty | Moderate to Difficult |
| Duration | 2-3hrs |
| Trail Type | Out and Back |
| Elevation Gain | Approx +1400′ |
| Seasons | All Year |
| Dogs | Allowed on Leash |
| Hike Trail Map | Click for a Trail Map of Royal Arch Area |
| Denver Drive Time | 40 min |
| Directions | Click for Google Map |
| Town Nearest Hike | Boulder, Colorado |
| Beauty | Rock formations, Bluebell Canyon, raptors, natural spring |
| Activities | Hiking, rock climbing |
If you talk with someone who has hiked the trail up to Boulder's Royal Arch, they will tell you two things: 1) The Royal Arch, though not as grand as some of the arches in Utah's backcountry, is really a beautiful sight, and 2) That the hike is a real challenge.
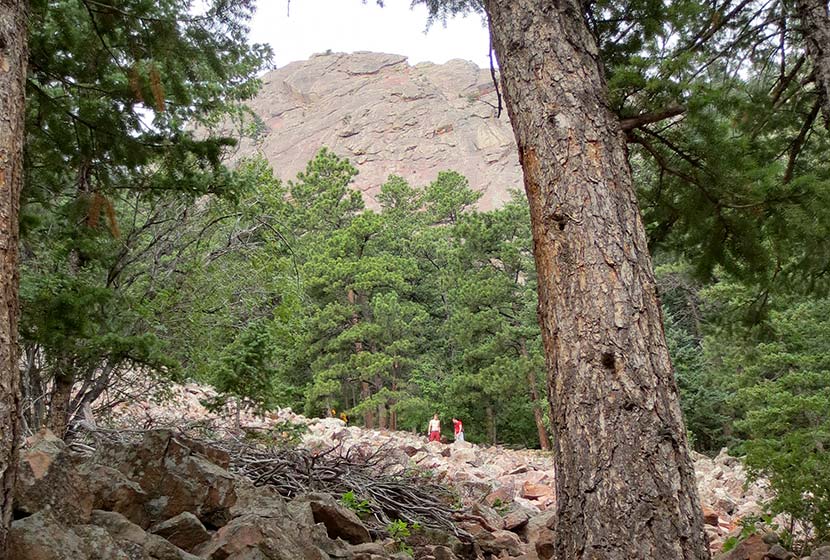
While the trail is relatively short - 3.5 miles round trip - the hike up through Bluebell Canyon to Royal Arch has a lot of uphill and downhill, making the elevation gain around 1400' over the course of the trip. Because the trail has a lot of rock steps and is heavily used, the latter half of the hike requires some negotiation. It's still a good trail, just don't expect a walk in the park.
The Hike to Royal Arch
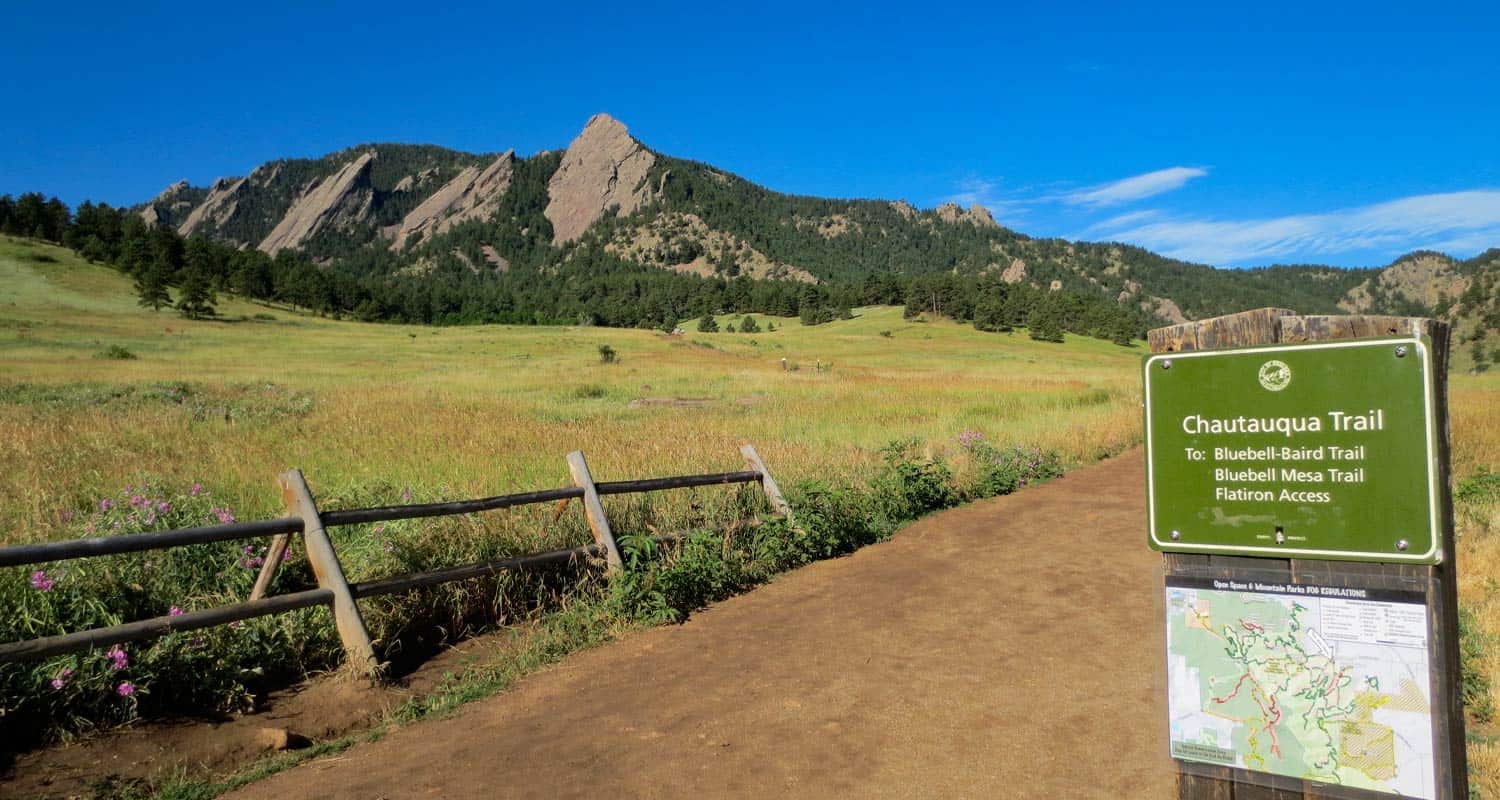
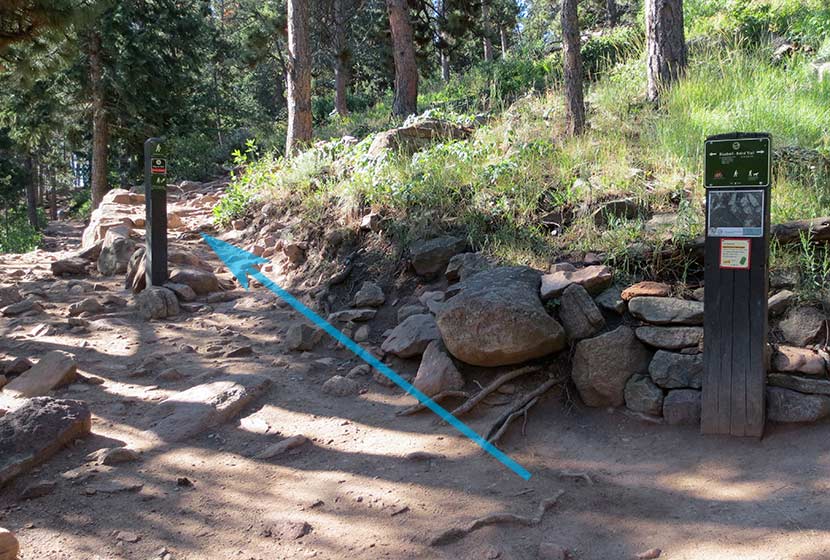
Beginning at the Chautauqua Park Trailhead, take the Bluebell Road Trail through the meadows and up to the Bluebell Shelter (see trail map here). You'll come to a junction near the Bluebell Shelter, and will see signs pointing you to the Royal Arch Trail.
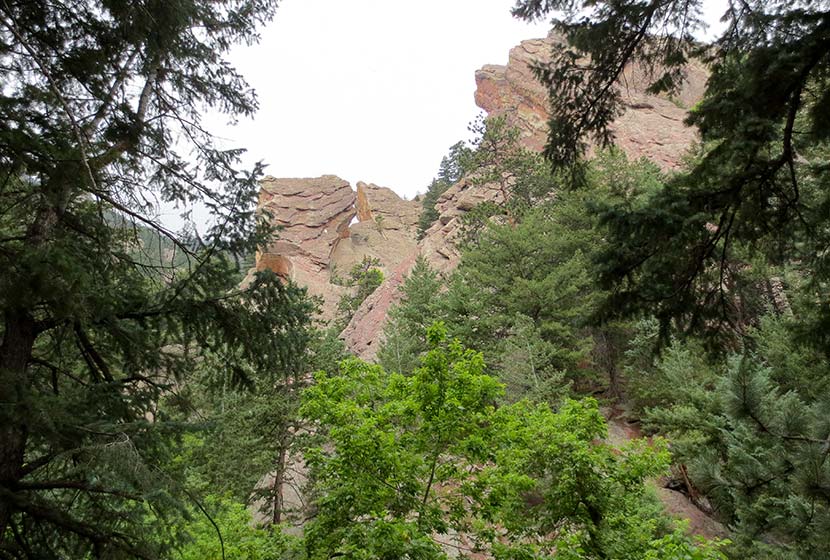
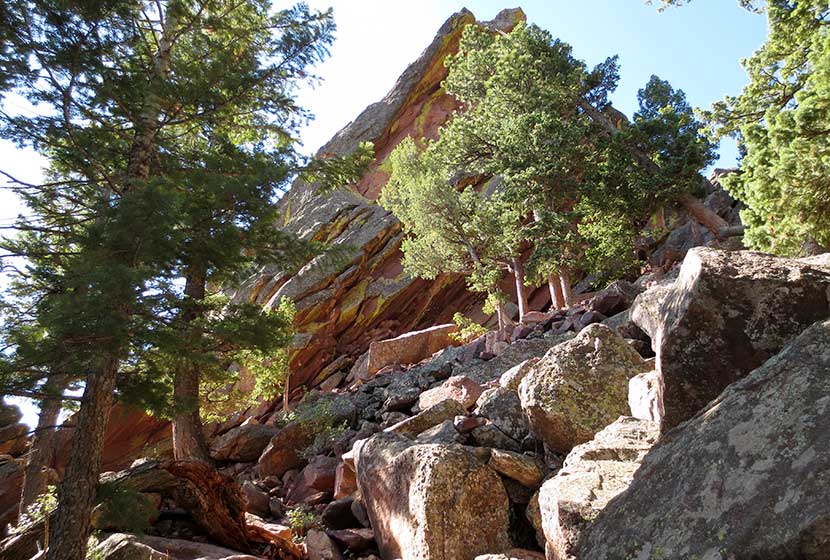
Soon, you'll enter Bluebell Canyon. The Royal Arch trail will descend before beginning its climb to the top. This section of the hike is especially alive and enchanting during the early morning hours. Bluebell Canyon is home to raptors and is seasonally protected when the birds are hatching. The trail is still accessible during those times, but signs are posted to keep the canyon drainage clear of hikers.
The higher you hike, the more stairs you'll encounter. It's nothing like hiking the Incline in Colorado Springs, but it's still a real workout. If you hike to the Royal Arch on the weekend, this is where you'll begin to experience the trail congestion. In fact, I'd have to say that this was the most overcrowded trail I've hiked in Colorado. A lot of hikers had stopped to rest, huffing and puffing trailside. Others gathered right in the middle of the trail. I overheard several people deliberating whether or not to keep going, and watched others turn around without making it to the top. So, our first and most important tip would be to hike to Royal Arch early in the morning by getting on the trail before 8AM, or hiking the Royal Arch trail on a weekday.
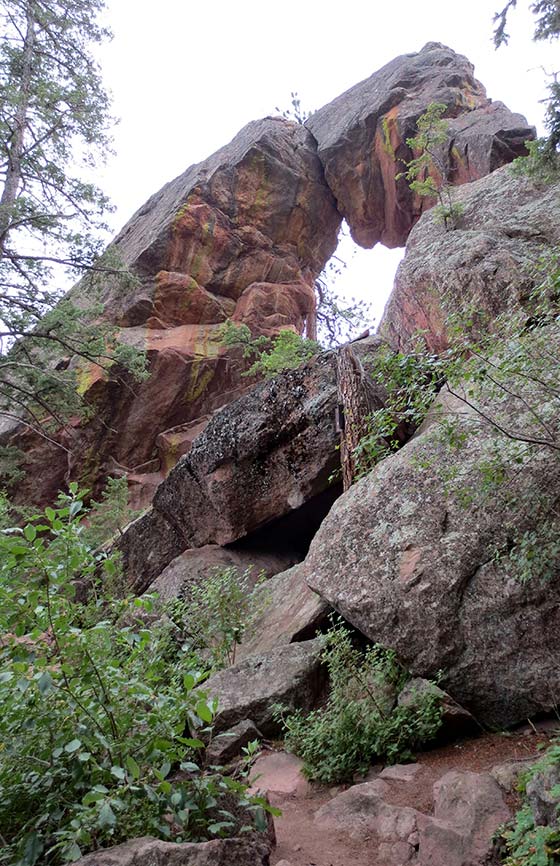
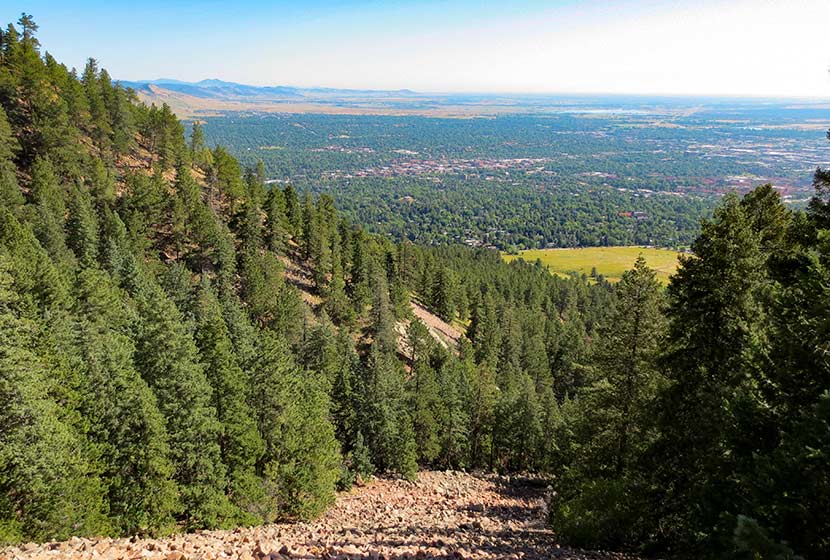
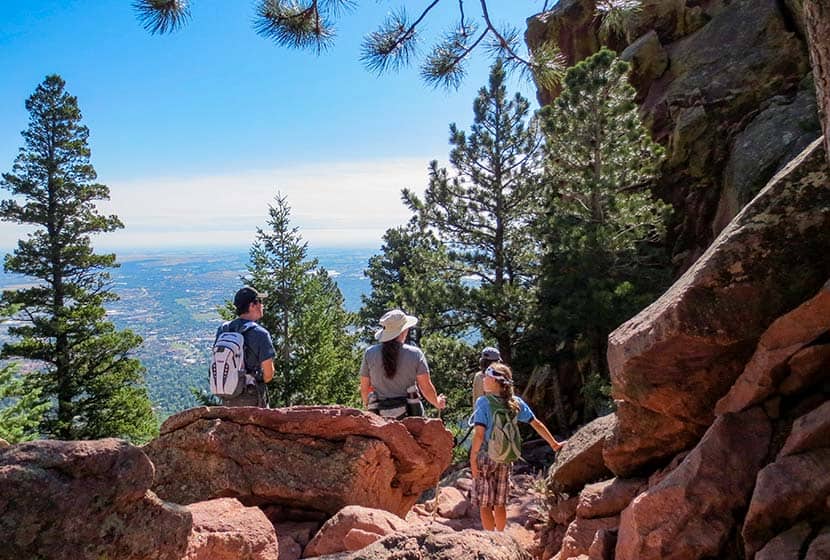
After pushing up to Royal Arch, be sure to walk around it and go through it. The views of Boulder are incredible. On a clear day, you can see all the way to Denver. I'd recommend taking a picnic or at least a snack, and kick back for a while. There is supposedly a way to make this hike more of a loop by taking a trail down the backside of the arch, but it's an unmarked trail and one hiker who took it warned against it. So, we recommend taking the marked Royal Arch trail back down to the shelter. From there, you have some trail options.
On my way back, I decided to take the Bluebell Mesa trail down to the Chautauqua trail, which led me home to the trailhead and ranger cottage. I'd highly recommend this route back. It takes you through a stand of pines on a mesa above the meadows of Chautauqua Park. You can pick up the Bluebell Mesa trail near the Bluebell Shelter soon after you exit the canyon.
Tips & Resources for Hiking to Royal Arch in Boulder:
- Leave Fido At Home: I love dogs; in fact, I took our Dog, Francine, on the hike up to Royal Arch. But it was so congested that it made it difficult for her and I to navigate the trail together. Other dog owners with long leashes nearly tripped several hikers along the trail. If you want to bring your dog on this hike, I'd recommend going early or going on a weekday.
- Bring Snacks and Water: It probably goes without saying, but be sure to bring food and water to refill your tank. This hike demands it.
- Bring Trekking Poles: The trail up to Royal Arch can be hard on the knees--especially the descent--so bring trekking poles if you have them. The trail is heavily shaded, so my guess is that it will ice up in the winter. Just another reason to bring something that will help you get traction.
- Take Time at the Top: Build time into your hike to rest and maybe have a picnic under the Royal Arch.
- Keep and Eye on the Weather: Talking to one of the rangers, he shared that storms can come up quickly along the Flatirons, which will catch hikers unawares. Because you are hiking through a densely wooded canyon and are so close to the mountain, it makes it difficult to really judge the skies. But the Flatirons area is like a lot of other mountain hikes, storms typically roll in during the early afternoon.
- Trail Map for Chautauqua Park: Trail Map Link
- Colorado Road Conditions: Colorado Road Conditions
- After the Hike: Ozo Coffee in Boulder, Colorado
Weather
Map & Driving Directions
Click for Driving Directions
First and Second Flatirons Hike in Boulder
Hiking the Flatirons near Boulder, Colorado is a must. The trail draws you across an green meadow, then up through a notch between the First and Second Flatiron. You'll find the best part of this hike in the Flatirons at the end of the trail: some breathtaking and unmatched views of Colorado's Rocky Mountains. There's even more though. Explore the trail profile below to get links to the Flatirons map, hiking tips, trail details, and driving directions to the Chautauqua Park trailhead.
First and Second Flatiron Hike Trail Snapshot
| Hike Distance | 2.6 miles Round Trip |
|---|---|
| Difficulty | Moderate |
| Duration | Approx 2 hrs |
| Trail Type | Out and Back |
| Elevation Gain | +1400′ |
| Seasons | All Year |
| Dogs | Allowed on Leash |
| Hike Trail Map | Click for Map for Boulder Colorado's Flatirons Hike |
| Denver Drive Time | 45 min |
| Directions | Click for Google Map |
| Town Nearest Hike | Boulder, Colorado |
| Beauty | Views of Continental Divide, Expansive Meadows, Wildflowers, Flatirons Rock Formations, Cliffs |
| Activities | Hiking, Rock Climbing, Picnic Areas |
| Video | Click For Video |
The Flatirons are the most prominent feature of Boulder Colorado's landscape. They are beautiful to take in from a distance, but they are even better to explore. Here I'll give you a some options on how to make the most of the First and Second Flatiron trail, and some details on what to expect.
The Flatirons Trailheads at Chautauqua
#1 - Chautauqua Trailhead: You can start your hike from a couple different places. I chose Boulder's Chautauqua Park trailhead. The parking lot will fill up fast, by 8:30 on the weekend, but you can park along Baseline Road. The city of Boulder is doing some improvements on the parking area beginning September 3rd, 2013 and it looks like the lot will be closed. Here's a link for construction updates. But don't let that deter you, just park out on Baseline. The Chautauqua trailhead features an historic Ranger Cottage (link for hours of operation), and you'll find free trail maps for the flatirons in a box attached to the sign at the entrance to meadow.
#2 - Enchanted Mesa Trailhead: This is a lesser known trailhead (but probably well known by locals). Here's a google map to help you find it. From here, you can walk across to Chautauqua Park and pick up the Chatauqua Trail, or you can make a longer trip out of it by following the McClintock Upper Trail in. See the Chautauqua Area Hiking Map for details.
Get our Dayhikes Near Denver Hiking Guide. It includes our favorite hikes near Denver, packing lists, hiking food and snack ideas, and tips for hiking the Front Range of Colorado.
The Flatirons Panorama:
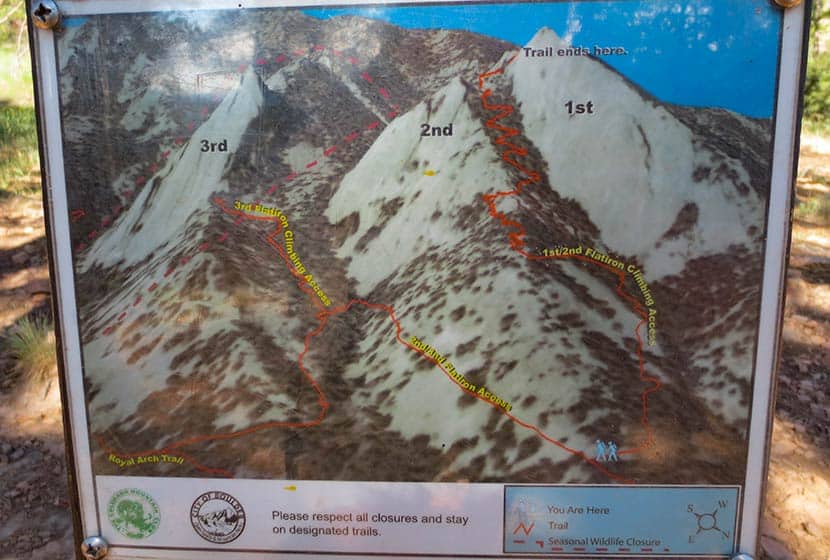
In the panorama video above, you'll see that the first flatiron is the most prominent. It's on the far right (North) and the second and third flatirons follow it to the south. There is an impressive canyon between the second and third flatirons that you'll get to peer down into towards the end of the trail. But let's start this hike profile at the trailhead.
The First Flatirons Trail Sequence
Here's the basic set of trails I'd recommend just because it's the most direct approach: Chautauqua Trail to First and Second Flatiron Trail. On the way back, I'd recommend the Bluebird Mesa trail; it takes you through a pine glade along the spine of a Bluebird Mesa, then gently drops back down to the Chautauqua trail near the trailhead. This makes for a roughly 2.5 mile hike.
Make it a loop. Deb Stanley details an interesting loop by taking a little known trail down the back side of the flatirons that hooks back into the Saddle Rock Trail. Looks like fun, but it also looks like it could be easy to get turned around in there if you're not careful. Check out the details on her loop trail profile if you're interested in taking this route.
First and Second Flatirons Hike Details
This photo gives you the best overview of the Flatirons one and two trail. Basically, once you break out of the meadow and start on the 1st and 2nd Flatirons trail, your going to ride the ridge of the 2nd flatiron up to a notch between the 1st and 2nd Flatirons. The trail continues behind the flatirons, then bends north and takes you up into a canopy formed by the back of the first flatiron.
 Starting at the Chautauqua Trail, you'll hike through the spectacular meadows at the base of the flatirons. If it's after a rain, be prepared for a lot of rain along what is essentially a fire road. The sides of the trail here have a good bit of poison ivy that tries to reach out and touch your calves, so keep an eye out for it. What I found most interesting about this section of the trail was the diversity of both plants and trees along the trail. There is a greater variety of deciduous trees and shrubs that I've seen anywhere on the front range.
After taking the Bluebird-Baird Trail (left), you'll encounter a fork in the trail. Follow the signage towards the 1st and 2nd Flatirons trail (see photo below). Soon the trail will fork again and you'll want to take the 1st and 2nd Flatirons trail. The signage is really good in the Chautauqua/Flatirons area.
Emerging from the woods, you'll hike up through a long talus field, but the trail is well-constructed through this gigantic pile of rock. Be sure to look back at the views that open to Boulder.
 The trail goes in and out of the shade, over a lot of rock, and eventually to a short scramble over some larger rock to regain the trail. The next landmark you'll reach is the notch between the first and second flatiron; you'll see the angled outcrop of the second flatiron just below the notch (photo below). This is a great place to stop and relax.
 The notch between the first and second flatiron offers more views of Boulder and a birds-eye view of the CU campus, it's terracotta roofs against the green of the city lawns.
But the better place to take a break is just behind the notch. Here, you'll be able to look down into canyon that runs between flatiron two and three, and you get a great view of the imposing profile of flatiron three.
 Then take the trail up a few switchbacks as it bends north. You'll hit a saddle but the trail will continue to bend to the right, until you find yourself in the shade of the massive top of the first flatiron. Back here you'll find all kinds of rock shelves and nooks to sit and take in some of fantastic views of Colorado's Rocky Mountains to the West.
 Tips & Resources for Hiking the First and Second Flatirons:
- TIP: This hike gets really crowded, so start early (before 8:30 AM).
- TIP: Take a lunch or breakfast and coffee with you. The first flatiron nooks are perfect for just sitting and enjoying a picnic.
- TIP: Weather can come up fast on the flatirons in the summer. Just be aware that it can change fast and bring a rain jacket.
- TIP: Dogs are allowed if they are leashed. Boulder does have a special tag you can get for your dog to allow it off leash in the park. It's called the Voice and Sight Control tag and you can get more information here.
- After the Hike: Ozo Coffee Roasters in Boulder
- Trail Map for Chautauqua Park: Trail Map Link
- Colorado Road Conditions: Colorado Road Conditions
Weather
Driving Directions to First Flatiron Trailhead
Click for Driving Directions