Bear Peak Near Boulder
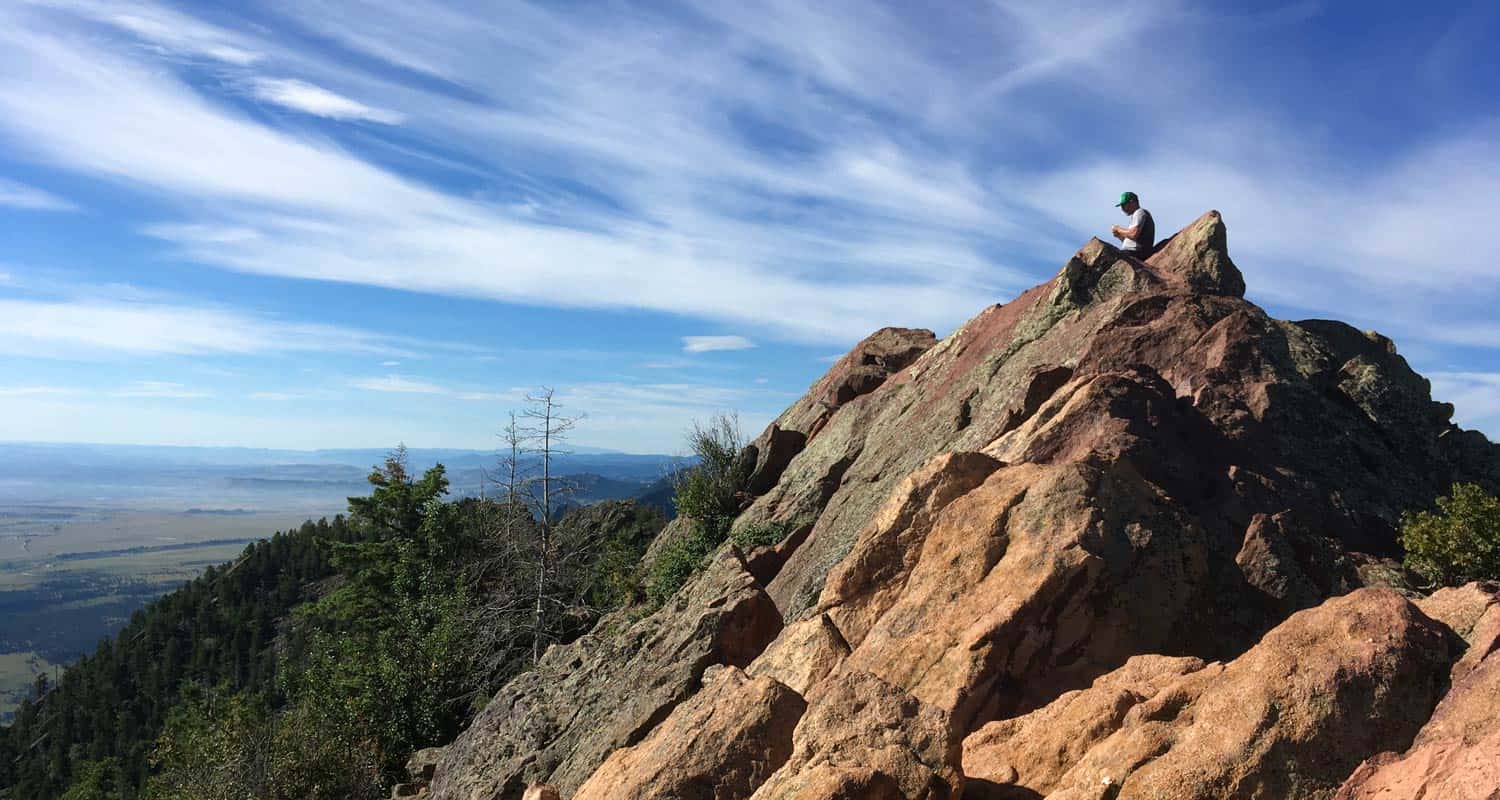
Bear Peak is a demanding 7.4-mile hike (round trip) through the broad meadows of South Mesa, up through the rocky trail of shadow canyon, to the granite summit with sweeping 360 degree views of the Colorado Front Range. Hikers can summit South Boulder Peak on your way and make a loop hike out of your adventure by returning via Fern Canyon. Explore the full Bear Peak hike profile below for the trail map, driving directions, and more tips and details to help you enjoy this adventure near Boulder, Colorado.
Bear Peak Trail Snapshot
| Hike Distance | 7.4 Miles Round Trip or 8.4 Mile Loop |
|---|---|
| Difficulty | Difficult |
| Duration | Approx 3-5 hrs |
| Trail Type | Out and Back and Loop Option |
| Starting Elevation | 5650′ |
| Elevation Gain | Approx +2800′ Bear Peak 8461' |
| Seasons | Year Round |
| Dogs | Allowed On Leash |
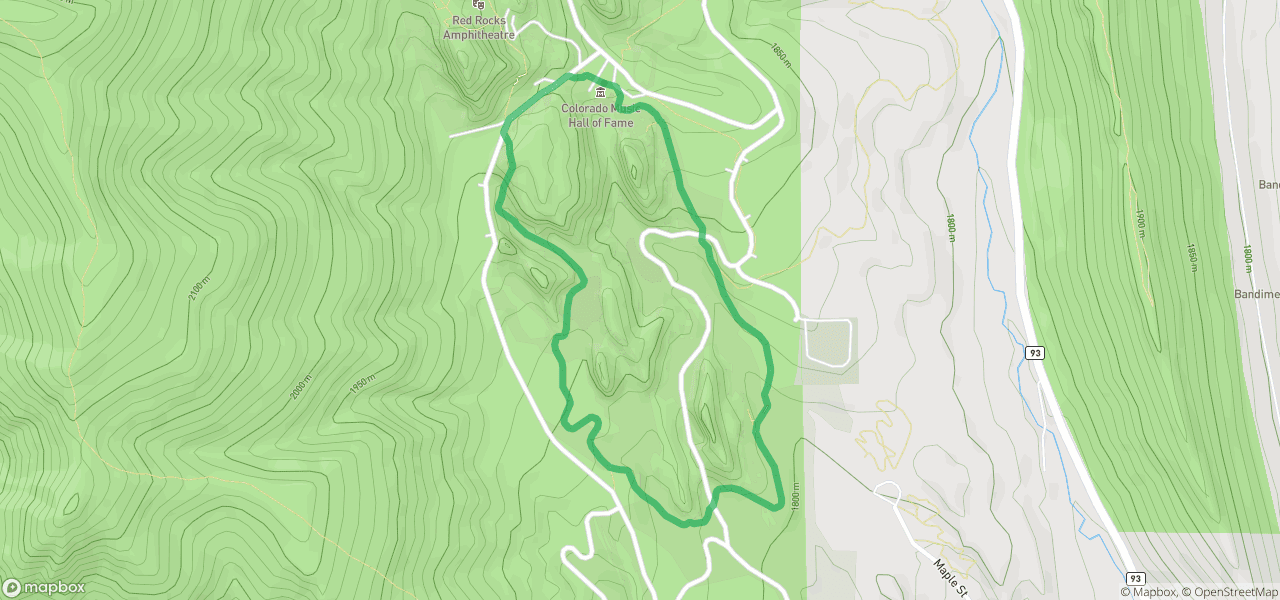
| Hike Trail Map | Click for a Map Bear Peak and South Mesa Trailhead |
| Denver Drive Time | 45 Minutes |
| Driving Directions to Bear Peak from South Mesa Trailhead | Click for Google Map |
| Town Nearest Hike | Boulder, Colorado |
| Beauty | Peak Top Views, Canyon, Wildflowers, Sunrise, Meadows, Wildlife: Deer, Bear, Birding. |
| Activities | Hiking, Trail Running, Photography |
Parking & Trailhead Information for Bear Peak
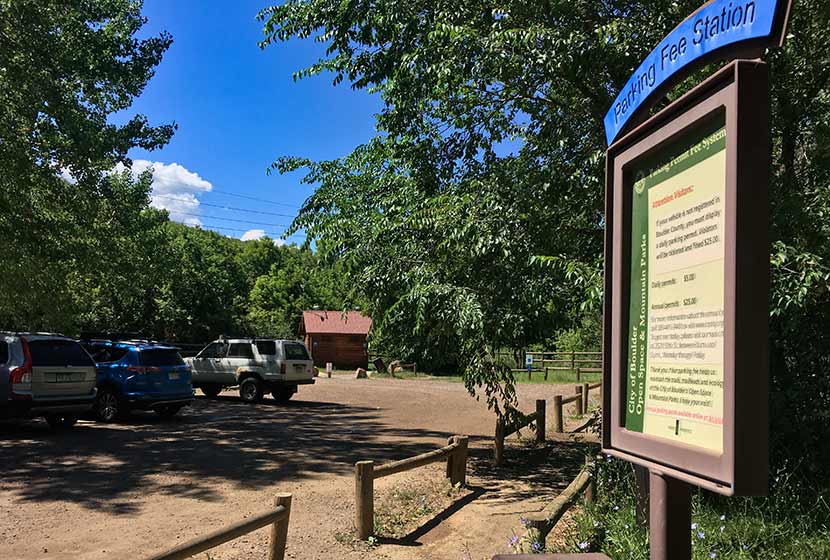
Access to Bear Peak is from the South Mesa Trailhead off of Eldorado Springs Drive just South of Boulder. From Denver, drive North on interstate 25 to 36 toward Boulder. Take the McCaslin Blvd exit and then go South/West onto McCaslin. At the intersection of McCaslin and Marshall, take a right onto Marshall Road. Marshall will intersect with Eldorado Springs Drive. Here, take a left onto Eldorado Springs Drive. About two miles down the road, you'll find the South Mesa Trailhead on your right. The South Mesa Trailhead is a part of the Boulder County Open Space and requires a daily parking fee, or an annual pass. I went online and bought an annual parking pass through the Open Space website. This gives you access to all the southern fee parking areas as well as the parking areas on Flagstaff Mountain. There are restrooms at the trailhead.
The Hike: Bear Peak
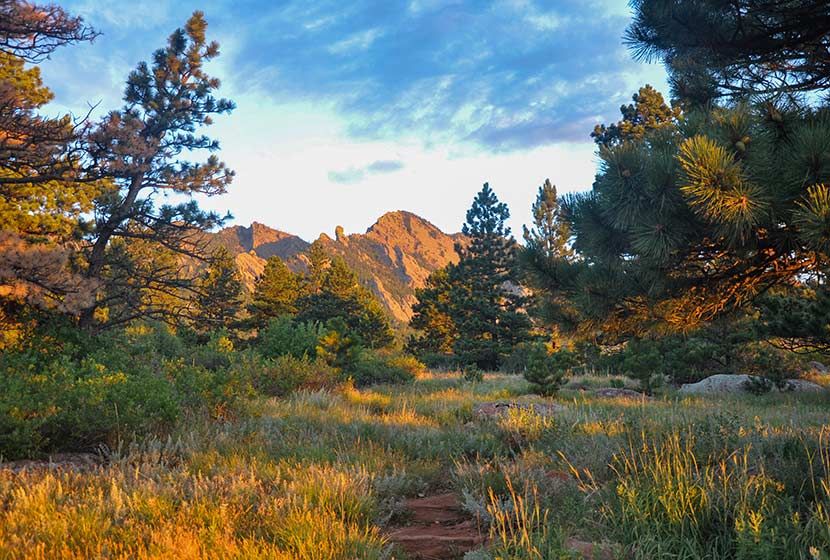
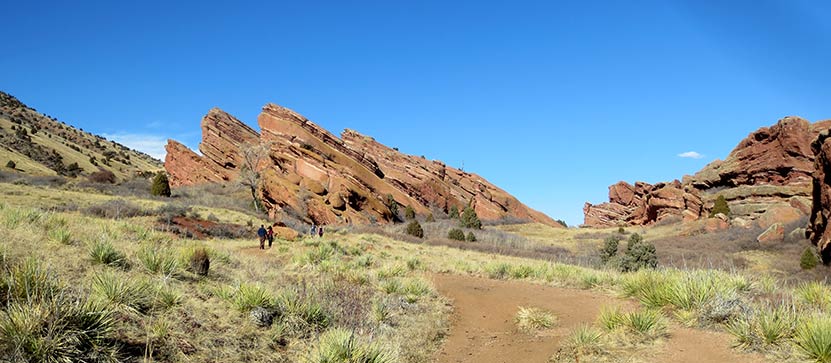
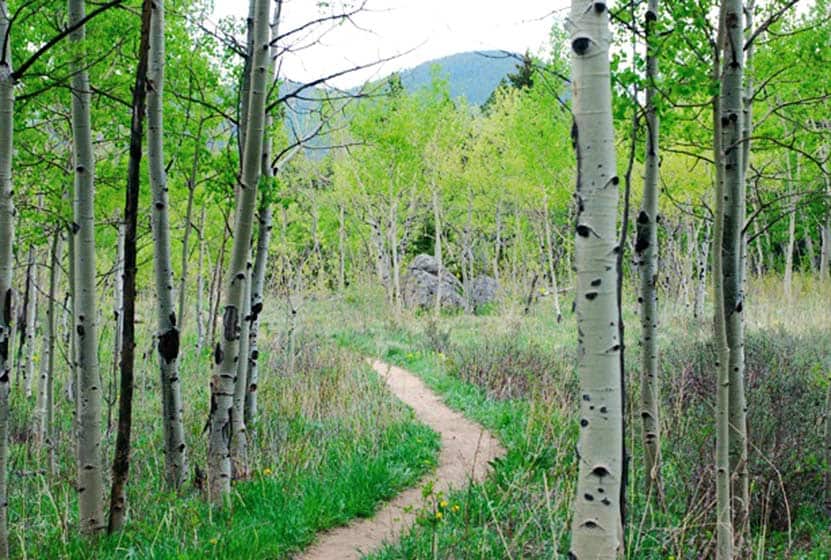
From the South Mesa Trailhead, the trail leads across a small bridge spanning over Boulder Creek. Willow trees arch over the stream making it worth a short pause to take in the sounds of water before you set off across the meadows of South Mesa. There are many trail options, but the most direct is to take the Homestead Trail, which heads West across a gentle grade toward Shadow Canyon.
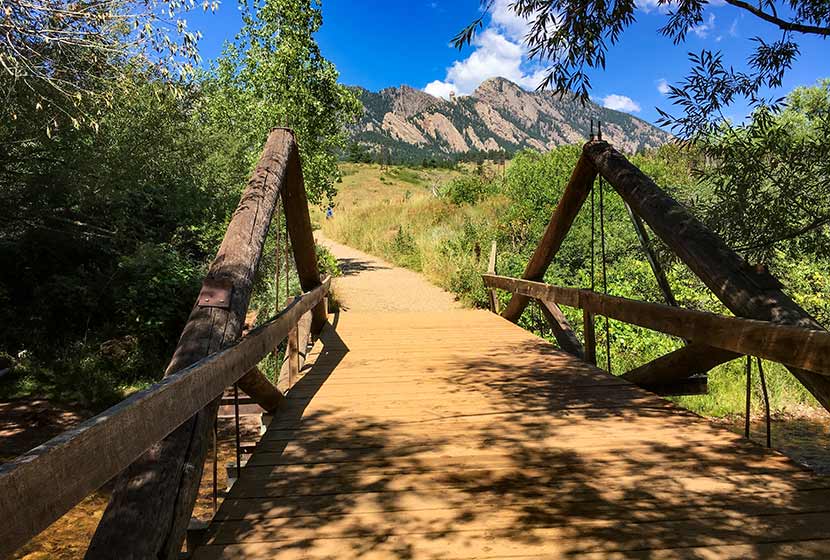
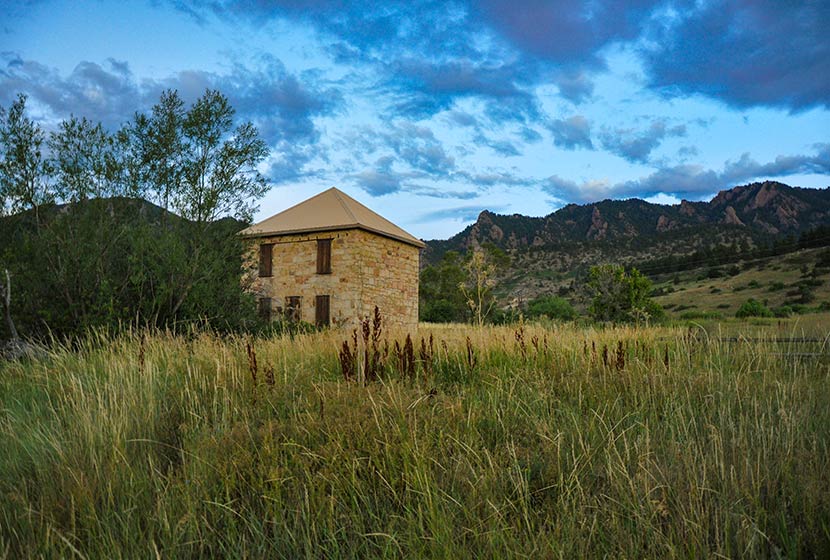
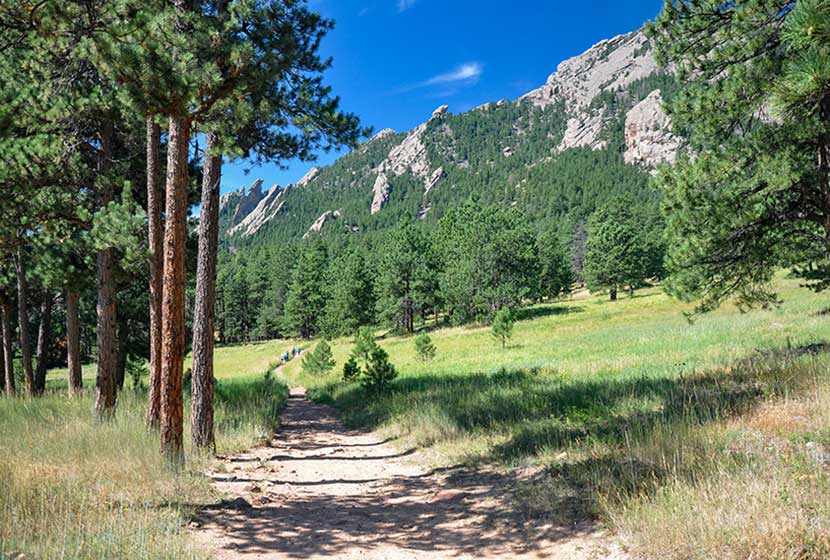
This first mile or so of the hike is easy and offers stunning views of the Flatirons and views of the entrance of Eldorado Canyon. An old stone building, part of an early homestead is the first marker you'll pass early in the hike.
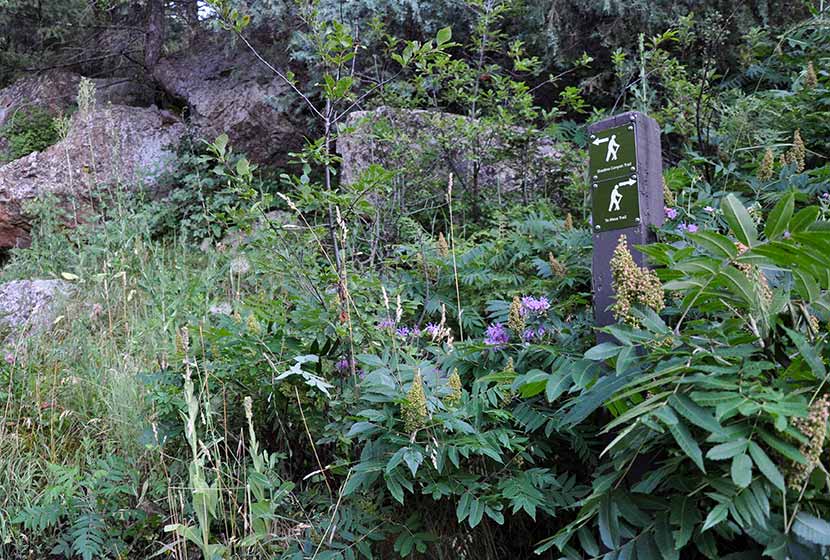
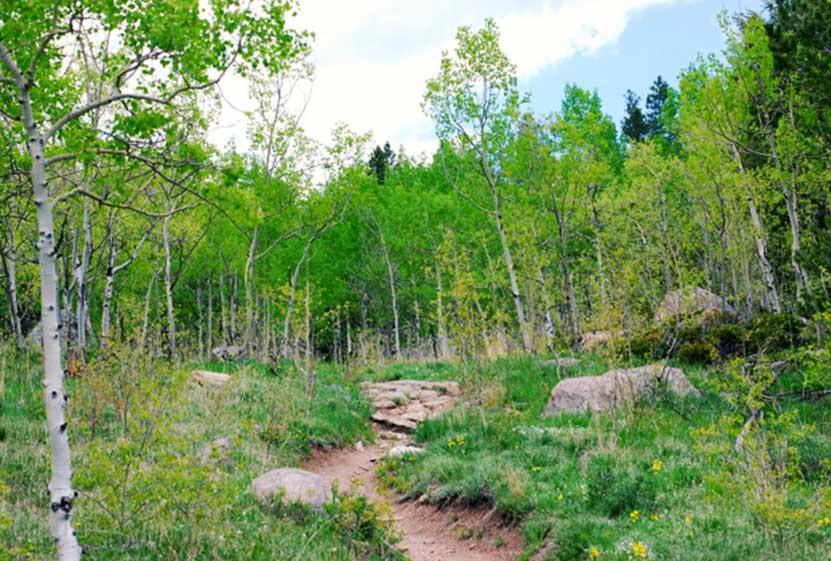
After about 1.3 miles, the trail will split. Take the left (West) trail, which leads to the South Shadow Canyon Trail. After about a 1/2 mile, you'll encounter a 2nd trail split. The Shadow Canyon Trail will again bear to the left and begin heading up steeper terrain.
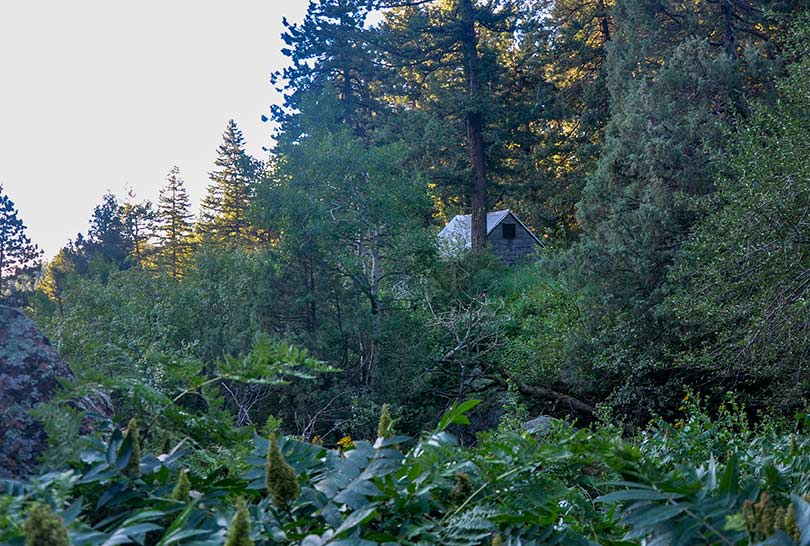
As the trail ascends, you soon leave the meadow and enter into more dense ponderosa pine forest. The vegetation in the understory grows tall and green at the entrance to the canyon. You'll see another cabin with a metal roof (pictured below). Soon past the cabin will be another important trail juncture. Again, the trail up Shadow Canyon will bear left (West).

Once in Shadow Canyon, the trail now becomes much more steep and requires navigating over rock and tree roots. This segment of the trail traveling up through the canyon is over a mile, so be ready for a steady and demanding climb.
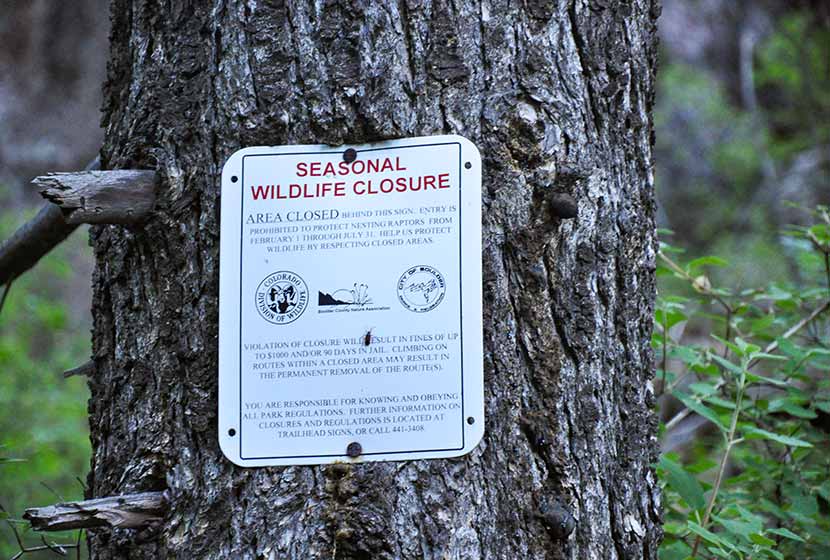
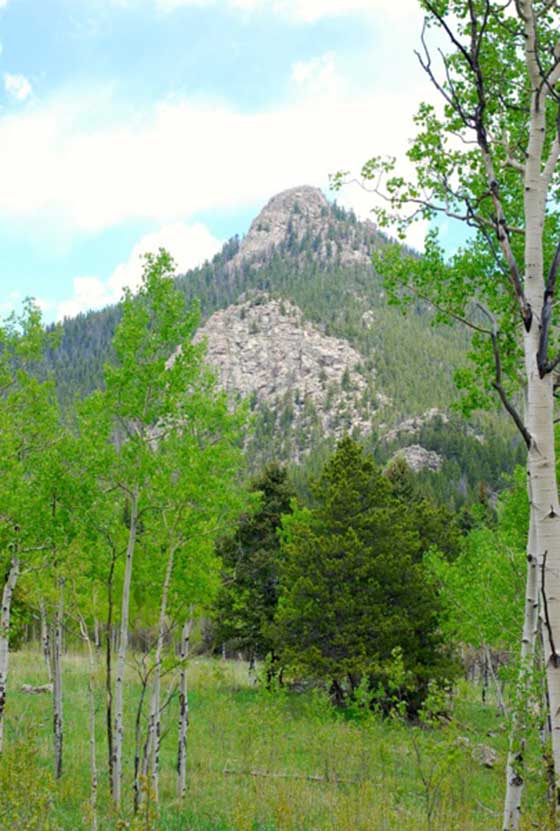
The canyon is an access route for Devils Thumb, a prominent rock formation along this ridge. There are seasonal closures (see photo below) because of nesting raptors. Be sure to stay out of this area from Feb. 1st to July 31st. You are welcome to stay on the Shadow Canyon trail--it's not closed during this time--but refrain from going off-trail or taking social trails during this time up to Devils Thumb.
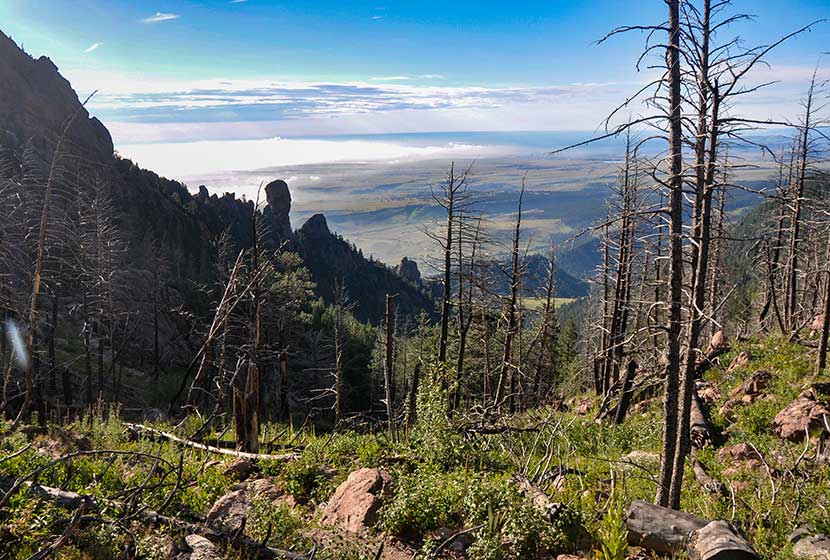
Eventually, the trail emerges from the canyon onto the saddle between South Boulder Peak and Bear Peak. This area is marked by a burn area, and in the late summer, raspberry plants grow trailside full of ripe berries. The burn was ignited by lightning in June of 2012. Named the Flagstaff Fire, it consumed about 300 acres before being contained by firefighters.
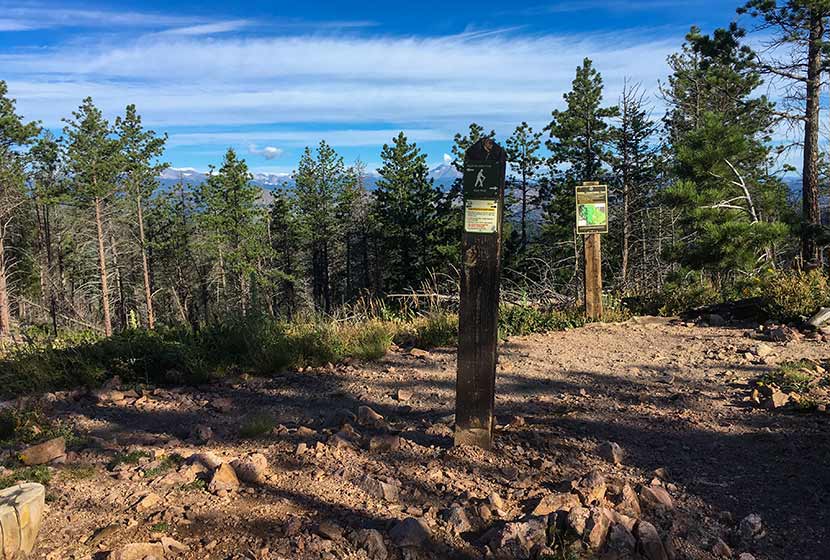
Another trail sign notes the way to Bear Peak, a 0.3 mile trail segment curving North up the back of the summit.
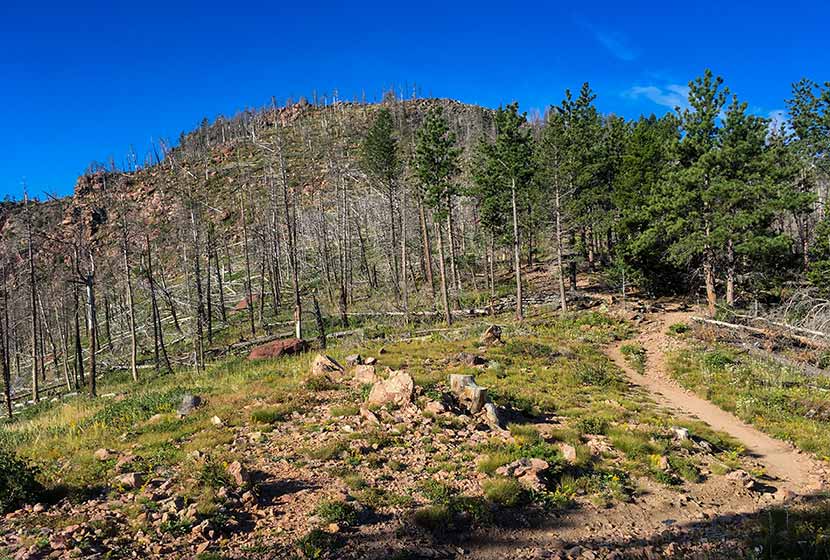
You'll notice more burn area on the left (West) side of the trail. The rock on the trail becomes increasingly brittle as you go, so be aware of those hiking below you and be sure to hike on the most secure and durable surfaces.
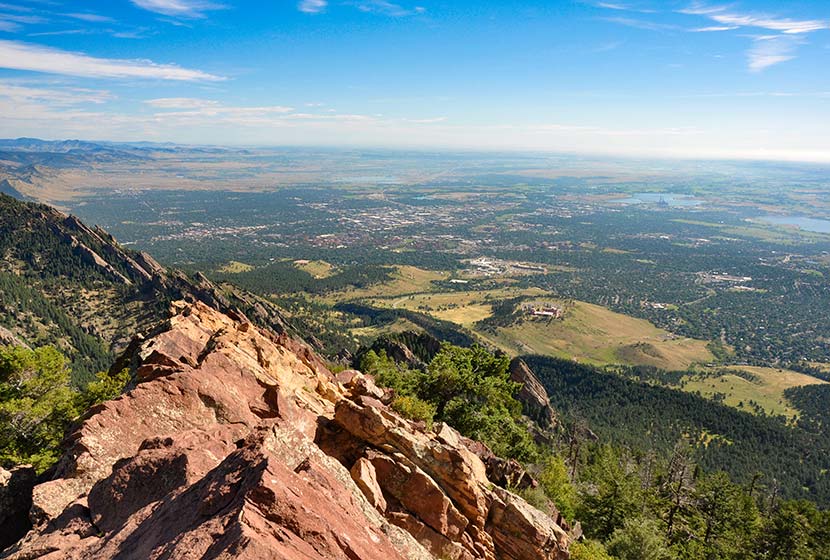
The final segment requires a scramble along about 25 yards of angled rock. Take your time and scope out the safest route to the summit. Most peaks along the Front Range have broad tops, but Bear Peak is tapered to a point with exposure on all sides. Several USGS markers are set into the rock (I think I counted 3--which is unusual). The views are great, both to the East and to the mountains in the West.
There are two options for the return hike: 1) to hike the 3.7 miles back through Shadow Canyon, retracing the same trails, or 2) to make a loop out of the hike by descending via Fern Canyon (about 4.7-mile return). The rest of this profile will follow the Fern Canyon to Mesa Trail return.
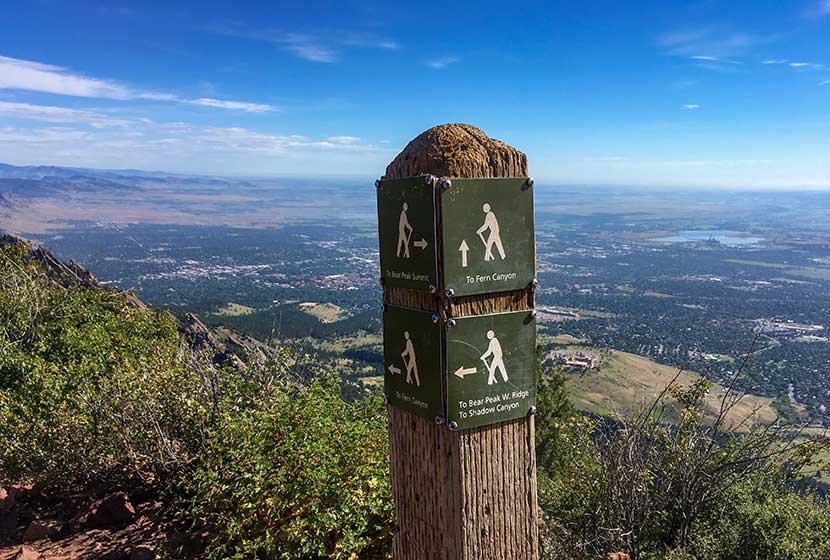
A sign marking the trail down Fern Canyon is located right at the base of Bear Peak (where the trail turns into a scramble up the summit). The descent into Fern Canyon is very steep and the rock is very loose. Hikers will also encounter people making their way up the trail, so be sure to move off to the side and grant right-of-way to hikers who are doing the harder work of ascending the trail. I would not recommend hiking up to Bear Peak from this route because the trail is way more demanding than the Shadow Canyon approach.

After about 1/2 of a mile descending this steep saddle, the trail will bear right (East) into Fern Canyon via a series of switchbacks. Eventually, the trail will emerge from Fern Canyon back onto the more gentle slopes of South Mesa. Look for signs for the Mesa Trail, and follow them South back to the South Mesa Trailhead.
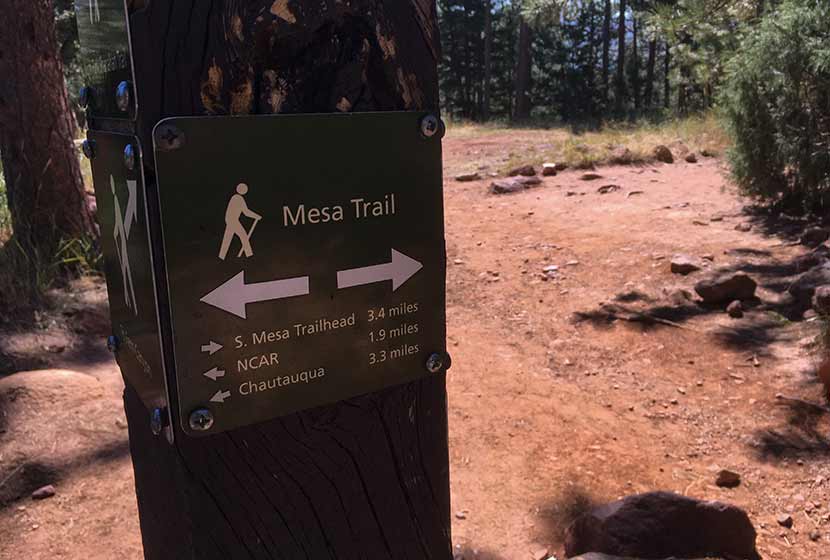
The hike back on the Mesa Trail travels in and out of the shade of Ponderosa pines and along the pink and orange Flatiron mountains that make this area so spectacular. We took the Upper Bluestem trail to some small connector trails leading back to the trailhead. Another approach is stay on the Mesa Trail (see map) until it connects back to the Homestead Trail.
Tips & Resources for Hiking to Bear Peak
- Weather: As with all hikes on the Front Range, especially peak hikes, be weather aware. Thunderstorms can emerge suddenly, especially in the early afternoon in the Summer months.
- Hiking with Your Dog: Though dogs are allowed on leash, and I've encountered people hiking with their dogs on the trails up to Bear Peak, I wouldn't put Bear Peak on the dog-friendly list because of the steep rock at the summit summit and the difficulty of the terrain leading up through the canyons.
- TIP: Be ready for a hike that is really demanding on your legs, especially the descent through Fern or Shadow Canyon. Trekking poles would be helpful on the descent.
- TIP: Hike to South Boulder Peak. It adds just 0.6 mile to your trip.
- Trail Map: Bear Peak Map from South Mesa Trailhead
- Packing List: Always pack the 10 Essentials. Download our Hiking Guide to get the list and dayhiking packing checklist.
- Colorado Road Conditions: Colorado Road Conditions
- After the Hike Cafe: Walnut Cafe in Boulder
- After the Hike Brewery: Sanitas Brewing Company
Weather
Map & Driving Directions
Click for Driving Directions
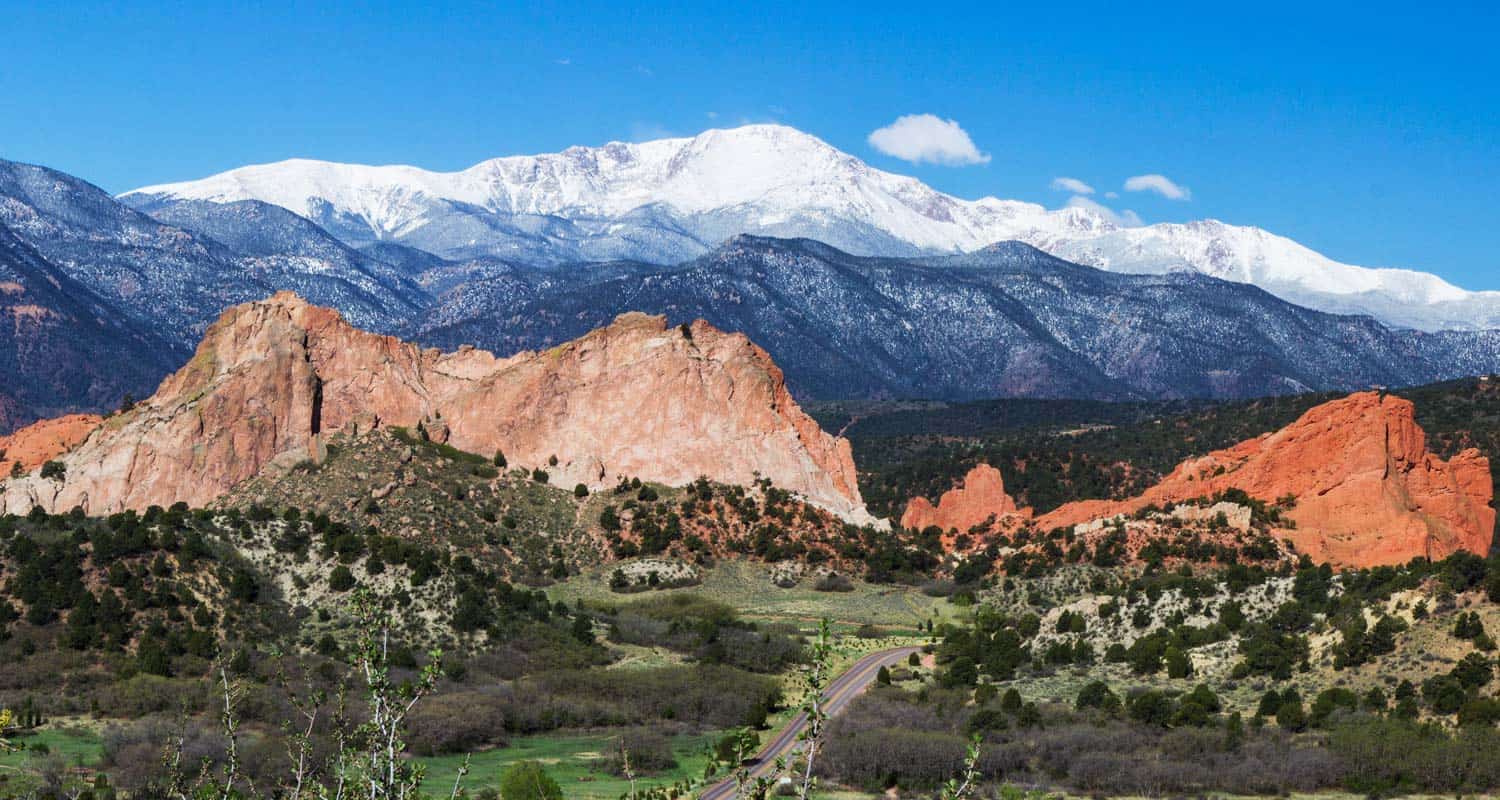
Garden of the Gods Ultimate Hiking Guide
Garden of the Gods is argueabley the best place to hike in Colorado Springs. Designated a National Natural Landmark, the park is known for its towering red sandstone formations and panoramic views of Pikes Peak. Hiking, Horseback riding, mountain biking, birding, and climbing are among the activities that can be enjoyed here. This guide to the Garden of the Gods features 6 different hiking trail options, spanning from easy to moderate and 1/2 mile to 2.5 mile hikes.
We've attempted to create the definitive guide to hiking in Garden of the Gods. In this guide, you'll find: Driving directions to Garden of the Gods, Trail Maps, Photography tips, Camping information for the Garden of the Gods area, and other Resources for planning your Colorado Vacation. This guide to Garden of the Gods is extensive, so we have created a table of contents to help you navigate. Have fun exploring!
Garden of the Gods Hiking Guide Contents
- Trail Snapshot
- Driving Directions
- Hiking Trails
- Central Garden Trail
- Ridge Trail
- Siamese Twins Trail
- Palmer Trail
- Scotsman & Buckskin Charlie Loops
- Balanced Rock Trail
- Photography
- Hiking with Kids
- For Out-of-State Hikers
- Things to Do Nearby
- History and Geology
- Protect Garden of the Gods
Trail Snapshot: Garden of the Gods
| Hike Distance | Six Trails: 1/2 to 3 miles Round Trip - Depending on Trail |
|---|---|
| Difficulty | Easy to Moderate |
| Trail Type | Both Loop and Out-and-Back Hikes |
| Starting Elevation | 6200′ |
| Elevation Gain | Up to +300' |
| Seasons | Year Round |
| Hours | 5AM to 9PM |
| Cost | Free to the Public |
| Dogs | Allowed On 6' Leash |
| Hike Trail Map | Click for a Map of Garden of the Gods Area Hikes |
| Denver Drive Time | 1 hr 10min |
| Driving Directions | Click for Driving Directions to Garden of the Gods |
| Town Nearest Hike | Colorado Springs, Colorado |
| Beauty | Red Rocks, Views of Pikes Peak, Wildflowers, Meadows, Aspens, Wildlife: Mule Deer, Whitetail Deer, and Bighorn Sheep. |
| Activities | Hiking, Biking, Running, Horseback Riding, Rock Climbing (in approved areas with permit), Camping, Visitor & Nature Center, Free Guided Nature Walk, Geo-Trekker Movie, Outdoor Scavenger Hunt. |
Driving Directions to Garden of the Gods
Take interstate I-25 to Colorado Springs. Exit onto West Fillmore Road and head West. Fillmore will change names to Fontmore Road. Take a right onto North 30th Street, and you'll find the Garden of the Gods Visitor Center just 1.2 miles up on the right/east side of the road. We recommend you stop at the Visitor Center to pick up a free color trail map. The main parking area for hiking is located on the North end of the park. You'll find Gateway Road (the access road into Garden of the Gods) directly across from the Visitor Center. Head west on Gateway road, then right at the intersection with Juniper Way Loop Road. The main parking area is located on the left-hand/South side of the first bend of the Juniper Way Loop. There are restroom facilities available at both the main parking area and at the visitor center.
- Driving Directions to the Main Parking Area at Garden of the Gods
- Driving Directions to Garden of the Gods Visitor and Nature Center
- Driving Directions to the Trading Post at Garden of the Gods
Before you park, consider driving around the entire Juniper Way loop to take in the sites and get your bearings. It's one of the most beautiful drives in Colorado, especially during sunrise and sunset. The loop is one way, has a low speed limit, and is frequented by cyclists. So, it also makes for a great bike ride-- the northbound loop is a gradual but demanding climb. Be attentive to hikers and cyclists as you drive in the park.
6 Hiking Trails at Garden of the Gods
Trail Option #1 - The Central Garden Trails
| Hike Distance | 1 Mile Round Trip |
|---|---|
| Difficulty | Easy |
| Trail Type | Lollipop Loop |
| Elevation Gain | Approx. +30' |
We've put this loop hike first on our list because it takes you right into the heart of the park. It's also paved and wheelchair and stroller accessible. From the parking lot, hikers will head south on the main trail (pictured above). On your right will be the largest of the sandstone Monoliths, North Gateway Rock. The tower on its north end is called the Tower of Babel, and its south end marks the gateway into the famous central valley. But before you enter the valley, be sure to look up at the Kissing Camels formation located at the middle-top of North Gateway Rock.
The loop begins right after you enter through the gateway at the twin spires of Sentinel Rock. Going left will take you on a clockwise circuit around the valley. You'll first pass between the Three Graces and Pulpit Rock before the trail bends to the North. Finally, the trail will bend South and meet back up with the trail that leads back to the main parking lot. There are many other trails that come off of the main loop trail, so bring a map with you if you plan to explore some of the nooks and crannies of the park.

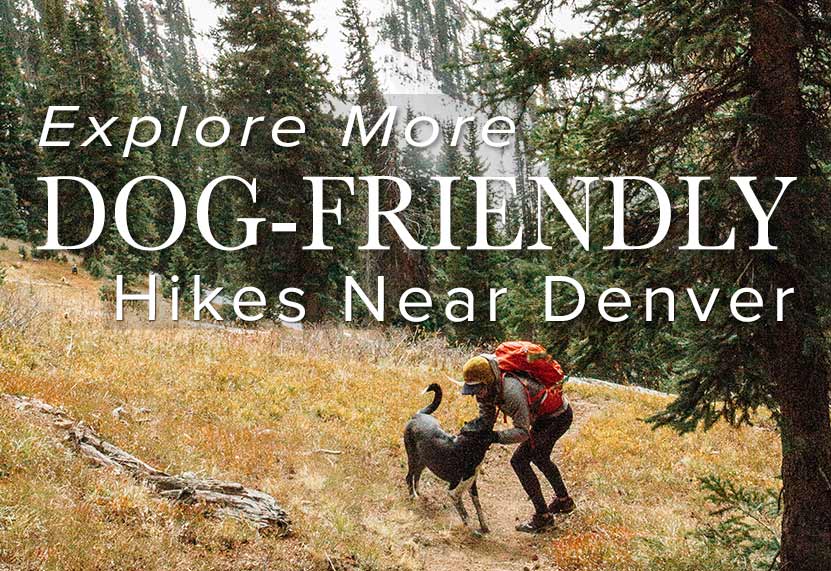
Looking for more places to hike with your dog? Explore more Dog-Friendly hikes near Denver by visiting our 25+ Dog Friendly Hikes and our Top 10 Dog Hikes Near Denver.
Trail Option #2 - The Ridge Trail at Garden of the Gods
| Hike Distance | 0.5 Mile Round Trip |
|---|---|
| Difficulty | Easy |
| Trail Type | Loop |
| Elevation Gain | Approx. +100' | Ridge Trailhead Driving Directions | Click for Directions to South Garden Parking Area |
The Ridge Trail is a short, half-mile loop on the southeastern end of the park. From the parking area indicated in the table above, the trail is located across the street to the left by takign a crosswalk. Before you cross, be aware of cars and cyclists (often the cyclists come around the curves of the park much faster and can take you by surprise). The Ridge trail makes it way to the foot of The Sleeping Giant formation before bending back toward the parking area.

Siamese Twins Rock Formation - Courtesy of Matt Santamarco
Trail Option #3 - The Siamese Twins Trail
| Hike Distance | Approx 1/2 Mile |
|---|---|
| Difficulty | Easy |
| Trail Type | Loop |
| Elevation Gain | Approx. +150' |
| Trailhead Driving Directions | Click for Directions to Siamese Twins Trailhead |
To hike to the Siamese Twins formation, take the trail on the north end of the parking lot that leads North. As you hike, you'll observe a very different landscape to the West, desert terrain that stretches out and up to Rampart Range Road. At the Siamese Twins, be sure to grab a photo of Pikes Peak framed by the window in the rock. Be sure to adjust your camera to take it's light reading from the distant mountain rather than the foreground (on your phone, simply press your screen to readjust the reference point for the lighting and focus). The trail heads South and will pass the parking area as it bends around and back up to it.
Trail Option #4 - The Palmer Trail (Chambers/Bretag Loop)
| Hike Distance | 2.5 as Described Miles |
|---|---|
| Difficulty | Moderate |
| Trail Type | Loop |
| Elevation Gain | Approx. +250' |
| Trailhead Driving Directions | Click for Directions to Main Parking Lot Trailhead |
This 2.5 mile loop hike is a great way to take in the full spectrum of terrain and rock formations in the park. The route, as describe below is about 2.5 miles, and mileage may vary depending on the side trails you decide to take. From the main parking area/trailhead, the Palmer Trail can be picked up by crossing Juniper Way directly North of the lot. Heading left/West on the Palmer trail, it will wind around South, roughly following the main road through Garden of the Gods.
To make the loop, at about 1.3 miles on the Palmer Trail hikers will cross Juniper Way at the Scotsman Picnic Area and join up with the Scotsman Trail. It will dips South initally, then heads Northeast to meet up with the trails of the Central Valley. This area can be quite a labyrinth and the best way to pick up the Eastern side of the loop will be to keep an eye out for the gateway, the space between North Gateway and South Gateway Rocks. Once through the gateway, hikers will pick up the Garden Trail, head East, and join up with the Susan G. Bretag Trail, by crossing Juniper Way where it intersects with Gateway Road. Heading North on the Bretage Trail, it will eventually come to a fork. Taking the left-hand/West trail (Palmer Trail) will lead back to the parking lot.
Trail Option #5 - The Scotsman and Buckskin Charlie Loops
| Hike Distance | Scottsman Loop Approx. 1 Mile; Scotsman+Buckskin Charlie Approx. 2 Miles |
|---|---|
| Difficulty | Moderate |
| Trail Type | Loop |
| Trailhead Driving Directions | Driving Directions to the Scotsman/Buckskin Charlie Trailhead |
These are two loops found just South of the Central Valley area. The parking area is small and will likely be full during most days during the Summer months. One alternative is to begin your hike at the main lot, then pick up the Scotsman trail on the South end of the Valley.
The Scotsman Loop is 1.1 mile in its entirety. Picking up the trail from the Scotsman Picnic ground by following social trails East, the Scotsman dips South then winds Northeast before making a sharp turn South and back to the parking area. Bring your trail map, or have it up on your phone to keep oriented.
The Buckskin Charlie Trail can be added to double your hike. Hikers will pick up the Buckskin Charlie Trail on the southern bends of the Scotsman. The trail winds around until it begins again to head North, following the line of the main road, Juniper way, until it joins back up with the Scotsman and returns home to the Scotsman Picnic area.
Trail Option #6 - The Balanced Rock Loop Hike
| Hike Distance | 0.7 Mile |
|---|---|
| Difficulty | Easy |
| Trail Type | Loop |
| Trailhead Driving Directions | Best Trailhead for Balanced Rock Loop Best Parking for Viewing Balanced Rock |
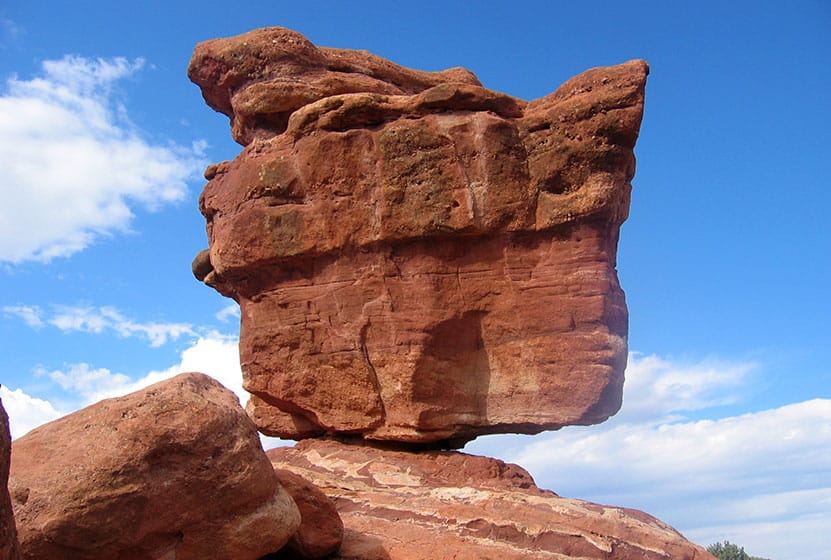
You don't have to hike to Balanced Rock (see driving directions in the table above). In fact, this loop hike is named "the Balanced Rock Trail" only because it is near Balanced Rock, not because it takes you there. For visitors entering through the South end of the park, Balanced Rock will be the first stop, then on to the Trading Post. In fact, the best way to pick up the Balanced Rock Trail is from the Northern end of the Trading Post lot. Hikers will find a connector trail that goes directly from the lot North, crosses the road, and immediately picks up the Balanced Rock Loop trail. Hiking counter-clockwise, the trail follows alongside Garden road, then leads North until it terminates at another section of the road. Hikers can cross the road (watch for cars and cyclists) and pick up the Cabin Canyon Trail across the street. Taking the Cabin Canyon Trail South, it will come to a crosswalk where you can pick the Balanced Rock Trail up again and back to the parking area.
Photography: Great Photos in Garden of the Gods
- All year round and any time of the day, Garden of the Gods is already photogenic. However, the best times to take photos are during the golden hours of sunrise and sunset when the rock faces are lit up and cast their shadows across the landscape. Going early in the morning will also help you avoid having people in your photos.
- Snow adds its white contrast during the Winter months and early Spring. If you want a snowcapped Pikes Peak in the background, you'll likely need to get that shot before mid-June.
- Wildflowers appear most noticeably in April through July.
- After heavy rains, standing water can form what look like small ponds (but are really giant puddles). These offer the rare opportunity to capture the reflection of the rock formations on water.
- One classic vantage point is to take your photo from the North End of the Palmer Trail at Sunset. This will give you one of the best photographs of the Central Valley area.
- For sunrise, a great place to capture Garden of the Gods with Pikes Peak in the background is from the parking area up on Mesa Road that overlooks the park.
Hiking with Kids at Garden of the Gods
- Hydrate: This goes for adults as well, but is even more important with kiddos. Almost all the trails in Garden of the Gods are exposed to the sun. You're also in a High-Plains Desert environment, so you simply need more water. Then add onto that physical exertion. So, bring water and hydrate.
- Pack Snacks or Bring a Lunch: Even though the hikes are not long in Garden of the Gods, it always helps to have fuel. Plus, nothing beats finding a great view of Pikes Peak and kicking back to rest and enjoy a picnic.
- Climbing can result in injury: Having hiked often in Garden of the Gods, I've witnessed people--usually young people--who have climbed up into areas and gotten themselves in a tough spot. Children should know that climbing up into an area is a lot easier than getting down.
Visiting Garden of the Gods From Out-of-State
- Download our Hiking Guide for a list of hiking tips, 10 essentials that everyone should pack for their dayhike, and recommended hiking snacks.
- Free Full-Color Map: Don't get lost. Pick up this freebie at the Garden of the Gods Visitor & Nature Center information kiosk.
- Bring Lots of Water: It can be very hot and dry, and there may not be a chance to refill, so bring a full water bottle.
- Altitude: If you are visiting Colorado from out-of-state, chances ar that it will take you a few days to adjust to teh altitude. The good news about hikes in Garden of the Gods is that they are relatively easy. However, a little exertion at altitude can result in feeling naseauted, winded, and just plain tired. So, don't overdo it if you are not feeling well. Hydrate, Hydrate, Hydrate (because it oxygenates your blood), and get good rest.
- Garden of the Gods Visitor CenterThe Visitor Center is a must-do, especially if you are visiting from out-of-state. They now have a cafe with a family-friendly and healthy menu.
- Free Guided Nature Walks led by a naturalist, from the north parking lot
- Geo-Trekker Movie Experience at the Geo-Trekker Theater in the Visitor Center.
- Outdoor Scavenger Hunt with a guide that will be provided
- Park Tours on Bus, Jeep, or Segway
- Garden of the Gods Trading Post: This gift shop and art gallery is located at the southwest edge of the park.
- Breakfast and Lunch: A favorite local go-to is the Mountain Shadows Cafe--a great place to refuel after your hike.
- Mediterranean Food: A great mediterranean option is the nearby Heart of Jerusalem Cafe.
- Amazing Sandwiches: You've got to be patient for this one, because, at the Mate Factor, they take their time crafting your sandwich--but it's worth it. Step inside and you'll agree that you've never been to a place like this before. Mate Factor, Manitou Springs.
- Stay the Trail: The sandstone in the parks is easily eroded, and because this area sees a lot of visitors the impacts of individuals quickly adds up. So keep on established trails during your hikes.
- Keep Dogs on a 6' Leash: And be sure to bring bags for picking up after your pet.
- Pack Out All Trash: It should go without saying but be sure to pick up after yourself. In the last few years it seems that litter along trails in Colorado has grown to be a real problem. Do your part to keep the park and our State beautiful. One of our family hiking habits is to pick up trash as we hike.
- Climbing and Bouldering: Climbing and Bouldering in Garden of the Gods require both the proper equipment and permits. You can pick up permits at the Visitor Center or online at the City of Colorado Springs climbing permit page.
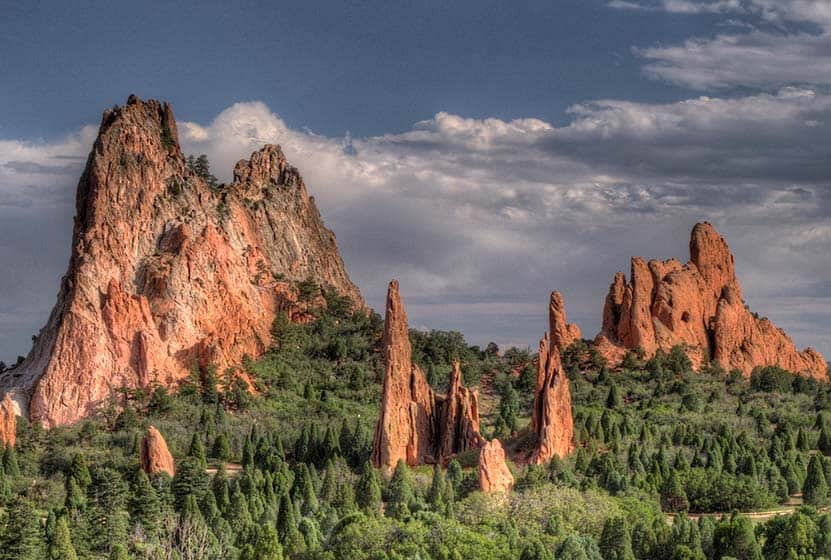
- Thanks goes out to Joel Tonyan for his great photo of Garden of the Gods and snow-dusted foothills.
- Care for the Rock: This should also go without saying, but don't carve or deface the rock in any way.
- Let them sit and grow: Removing rocks, plants, or animals is prohibited.
- Mountain Biking: Mountain biking is limited to designated trails.
Camping Near Garden of the Gods
Camping is prohibited in Garden of the Gods, and it's important to understand that the Park is located in the town of Colorado Springs--it's not a backcountry experience. Those looking to camp will need to explore campgrounds and tent camping options outside the immediate area. However, there is a nearby campground in Manitou Springs that offers cabins, bunkhouses, and RV spots. It's pet-friendly and even offers bike rentals. You can find current rates and more at Garden of the Gods RV Resort. Most of the tent camping is going to be out near Rampart Range Reservoir or further West past Woodland Park, CO.
Things to Do and Places to Eat Near Garden of the Gods
History and Geology of Colorado’s Garden of the Gods
Imagine a prehistoric landscape of sand dunes plunged and crushed into the earth by some violent upheaval involving tectonic and hydraulic forces. That's how the red rock fins of Garden of the Gods were formed in the womb of the earth. Then another cataclysm. The Pikes Peak massif gets thrust to the sky along with the surrounding red sedimentary rock. Some at angles and some perpendicular to the land. Then the forces of wind and water began to wear down the loose rock creating the unusual holes and across the surfaces of the rocks. You'll find these types of rock formations stretching from North of Ft. Collins down into Southern Colorado. Some of the most notable are Roxborough State Park and South Valley Park near Littleton and Red Rocks Park in Denver.
After his death in 1907, the children of railroad tycoon, Charles Elliott Perkins, fulfilled their father's wishes by donating 480 acres of Garden of the Gods to become a permanent park and free to the public. The park has expanded over the years to over 1,300 acres. The park got its name from a German surveyor mapping out the land in 1859.
How You Can Protect the Garden of the Gods Area
Weather
Map & Driving Directions
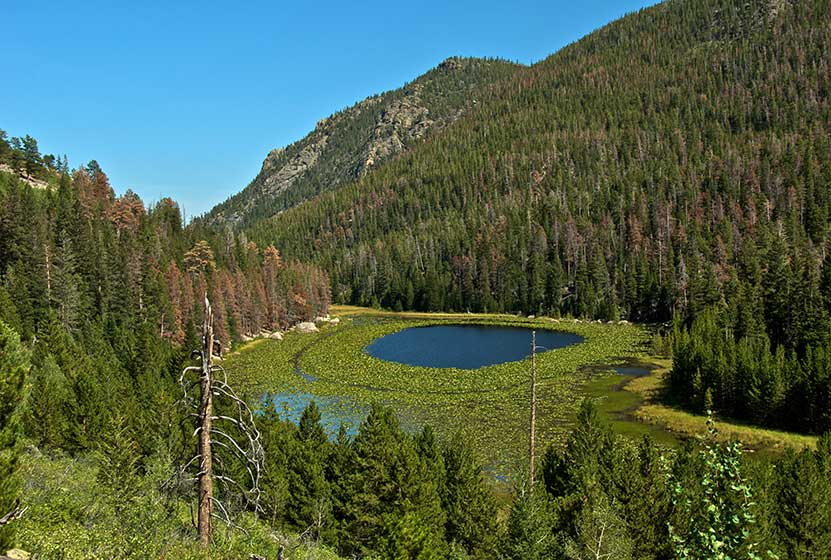
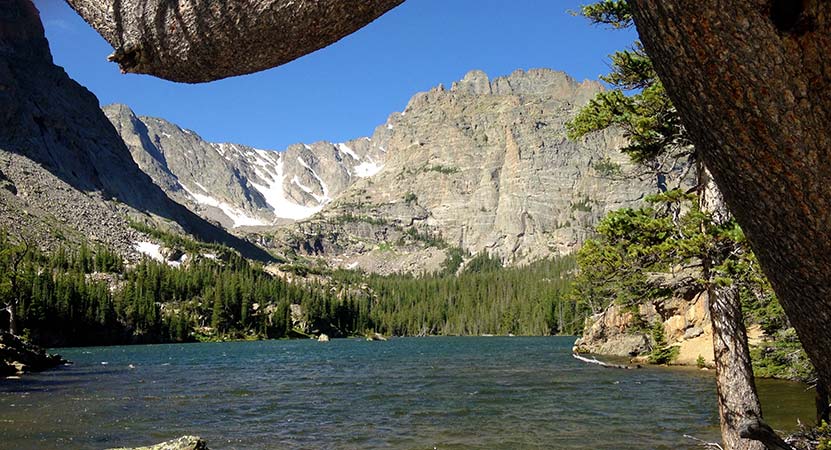
Cub Lake in Rocky Mountain National Park
Cub Lake, in Rocky Mountain National Park, is known for its unusual halo of lily pads. The 4.6 mile, roundtrip hike dazzles with its variety - especially the wildflowers. You'll pass through wetlands, glacial formations, and meadows before arriving at the lake. Explore the full Cub Lake hike profile below for trail map, driving directions, and all the details you need to enjoy this adventure in Rocky Mountain National Park.
| Hike Distance | 4.6 miles Round Trip |
|---|---|
| Difficulty | Moderate |
| Duration | Approx 3 hrs Round Trip |
| Trail Type | Out and Back |
| Starting Elevation | 8080' |
| Elevation Gain | Approx. +540' |
| Seasons | Spring through Fall, Winter Snowshoeing |
| Dogs | Prohibited in RMNP |
| Hike Trail Map | Click for a Map of Cub Lake RMNP |
| Denver Drive Time | 1 hr 40 min |
| Driving Directions to Cub Lake Trailhead | Click for Google Map |
| Driving Directions to Fern Lake Trailhead | Click for Google Map |
| Driving Directions to Park & Ride Trailhead | Click for Google Map |
| Town Nearest Hike | Estes Park, Colorado |
| Beauty | Sub-alpine lakes, mountain views, meadows, river, wildlife: Abert's squirrel, elk, deer, moose, duck, bear; yellow pond lilies and wildflowers |
| Activities | Picnicking, Hiking Trails, Snowshoeing |
| Fee | Park Pass Required |
Parking & Trailhead Information for Cub Lake
The Cub Lake Trailhead in Rocky Mountain National Park has a very small parking area where only 7 to 8 vehicles can park. Chances are, if you don't arrive early in the morning, you'll need to park just .3 mile further down the road at the Fern Lake Bus Stop parking area. If both lots are full, then your best bet is to park in the RMNP Park & Ride lot and use the shuttle service to get to the Cub Lake Trailhead. Please do not park alongside the road. This causes significant erosion and damage to roadside--and you might get a ticket.
The Hike to Cub Lake in RMNP
One of the things we love about Rocky Mountain National Park is the diversity of landscapes. The Cub Lake trail is a great example. Over the course of the 2.3 mile journey to the lake, you'll encounter plenty of sights that you will want to take in. The trail begins in the wetland meadows of Moraine Park, replete with willows and other wetland shrubs. It's a perfect habitat for a variety of birds, including western tanagers and warblers.
The trail crosses several bridges, including one over the Big Thompson River, (just a mountain stream at this point) then begins a climb into stands of evergreens, and then into an unusual area scraped by an ancient glacier, riddled with unusual boulders and rock. Leaving this strange landscape, the trail goes down to another meadow area and meets up with the horse trail that runs along the southern border of Moraine Park. The local YMCA offers horseback rides along this area, so keep your eyes out for horses. At this trail junction, the trail that leads up to Cub Lake is the one to the right.
Soon, the trail goes from easy to quite demanding, working its way up a series of switchbacks before reaching Cub Lake. Two things will catch your eye at Cub Lake. First is the strange halo formation made by the yellow pond lilies that grow around the inside of the lake. The middle of the lake, open to reflect the sky, looks like a big, blue eye staring into the heavens. The second thing you may notice is a large stand of dead trees from a forest fire in the 1970s.

Tips & Resources for Hiking to Cub Lake in Rocky Mountain National Park
- TIP: It is advisable to arrive early as parking is limited. One may opt to ride a shuttle that drops you off at the trailhead.
- Trail Map for Bear Lake Corridor: Trail Map Link
- Packing List: Always pack the 10 Essentials. Download our Hiking Guide to get list and dayhiking packing checklist.
- Colorado Road Conditions: Colorado Road Conditions
- Photo: We would like to express our gratitude to Jeff Livingston for sharing such an amazing photograph of this hike to Cub Lake in RMNP.
- After the Hike: Baba's Burgers & Gyros
Weather
Map & Driving Directions
Click for Driving Directions
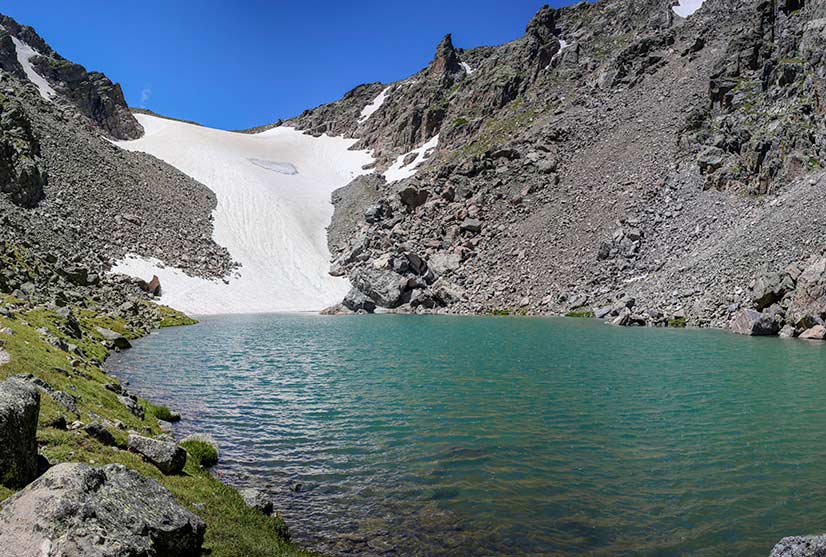
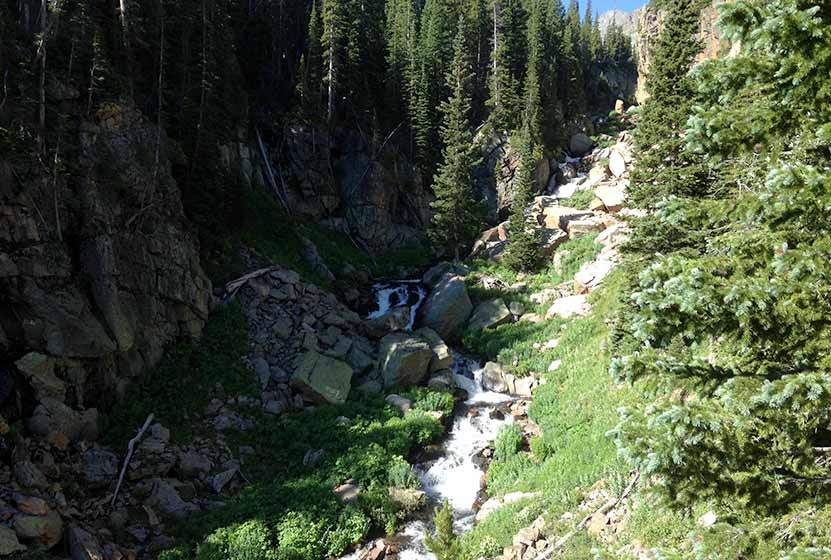
Andrews Glacier and Tarn in Rocky Mountain National Park
Andrews Tarn and Andrews Glacier are high up in a more secluded area of Rocky Mountain National Park. It's a strenuous, almost 10 mile hike for those who are up for the challenge. Though it can be demanding, the Andrew's Creek area is one of our favorite trail sections in RMNP. Explore the full Andrew's Tarn and Andrew's Glacier hike profile below for trail map, driving directions, and all the details you need to enjoy this adventure in Rocky Mountain National Park.
Note: Rocky Mountain National Park now requires timed entry permits from May 27th through October 10th. See the RMNP permits page for more information.
Trail Snapshot: Andrews Glacier in Rocky Mountain National Park
| Hike Distance | 9.4 to 10 miles Round Trip |
|---|---|
| Difficulty | Difficult |
| Duration | Approx 5-6 hr Round Trip |
| Trail Type | Out and Back |
| Starting Elevation | 9240' at Trailhead |
| Elevation Gain | +2150' |
| Seasons | June-September |
| Dogs | Prohibited in RMNP |
| Hike Trail Map | Click for a Map of Andrews Tarn and Glacier in Glacier Gorge |
| Denver Drive Time | 2 hr |
| Driving Directions to Glacier Gorge Trailhead | Click for Google Map |
| Town Nearest Hike | Estes Park, Colorado |
| Beauty | Waterfall, wildlife: elk, deer, marmots; meadows, lakes, streams, wildflowers, glacier |
| Activities | Hiking, photography |
| Fee | Park Pass Required |
Parking & Trailhead Information for Andrew's Tarn and Glacier
The trail to the Andrews Tarn begins at either the Glacier Gorge Trailhead (see driving directions above), or at the Bear Lake Trailhead (driving directions). Because the Glacier Gorge Trailhead has a much smaller lot, you may need to drive further up to Bear Lake. There you'll find a short connector trail that will put you on the path down and over to the Glacier Gorge Trail system. In the event that parking at Bear Lake is full, you'll then need to park at the Park & Ride near the Bierstadt Trailhead and take the bus into the trailhead. This service runs 7am to 7PM and more information on the RMNP shuttle bus routes can be found at this link.
The Hike to Andrew's Glacier and Andrew's Tarn
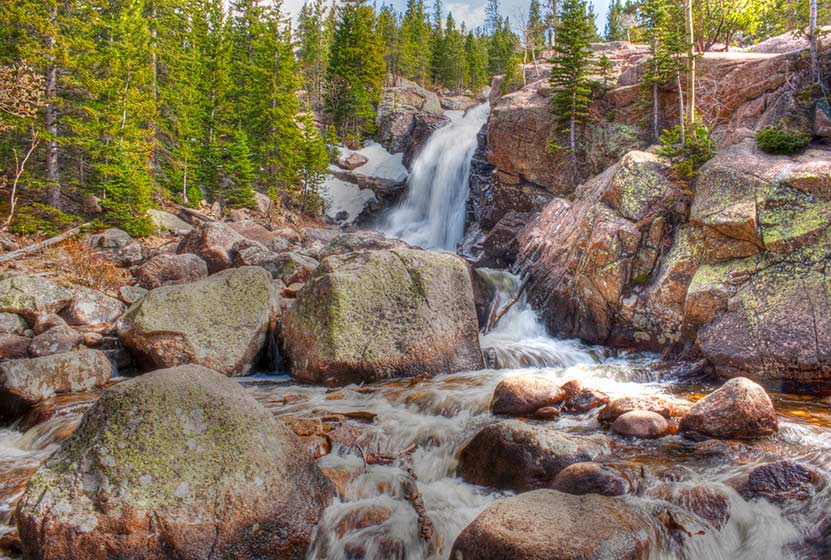
Hikers will begin on the trail leading to Glacier Gorge and Loch Vale. The first destination that you'll encounter is at .8 miles, Alberta Falls (photo above). The trail then climbs toward an eventual trail junction. The way to the Loch is to follow the Glacier Gorge/Loch Vale trail that bears right and ascends for about another .5 mile to another trail junction. At this second junction the trail to the left will take hikers to Glacier Gorge, and the trail to the right takes hikers on a jaunt to Lake Haiyaha. The middle trail leads onto the Loch Vale Trail--this is the trail that will eventually lead into the Andrew's Creek area and to Andrew's Tarn and Andrew's Glacier.
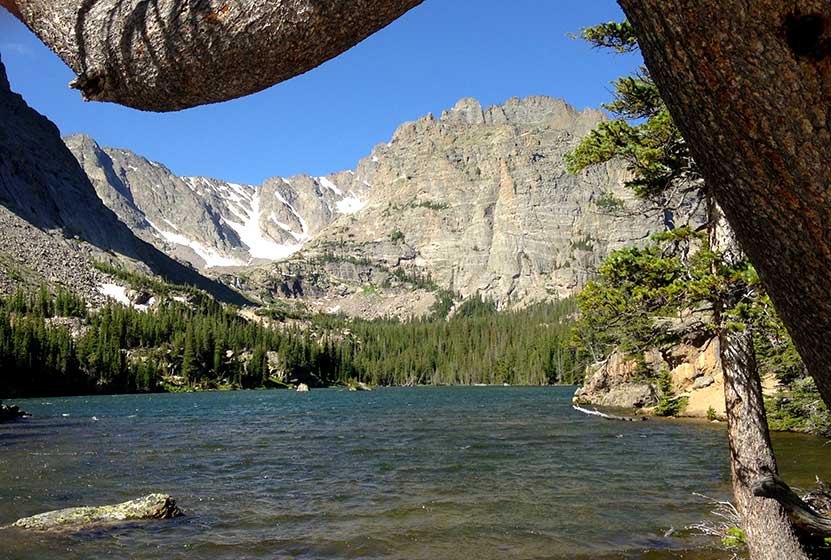
Having hiked about 2.7 miles, you'll arrive at the shores of The Loch, one of the most photographed lakes in Rocky Mountain National Park and a popular destination for hikers and those looking to catch some trout.
After this point, you should see fewer hikers. The trail continues along the northern (right-hand) side of the Loch for about .6 mile where there is a final trail junction. The trail to right will lead to Andrew's Glacier and Andrew's Tarn. The other option leads to Timberline Falls, Lake of Glass, and Sky Pond.
The next segment may be my favorite in all of Rocky Mountain National Park. The trail weaves through a verdant forest following Andrew's creek. Its clear waters spill over tree roots, rock, and snow as it makes it way through this fairy tale valley. In the early summer of 2004, I camped in the valley just before a snowstorm. Everyone was leaving this part of the park, so I had it all to myself. A cow elk and its calf were my only visitors. The Andrews Creek Backcountry Campsite is the only campsite in this area of the park and must be reserved through the backcountry office.
As the trail ascends it becomes more of a challenge, and hikers may need to pause to locate cairns (stacks of rocks) that indicate the location of the trail as it courses through scree and talus. Snow lingers up in this part of the park, so trekking poles and traction devices can be a great help. After hiking this 1.3 mile segment, the trail terminates at Andrew's Tarn, an emerald meltwater lake that has formed in this bowl high in the Rocky Mountains. It's about another 1/4 mile around the lake to the base of Andrew's Glacier.
While Andrew's Glacier is a used route for accessing the continental divide and peaks such as Taylor, and is used as a route of descent after summiting Flattop and Hallet Peaks, travel on the glacier is both problematic and can be very dangerous. Though it's a small glacier, in the summer, crevasses open in its surface. And sliding down, especially when it's icy, can quickly turn into an out-of-control trip down its surface. Hitting rock on the way down could even be fatal. Please talk with a ranger or call the park service before making travel on Andrew's Glacier a part of your plans.
List and Links of Destinations Along the Loch Vale Trail
1. Alberta Falls - @ .8
2. The Loch - @ 2.7 miles
3. Andrew's Glacier and Andrew's Tarn - Junction at 3.65 miles - Destination at 4.85 miles
4. Timberline Falls - @ 4 miles
5. Lake of Glass -@ 4.2 miles
6. Sky Pond - @ 4.6 miles
Tips & Resources for Hiking Andrews Glacier in Glacier Gorge RMNP
- TIP: If parking at the Glacier Gorge trailhead is full, park in another established parking area. A shuttle bus is also available.
- Add Timberline Falls to Your Hike: Before or after your trip to Andrew's Tarn and Glacier, hikers can enjoy Timberline Falls--one of the best waterfalls in the park--and located approximately 1/4 mile beyond the Andrews Creek trail junction along the main Loch Vale trail.
- Trekking Poles in Spring and Winter: Because the snow and ice can settle in until early Summer we recommend Trekking Poles and/or Traction Devices for this trail.
- Start early in the morning: Do so on a day with a good weather expected. This is to secure a good parking spot and to avoid thunderstorms.
- Rocky Mountain National Park Trail Conditions: Click for RMNP Trail Conditions
- Trail Map for Rocky Mountain National Park: Trail Map Link
- Colorado Road Conditions: Colorado Road Conditions
- Photo: We would like to express our gratitude to Ed Ogle for his photograph of Andrew's Tarn and Glacier .
- After the Hike: Inkwell Brew Coffee
Weather
Map & Driving Directions
Click for Driving Directions

Black Lake in Rocky Mountain National Park
Black Lake is among the most spectacular lakes in Rocky Mountain National Park. The journey to Black Lake is a strenuous, 10 mile, round-trip hike with significant elevation gain--but both the destination of Black Lake and the several waterfalls along the way make it more than worth the effort. Explore the full Black Lake hiking trail profile for trail map, driving directions, and all the details you need to enjoy this adventure in Rocky Mountain National Park
Note: Rocky Mountain National Park now requires timed entry permits from May 27th through October 10th. See the RMNP permits page for more information.
Trail Snapshot: Black Lake Falls in Rocky Mountain National Park
| Hike Distance | 10 mile Round Trip |
|---|---|
| Difficulty | Difficult |
| Duration | Approx 6 hrs Round Trip |
| Trail Type | Out and Back |
| Starting Elevation | 9240' at Trailhead |
| Elevation Gain | +1430′ |
| Seasons | May-September |
| Dogs | Prohibited in RMNP |
| Hike Trail Map | Click for a Trail Map |
| Denver Drive Time | 2 hr |
| Driving Directions to Glacier Gorge Trailhead | Click for Google Map |
| Town Nearest Hike | Estes Park, Colorado |
| Beauty | Waterfalls, wildlife: elk, deer, marmots; meadows, lakes, streams, wildflowers, aspen trees |
| Activities | Hiking, photography, fishing |
| Fee | Park Pass Required |
Parking & Trailhead Information for Black Lake RMNP, Colorado
The trail to Black Lake begins at either the Glacier Gorge Trailhead (see driving directions above), or at the Bear Lake Trailhead (driving directions). Because the Glacier Gorge Trailhead has more limited parking, you may need to drive further up to Bear Lake. There you'll find a short connector trail that will put you on the path to the Glacier Gorge Trail system. In the event that parking at Bear Lake is full, you'll then need to park at the Park & Ride near the Bierstadt Trailhead and take the bus into the trailhead. This service runs 7am to 7PM and more information on the RMNP shuttle bus routes can be found at this link.
The Hike to Black Lake RMNP
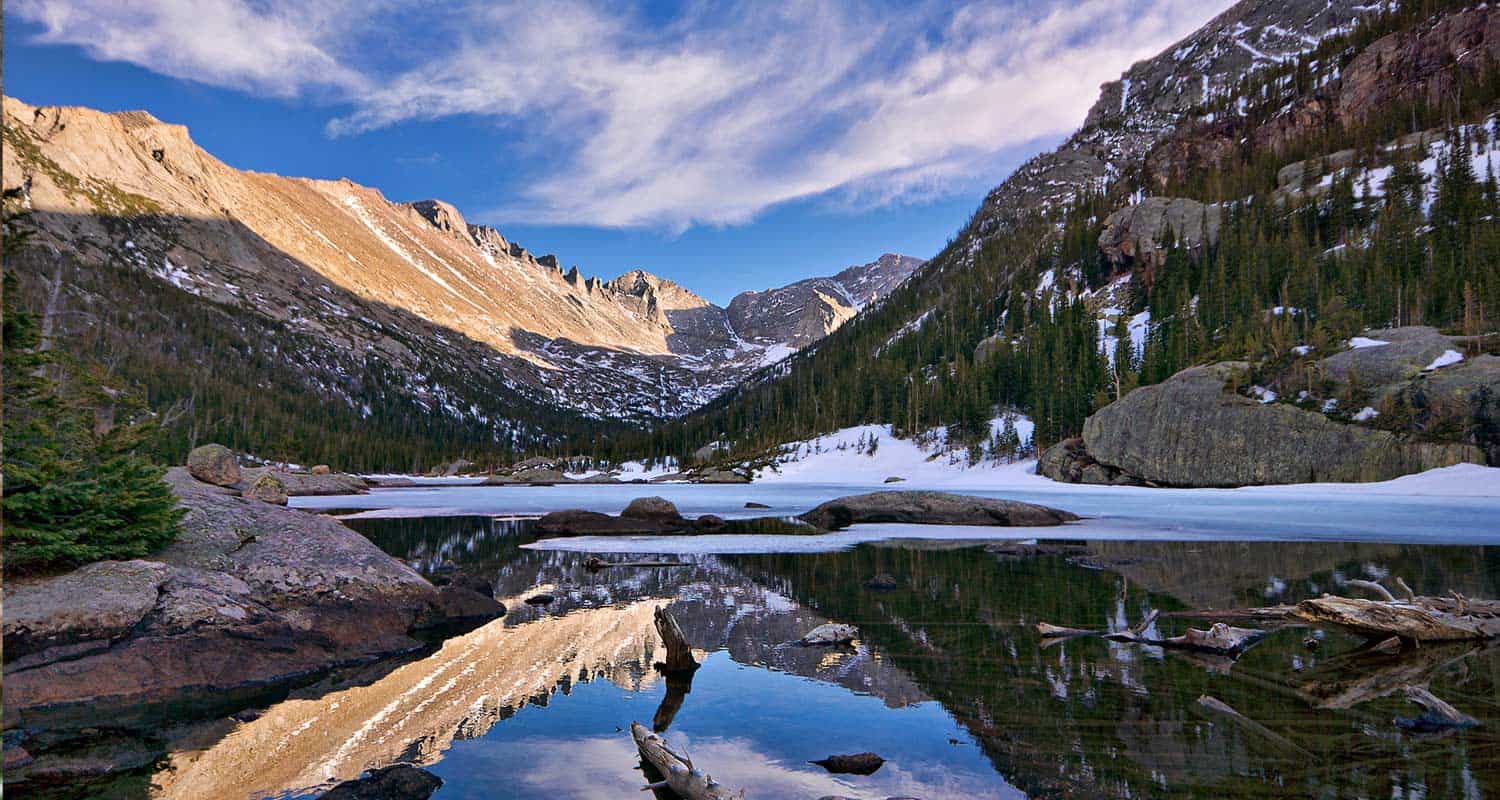
Hiking to Black Lake takes you into the Glacier Gorge Trail system with many wonderful destinations including Mills Lake, Jewel Lake, and Ribbon Falls. Be sure to review the different waypoints and destinations below so that you don't miss any of the sites. The first destination--and one you can't miss because it's right along the trail--is at .8 miles, Alberta Falls. After the waterfall, the trail ascends toward an eventual trail junction. The way to Black Lake is to follow the Glacier Gorge/Loch Vale trail that bears right. This trail climbs steadily for about another half mile until arriving at a second major trail junction with three options. The left-hand trail leads into Glacier Gorge and eventually to Mills Lake.
List and Links of Destinations From Glacier Gorge Trailhead to Black Lake
1. Glacier Gorge Trailhead
2. Alberta Falls - @ .8 mile
3. Mills Lake - @ 2.8 miles
4. Jewel Lake - @ 3.2 miles
5. Ribbon Falls - @ 4.8 miles
6. Black Lake - @ 5 miles
At Mills Lake, the trail follows its eastern shore for about 1/2 a mile until arriving at Jewel Lake, a much smaller body of water surrounded by lush green marshes. The next segment of the trail is my favorite, a challenging stretch of approximately 2 miles that leads hikers across bogs, and through verdant forest where the snow hangs on well into the summer months. In fact, this stretch may prove very difficult in the spring and early weeks of June depending on that year's weather. The trail continues to follow Glacier Creek up into the higher reaches of the park and ever closer to Keyboard of the Winds, the jagged rock formation ever present against the eastern sky.
Keyboard of the Winds is named for the sounds that flow from it's sharp edges as high winds whistle and roar across its peaks. Be sure to stop and listen for the music. It can be a mesmerizing experience.
If snow is still on the ground, then the last bit of the trail may require some basic route finding. The established trail skirts the left/east side of Black Lake, but can at times be hard to find. Stay close to the creek and you should be okay. Soon, hikers will encounter Ribbon Falls, a beautiful slide waterfall. Black Lake is just .2 mile further up the trail. This final segment is steep and requires negotiating some rocks and boulders before coming over the rise to gain breathtaking views of Black Lake.
Tips & Resources for Hiking Black Lake in Glacier Gorge RMNP :
- Start Early: The hike to Black Lake is challenging and hikers will want to begin early to avoid being in this exposed area when afternoon thunderstorms often tear through the area in Summer.
- Trekking Poles in Spring and Winter: Because the trail is high in the mountains, the snow and ice can hang around into late Spring and even early Summer, then pick up again in the Fall. Because of this, we recommend Trekking Poles and/or Traction Devices for this trail when the trail conditions are such.
- Parking: If the parking lot is full at Glacier Gorge Trailhead, there is a shuttle available to take you to the trailhead, or you can park at the Bear Lake Trailhead.
- Rocky Mountain National Park Trail Conditions: Click for RMNP Trail Conditions
- Trail Map for Bear Lake Corridor Trails: Trail Map Link
- Rain Gear Recommended: On every occasion I've been into Glacier Gorge, it's been gorgeous weather--and it rained. So, bring Rain gear. In the summer months, thunderstorms can form quickly in this area, especially in the afternoon--just another reason to begin your hike early.
- Packing List: Always pack the 10 Essentials. Download our Hiking Guide to get list and dayhiking packing checklist.
- Colorado Road Conditions: Colorado Road Conditions
- After the Hike: Inkwell Brew Coffee
- Photo: We would like to express our gratitude to Erik Page for sharing such an amazing photograph of this hike.
Weather
Map & Driving Directions
Click for Driving Directions
Eldorado Cascades at Walker Ranch
Eldorado Cascades is tucked back in Walker Ranch near Boulder, Colorado. It's an easy to moderate 1.25 mile hike from the Ethel Harrold Trailhead down to where South Boulder Creek winds through the park and crashes over the boulders blocking its path. Explore the full trail profile below for all the details: tips, trail map, and driving directions to the trailhead.
Trail Snapshot: Eldorado Cascades at Walker Ranch
| Hike Distance | 2.5 mile Round Trip |
|---|---|
| Difficulty | Moderate |
| Duration | Approx 1.5 hr Round Trip |
| Trail Type | Out and Back |
| Starting Elevation | 7000′ |
| Elevation Gain | Approx -500' to Cascades, +500 back to Trailhead |
| Seasons | Spring through Fall |
| Dogs | Allowed On Leash |
| Hike Trail Map | Click for a Map of Walker Ranch |
| Denver Drive Time | 1 hr |
| Driving Directions to Walker Ranch Ethel Harrold Trailhead | Click for Google Map |
| Town Nearest Hike | Boulder, Colorado |
| Beauty | Boulder Creek, Cascades, Wildlife: Birds, Elk |
| Activities | Hiking, picnic facilities, mountain biking, horseback riding |
Eldorado Cascades can be reached from several different trailheads that tie into the Walker Ranch Loop system. However, the shortest and probably easiest access is by starting at the Ethel Harrold Trailhead. See the directions driving directions links on this page, and be sure to make note of your last couples turns because cell phone services are spotty.
The drive up to the trailhead on Flagstaff Road is a beautiful one, but do be aware of the many hikers, climbers, and cyclists along the road. After Flagstaff road, the two roads that lead to the trailhead, Pika, then Bison, are improved dirt roads. These were recently graded when we visited (early April) and were fine to drive. However, 4-wheel drive is probably necessary during the winter months or after early Spring rains or snowfall. The trailhead parking area has a pit toilet and information board. If you are interested in birdwatching, you'll find a Birds of Walker Ranch Chechlist at the board.
The Hike to Eldorado Cascades
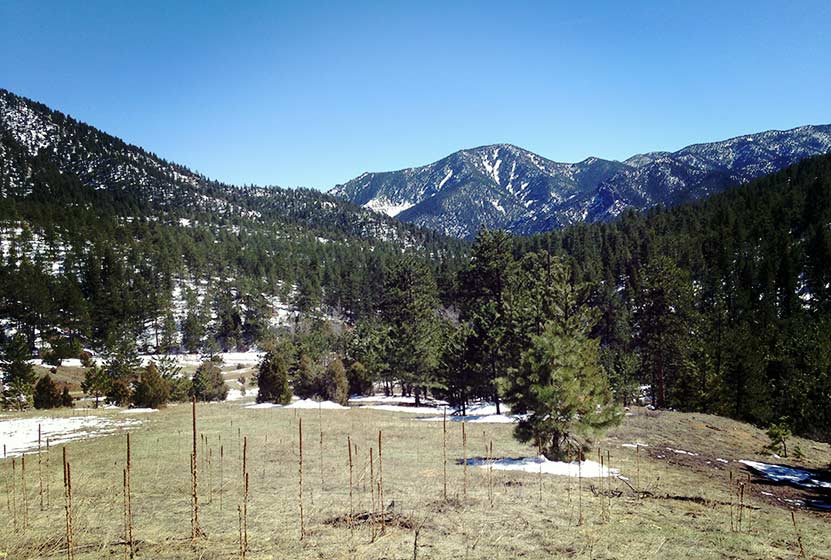
The hike begins with expansive views of Walker Ranch and out towards Eldorado Canyon State Park (pictured above). The air was full of the scent of juniper trees, and we found abundant Elk sign in the meadows near the trailhead. The trail winds down to a intermittent stream that was gushing with the early Spring snowmelt. A bridge buried in snow leads across the creek, then the trail skirts the hillside for most of the hike, gradually working its way down to a junction with the Walker Ranch Loop Trail. At the junction, the trail to Boulder Creek and Eldorado Cascades is to the right and takes hikers further downhill to a bridge that crosses South Boulder Creek.
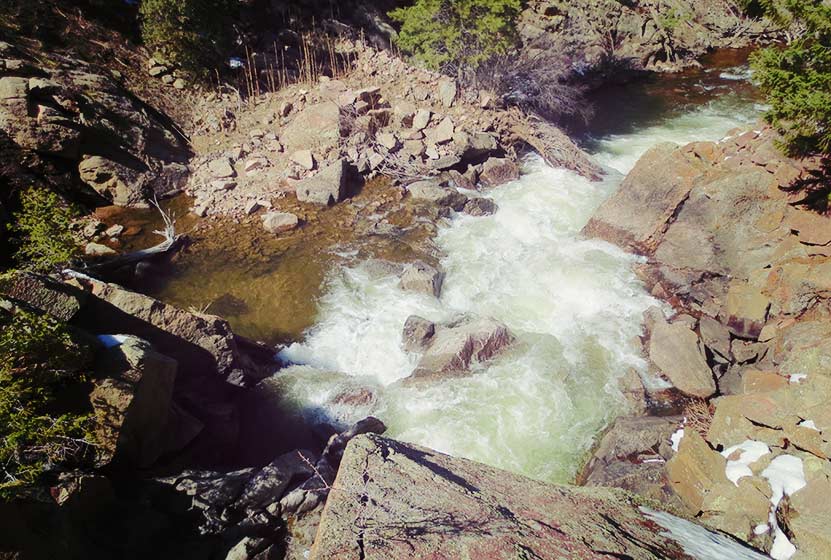
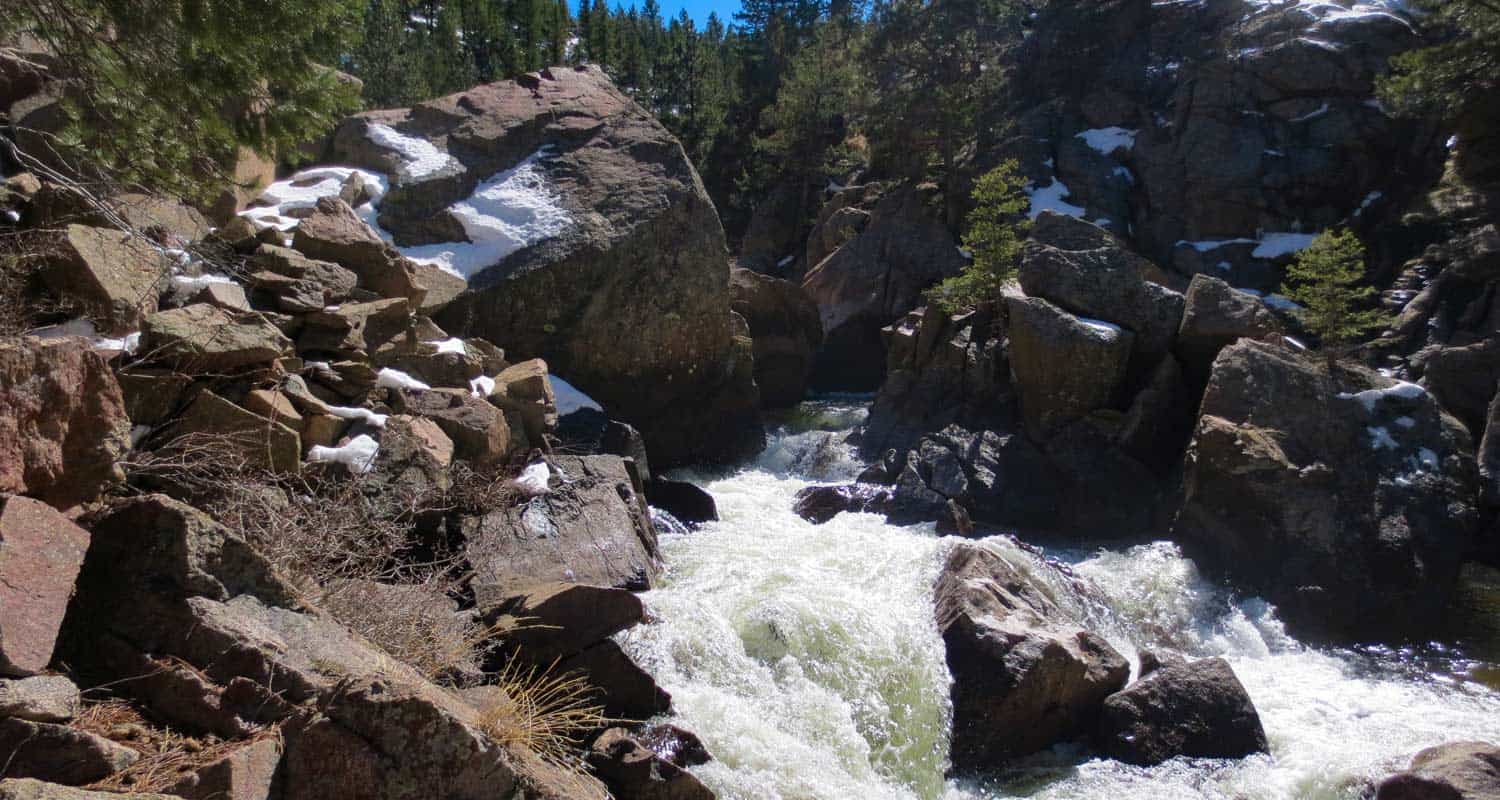
The sound of water is almost always within earshot, and the chirps of a variety of birds fill the air. Shortly before the bridge, hikers may notice a "To Eldorado Canyon" sign and trail on the left side of the Walker Ranch Trail. This leads to Eldorado Canyon State Park, about 3.5 miles away, but does not lead to the cascades. The cascades can be found almost immediately after crossing the bridge that spans South Boulder Creek. Here the trail becomes a series of uneven rock stairs that lead to the top of the cascades (pictured above is view from the top).
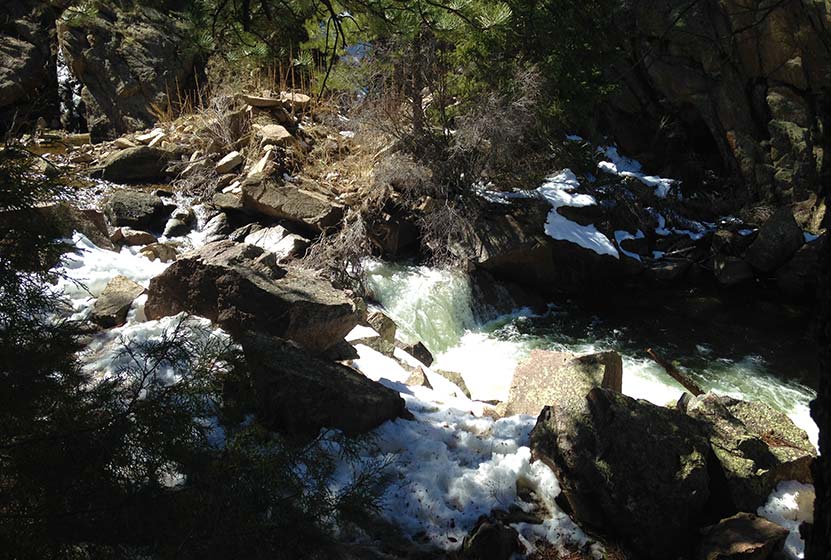
"Eldorado Falls" seems to be a local and unofficial name given to this set of cascades. The trail map simply marks them as "falls." On the back side of the cascades, South Boulder Creek seems to disappear under massive boulders that block its path. Here the water slips under the rock then shoots out on the other side in a series of small cascades. The water pools, then pours over another lower cascades (pictured above) before returning to calmer waters.
The hike back is mostly uphill, but it's only about a +500' of elevation gain. The park is open in the winter; however, the trail from the Ethel Harrold trailhead down to the Walker Ranch Loop might become difficult to discern after a blanket of snow. So, the ideal times are Spring through Fall.
Tips & Resources for Hiking to Eldorado Cascades
- Come Prepared in Spring and Winter: Because the trail is mostly in shade of ponderosa pines, the snow and ice can settle in during both winter and spring. Therefore, we recommend Trekking Poles and/or Traction Devices for this trail (I wish I had brought mine).
- Exercise Caution Around the cascades: The area around Eldorado Cascades is rocky and uneven. The cascades are also difficult to photograph because of how it's tucked back into the canyon. For this reason, exercise caution along the slippery rock and near the waters of South Boulder Creek.
- Trail Map for Walker Ranch: Trail Map Link
- Packing List: Always pack the 10 Essentials. Download our Hiking Guide to get list and dayhiking packing checklist.
- Colorado Road Conditions: Colorado Road Conditions
- After the Hike: Ozo Coffee in Boulder
Weather
Map & Driving Directions
Click for Driving Directions
Looking for waterfalls near Denver? Explore our more than 50 Colorado Waterfall Hikes, our favorite Waterfall Hikes in Rocky Mountain National Park, or 7 Waterfalls within One Hour of Denver.
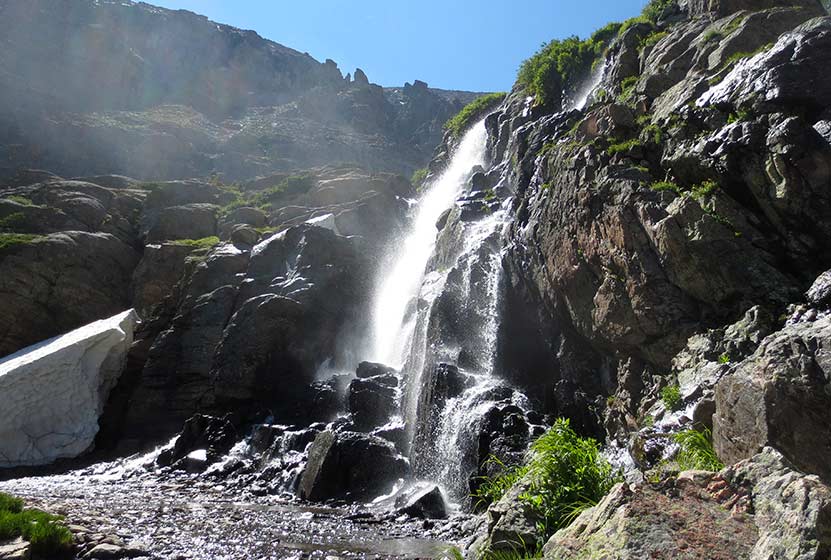
Timberline Falls in Rocky Mountain National Park
Timberline Falls is a demanding 8-mile round-trip waterfall hike in Rocky Mountain National Park. The trail takes you past Alberta Falls up into beautiful Loch Vale. Beyond Timberline Falls hikers will find Lake of Glass, additional falls, and breathtaking Sky Pond.
Glacier Gorge is the home to some of the best hiking in Rocky Mountain National Park, and this waterfall hike is one of the best. Be sure to read through the trailhead and parking information below, because, in the busy season, parking fills up fast. Explore our Timberline Falls trail profile below for trail details, driving directions, maps, and more.
Note: Rocky Mountain National Park now requires timed entry permits from May 27th through October 10th. See the RMNP permits page for more information.
| Hike Distance | 8 miles Round Trip |
|---|---|
| Difficulty | Difficult |
| Duration | Approx 5 hr |
| Trail Type | Out and Back |
| Starting Elevation | 9240′ |
| Elevation Gain | +1510′ |
| Seasons | May-September |
| Dogs | Dogs Prohibited |
| Hike Trail Map | Click for a Map of Timberline Falls |
| Denver Drive Time | 2 hr |
| Driving Directions | Click for Google Map |
| Town Nearest Hike | Estes Park, Colorado |
| Beauty | Waterfall, wildlife: elk, deer, marmots; meadows, lakes, streams |
| Activities | Hiking, photography |
| Fee | Park Pass Required |
Parking & Trailhead Information
The trail up to Timberline Falls begins at either the Glacier Gorge Trailhead (see driving directions above), or at the Bear Lake Trailhead (driving directions). Because the Glacier Gorge Trailhead has a much smaller lot, you may need to drive further up to Bear Lake. There you'll find a short connector trail that will put you on the path down and over to the Glacier Gorge Trail system. In the event that parking at Bear Lake is full, you'll then need to park at the Park & Ride near the Bierstadt Trailhead and take the bus into the trailhead. This service runs 7am to 7PM and more information on the RMNP shuttle bus routes can be found at this link.
The Hike to Timberline Falls
The hike up into the Glacier Gorge/Loch Vale trail system takes you past one of Rocky Mountain National Parks' most accessible waterfalls, Alberta Falls.

After the waterfall, the trail begins to wind up a series of switchbacks for just shy of a mile until a trail junction with the NorthLong's Peak Trail. The trail into Glacier Gorge/Loch Vale then bears right and ascends for about another .5 mile to another trail junction. The trail to the left will take hikers to Glacier Gorge, and the trail to the right takes hikers on a jaunt to Lake Haiyaha (fun to say three times fast) but this trip to Timberline Falls takes the middle trail onto the Loch Vale Trail.
The path follows the path of Icy Brook through a series of longer switchbacks. The brook can be heard gushing and pouring over the rocks below, and one particular switchback there is a great view of its waters casacading through a green canyon (pictured above). At approximately 1 mile after leaving the junction, the trail opens up to more level ground at The Loch. In the distance, beyond the Loch in the west, the cliff face of the Cathedral Wall calls technical climbers to its challenging routes.
The trail continues along the right side of the Loch until another trail junction beyond its western shores and deep in the the lush forest surrounding Icy Brook. The trail up to Timberline Falls, Lake of Glass, and Sky Pond is on the left, and the path to the right will take hikers into the Andrew's Creek area, one of my favorite areas of the Park. Here the trail up to Timberline Falls gets more steep, working its way up through subalpine forest of fir and spruce, the ground bejeweled with Columbine flowers. Soon you'll gain views of the falls in the distance.
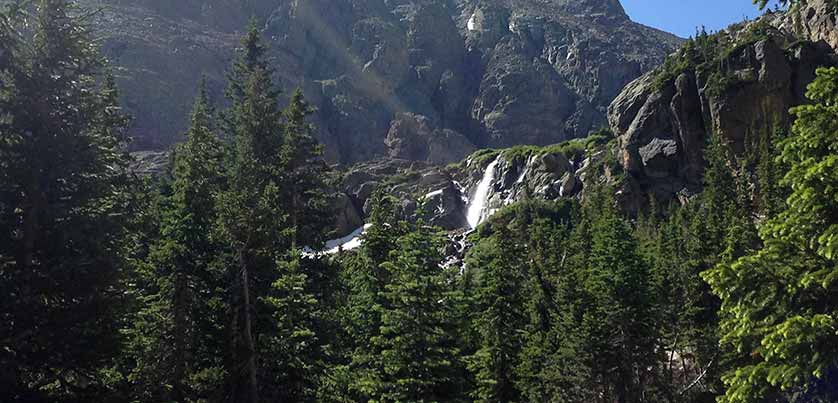
A series of stone stairs takes you to the base of the waterfall. In the late Spring and Early Summer, the falls cut through the winter snowpack and creates fantastic shapes out of the snow. For hikers who want to see more, a very steep and slick trail can be found to far right side of the waterfall. This leads up to the Lake of Glass, it's own waterfall, and to Sky Pond.
Video of Timberline Falls in RMNP
Tips & Resources for Hiking Timberline Falls :
- More to Explore: Be sure to budget extra time to explore the lakes above Timberline Falls.
- Parking: If the parking lot is full at Glacier Gorge Trailhead, there is a shuttle available to take you to the trailhead. See details at the the top of this trailprofile
- Gear: Wear good boots with soles that are good for grabbing the rock if you plan to scramble up the steep trail to Lake of Glass and Sky Pond.
- Pack a Lunch: This is a long hike and you'll certainly need water, but you'll also most likely need fuel for the journey back. Download our hiking guide for a list of great hiking food and snacks.
- Trail Map for Bear Lake Corridor: Trail Map Link
- Packing List: Always pack the 10 Essentials. Download our Hiking Guide to get list and dayhiking packing checklist.
- Colorado Road Conditions: Colorado Road Conditions
- After the Hike: Inkwell & Brew Coffee
Weather
Map & Driving Directions
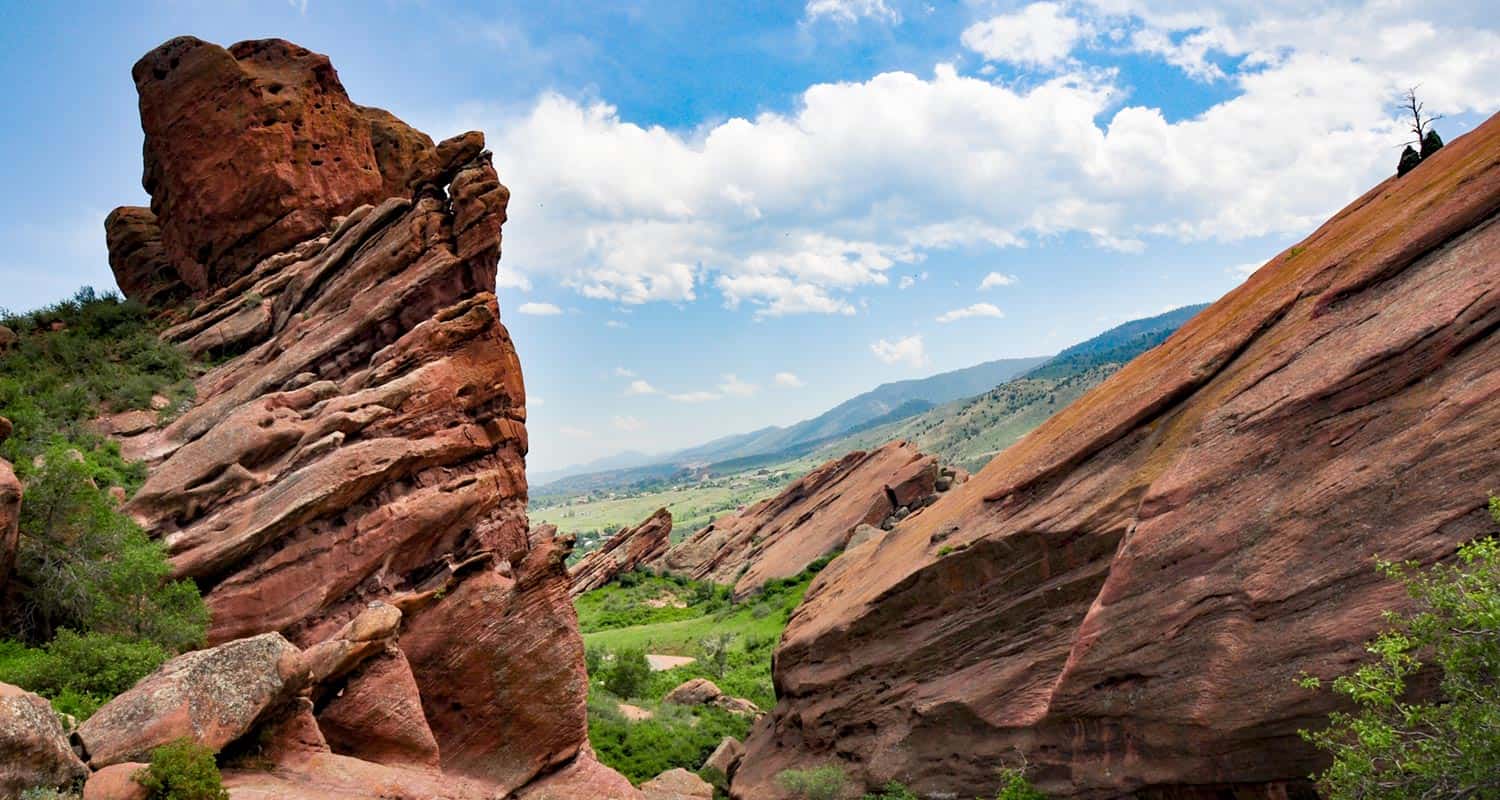
Trading Post Trail at Red Rocks Park
Ready for a hike around Colorado's Red Rocks Park and famous amphitheater? The Trading Post trail at Red Rocks takes you around 10 of the park's giant red rock formations. It's a short, 1.4-mile loop hike just 25 minutes from downtown Denver. Check out our full hiking trail profile below for all the details.
Trail Snapshot: Trading Post Loop Trail
| Hike Distance | 1.4 Mile |
|---|---|
| Difficulty | Easy |
| Duration | 1 hr |
| Trail Type | Loop |
| Elevation Gain | +500′ |
| Seasons | Year Round |
| Dogs | Allowed on Leash |
| Hike Trail Map | Click for a Trail Map |
| Denver Drive Time | 30 min |
| Directions | Click for Google Map |
| Town Nearest Hike | Morrison, Colorado |
| Beauty | Red rocks, meadows, Front Range views, Bluff Overlooks, wildlife: red fox, and mule deer |
| Activities | Picnic areas, hiking trails |
If you are looking for a family adventure that's quick to get to, this hiking trail at Red Rocks is a great option. The Trading Post trail weaves through some of Colorado's most majestic red rock formations, into meadows, and great views of Red Rocks park. Because the trail is narrow and has some steep areas, keep a good eye on the kiddos.
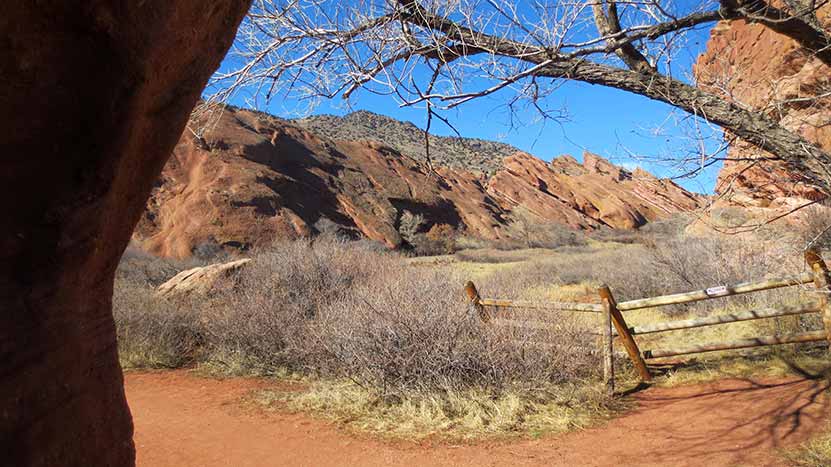
We hiked the Trading Post Trail on a sunny Saturday in February with our children, ages 7 and 4. They loved it, but were definitely tired at the end. However, after we finished the 1.4 mile loop, it was their idea to hike up to the amphitheater, then all the way to the top.
Trail Map for Trading Post Trail
The Hike: The Trading Post Trail at Red Rocks
We started at the trading post, and hiked the loop counter-clockwise. I'd recommend hiking it this way because it gives you the move favorable views, and offers a bit of shade about 3/4 of the way through the hike--right when you need it the most. The sand and grave on the rock surface of the trail can cause your feet to slip, but as long as you are aware and take your time, it makes for a perfect leisurely hike.
You can bring your dog on this hike, however, we haven't added this trail to our list of best trails for hiking with your dog near Denver because the trail can be narrow and can be high traffic. So, if you are bringing Fido, we recommend going early in the morning, or taking the Red Rocks trail, which is more open and has fewer people on it.
I get a lot of emails from people who are only in Denver for a few days, limited when it comes to their transportation, and want to experience the outdoors. This is the hike I send them to. Why?
- The Trading Post is gorgeous year-round.
- Red Rocks is super close to Denver, and while it's still expensive, you could take a Lyft or Uber there from downtown. Get a group of friends to share the cost and you're golden.
- The elevation is less of an issue for out-of-towners, and it's a relatively easy hike. It's short, but long still long enough to get a workout.
Tips & Resources for Hiking the Trading Post Trail at Red Rocks :
- Sunscreen: There's not much shade on this hike, so bring the sunscreen
- Rattlesnakes: There are rattlesnakes in Red Rocks, as there are in many parks along the front range. Like us, they love to sunbathe, but on rocks and other warm areas. Don't let their presence deter you from enjoying this hike, but keep an eye out for the varmints.
- Climbing: Rock Climbing is Prohibited at Red Rocks
- View of Denver: After your hike around the Trading Post loop, walk up into the Red Rocks Amphitheater. It's worth climbing all the stairs to the top for a great view of Denver.
- Hours: The hiking trails at Red Rocks open one hour before sunrise and close one hour after sunset
- After the Hike: Ice Cream @ The Blue Cow
- Trail Map for Red Rocks Park: Trail Map Link
- Colorado Road Conditions: Colorado Road Conditions
Weather
Map & Driving Directions to the Trading Post Trail at Red Rocks
Click for Driving Directions
Elk Range Trail at Centennial Cone Park
For those who are looking for a nice hike that incorporates the highland meadows of Colorado and views to snowcapped mountains, then the Elk Range Trail at Centennial Cone Park is the perfect hike. The Elk Range Trail can be hiked as an out-and-back 6.6 mile adventure, starting from one of two different trailheads. We saw a lot of wildlife and few people. Explore the full trail profile below for trail details, Centennial Cone park map, driving directions, and more.
Trail Snapshot: Elk Range Trail at Centennial Cone
| Hike Distance | 6.6 miles Round Trip |
|---|---|
| Difficulty | Easy to Moderate |
| Duration | Approx 2.5 hr |
| Trail Type | Out and Back |
| Elevation | +446'/-314' |
| Seasons | All Year (closes during hunting season) |
| Dogs | Allowed on Leash |
| Hike Trail Map | Click for a Map of Centennial Cone Park |
| Denver Drive Time | 42 min |
| Directions | Click for Google Map |
| Town Nearest Hike | Golden, Colorado |
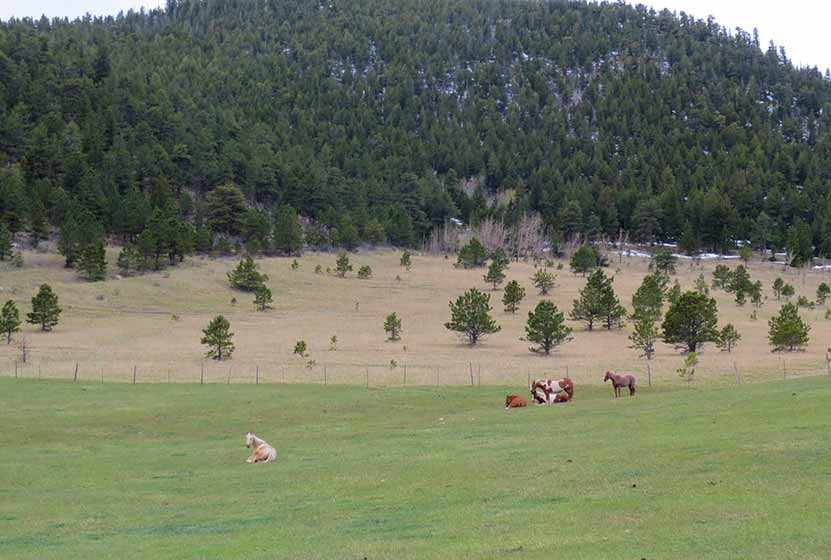
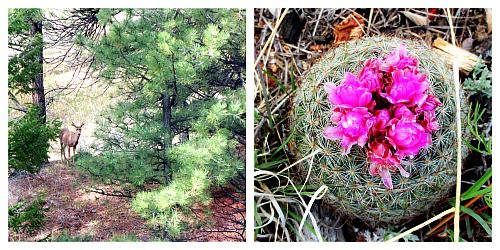
| Beauty | Upper foothills and the peaks of the Rockies beyond, high country meadows, grazing cattle and horses, elk and whitetail deer |
| Activities | Horseback riding, hiking, mountain biking and wildlife viewing |
| Video | Click For Video |
| Weekend Use | Odd days hiker-only, Even days bike-only |
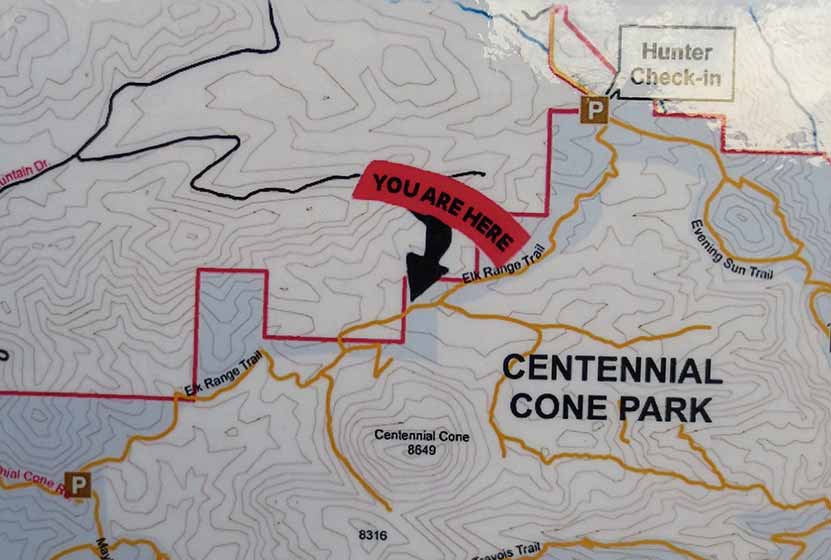
 Looking East towards Centennial Cone
Elk Range Trail at Centennial Cone Profile
You have two trailhead options when taking the 6.6 mile Elk Range Trail.The driving directions link above are for the Centennial Cone Road trailhead. A North Centennial Cone Park Trailhead has equestrian trailer parking and can be located at this link. Our trail profile here describes the trail hiking from West to East.
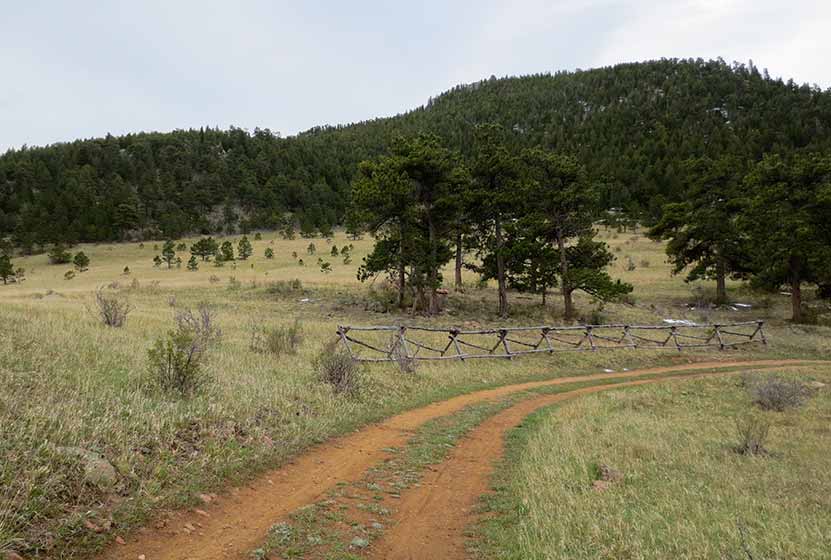
From the Centennial Cone trailhead, you immediately find yourself surrounded by green open fields. At about half a mile in you'll encounter a fence with a gate. When you walk through the gate, you'll be on private property for a few hundred yards. Jefferson County parks has some sort of easement, so continue your hike but stay on the trail, until you get to the other gate. There are horses and cows that wander about the area without fences, so they may be on the trail when you arrive. Another reason to be sure that the gates close behind you.
Hiking along the Elk Range Trail, I couldn't help wondering, "Can you hike up to the top of Centennial Cone?" There is no trail on the map but there appears to be the vestiges of an old road or trail leading up the North end of Centennial Cone. Because I haven't hiked it yet, I can't recommend it, but the old trail can be found just before the trail enters private property. Where the trail bends just before the gate, you can follow a set of what look to be markers for an underground gas line. These lead up to the trail at the base of Centennial Cone. This is as far as I explored, and hope to get back to attempt a hike to the top of the cone.
It's important to know that on the weekends the trail alternates from hiker-only to biker-only. Here's how to keep track of it: Odd days are hiker only and even days are bikes only.The weekdays are open to both hikers and mountain bikers.The park is closed during certain days for hunting season. You can get the exact closure dates from the Centennial Cone page of Jefferson County's opens space site.
If you've started from the Centennial Cone Road trailhead and would like a pleasant and beautiful drive home, take Highway 6 through Clear Creek canyon, and into Golden.
Tips & Resources for Hiking the Elk Range Trail:
- Mud: The Elk Range Trail can be a bit muddy after a good rain. You'll want to bring appropriate gear if you're planning a hike after a storm for a good day or two, including sturdy shoes.
- Storms: The Elk Range Trail is at a high enough altitude that you'll want to keep an eye out for thunderstorms. There is very little cover on this trail, so check the weather report before heading out as well.
- After the Hike: Cafe13 in Golden
- Road Conditions: Colorado Road Conditions
- Trail Map for Centennial Cone Park: Trail Map Link
Weather
Map & Driving Directions
Click for Driving Directions
Horseshoe Trail at Golden Gate Canyon Park
The Horseshoe Trail in Golden Gate Canyon State Park is a wonderful hike for older kids, experienced and non-experienced hikers. It's a great trail for spotting wildlife, from birds to deer, viewing fall colors and wildflowers, and taking in the beautiful scenic view along the trail. Several of the backcountry campsites areas are also accessible from the Horseshoe trail. We'll detail those locations, provide links to a trail map, driving directions and more in the trail profile on this Colorado hike.
Trail Snapshot: Horseshoe Trail at Golden Gate Canyon Park
| Hike Distance | 3.6 miles Round Trip |
|---|---|
| Difficulty | Moderate |
| Duration | Approx 2 hr |
| Trail Type | Out and Back |
| Elevation Gain | +910′ |
| Seasons | Spring through fall, depending on snow fall |
| Dogs | Allowed on Leash |
| Hike Trail Map | Click for a Map of Golden Gate Canyon Park |
| Denver Drive Time | 50 min |
| Directions | Click for Google Map |
| Town Nearest Hike | Golden, Colorado |
| Beauty | Wildflowers, spruce and fir trees, aspen meadows, big boulders, wildlife, mountain views and running stream along trail |
| Activities | Hiking only trail |
| Video | Click For a Video of Golden Gate Canyon Park |
| Pass Required | Daily Pass Link Annual State Parks Pass Link |
Golden Gate Canyon's Horseshoe Trail is a 3.6 mile out-and-back hike (1.8 miles one-way). We've rated it as moderate in difficulty because of the 900+ feet of elevation gain. The Horseshoe Trail is popular because it follows the beds of several small streams, winds through groves of aspen trees, and leads to beautiful meadows, as well as three of Golden Gate Canyon State Park's backcountry camping areas.
To get to the trailhead (first,use our driving directions). Once in the park, exit to the right out of the Visitors Center--you'll want to stop here first to pick up a map. You'll find the Frazer Meadows parking area and trailhead for the Horseshoe Trail on the left-hand side of the road. Keep in mind that parking is limited, so it would be best to arrive early. There are also restrooms at the Horseshoe trail trailhead and we found them to be kept up and clean.
One of the highlights of this trail are the streams that run along it. You'll find that there are several small bridges to cross as you make your way up the trail. Seasonal streams also mean that sections of the Horseshoe trail will get muddy on after rains and during the Spring melt-water runoff. But water also means wildflowers, and this trail comes alive with them in late Spring through the Summer.
The Horseshoe Trail also leads you to access trails for three of the five Golden Gate Canyon backcountry camping areas. Use this link to the backcountry camping brochure to get details on cost per night and how to make campsite reservations in Golden Gate Canyon State Park. The first campsite access trail is at 1.1 miles and will take you to Greenfield Meadows, which has 4 campsites. Continuing on the same spur, you can hike further in to the Frazer Meadow campsite which has 4 campsites and one backcountry shelter. If you continue on the Horseshoe trail, you'll come upon the access trail for Rim Meadow campsite at 1.3 miles. Rim Meadow also has 4 campsites.
Tips & Resources for Hiking the Horseshoe Trail:
- Park Pass: A Colorado State Park Pass is required to enter Golden Gate Canyon State Park. Check the Golden Gate Canyon Fees page for details on park passes. Some trails offer passes at self-serve dispensers.
- Printed map: The trail forks to the left, make sure to have a printed map on hand which you can pick up at the Visitors Center.
- Bug spray: for hot summer days not a bad idea.
- Sun protection: The trail is often shaded--a rare thing for Front Range hikes--but be sure to bring sun protection because it is almost 4 miles round trip and there are areas exposed to the sun.
- No cell phone: There is no cell phone coverage at Golden Gate Canyon State Park.
- Download our Dayhikes Hiking Guide for a day hike packing checklist
- After the Hike: Windy Saddle Cafe in Golden
- Road Conditions: Colorado Road Conditions
- Trail Map for Golden Gate Canyon State Park: Trail Map Link
A big thanks goes out to Lisa Palmer, a member of our Dayhikes Pathfinder Team, who hiked this trail with her family, gathered the information for the trail profile, and took the photos for this post.
Weather
Map & Driving Directions
Click for Driving Directions